Over the past thirty years, thanks in part to its success in everything bike-related, Taiwan has developed thousands of kilometres of bicycle lanes and bicycle touring infrastructure to encourage both locals and visitors to experience the island at a more leisurely pace.
In a week, I’m on my way to Taipei. I bought my EVA Airline ticket in late November and have been watching the weeks pass by as I prepare for what should be a memorable bicycle tour of what many say is Asia’s number one cycling destination. My goal is to cycle around the perimeter of the island at a pace of 15 to 20 km/hr, with a maximum daily distance of 100 km.
NE coast
————
Route No.1-Huándǎo – Around The Island
Screenshot
The route I plan to follow will mostly be the famous Route 1, established in 2015. Starting in Taipei, it heads about 500 kilometres down the west side of the island to Kenting. Then it is another 500 back to Taipei on the Pacific Coast, alternating between the Rift Valley road and the Pacific Coast road up to Hualien and Yilan.
The generally flat terrain on the west side is why it is recommended to do the route counter-clockwise. It gives you some time to find your cycling legs before tackling the hills.
Taiwan Huan Dao – elevation profile
Another reason is that in April, the wind is usually still blowing from the NE. However, when it’s time to head north again, it would be a bonus if the winds have shifted to the usual summertime SE direction! Paddling earlier in the morning is how Canadian canoe trippers deal with wind issues. I’ll see if it also applies to Taiwan on a bike!
cyclists at Tienshang- ready to head back down the gorge
————
The Island’s West Side Vs. The East Side
The official Route 1 map above breaks the trip up into 9 days of cycling. I have set aside 16! Some cyclists suggest skipping the west side completely. Since most of Taiwan’s population lives on the west side of the island, on leaving Taipei, you cycle through or around almost all of its major cities! From north to south – Hsinchu, Taichung, Tainan, and Kaohsiung, Taiwan’s second-largest city.
Organized bike tours mostly skip the west side of the island, spending most of their time on the island’s east side. This offering by World Expeditions, an Australian-based adventure travel company, has cyclists take the train from Taipei to Hualien, then cycle down the Rift Valley to Taitung, then be shuttled by vehicle to Shouka Pass, and finally ride mostly downhill to Kenting. The trip ends with a vehicle shuttle to Kaohsiung for an easy return to Taipei.
If the urban, factory, industrial-scale animal agriculture, stoplights, and traffic-heavy terrain gets to me, I may skip some of the west side by hopping on a bicycle-friendly train for 100 km or so. I’ll see how it goes.
————
A Route No. 1 Add-On – Kenting
One addition I’ll make to the usual Huándǎo (the Pinyin or Romanized version of standard Chinese 環島 meaning “around the island journey”) route is an extension to the very southern tip of the island at Cape Eluanbi. I’ll spend an afternoon and an overnight in the beach town of Kenting first, then head over to the cape.
Taiwan’s southernmost point
I’ll be at the south end of the island on one of Taiwan’s two official and hectic long weekends – the early April long weekend when the Taiwanese celebrate Children’s Day (Thursday) and Tomb Sweeping Day (Friday) on top of the usual weekend. Accommodation was already scarce in late January! I ended up booking rooms for the Thursday to Sunday period to make sure I had a place to stay.
Shouka Pass climb and descent – Day 8’s ride
On Day 8, I head over the mountains via the 460-meter Shouka mountain pass to the east coast. It may take me a bit longer than the 2 hr. 20 min. that my Ride With GPS map app calculates! One reward for doing the 35-km climb to Shouka Pass is the 15 km downhill to the Pacific! The other reward is the splurge on a B&B accommodation with a bit of beach to walk on!
Daran Guesthouse off Hwy 9
Then I have eight days to get back to Taipei and my room at the Hotel Papa Whale in Ximending.
fellow cyclist emerging from Taroko Tunnel
————
Getting To Taipei From Toronto
The original plan was to take my Miyata GT600 touring bike to Taiwan. That made a direct Toronto-Taipei flight essential. It would mean the bicycle would only be loaded and unloaded once, and therefore more likely to arrive undamaged! The one direct flight I found was with EVA Airlines, Taiwan’s national carrier. Skytrax has awarded it a 5-star rating for the past nine years. (No North American carrier rated more than 4 stars.)
At about CAN $2000, it was a competitive price. There were cheaper options; one was $400 cheaper but required a stopover in Hong Kong before a connecting flight to Taipei. It also added hours to the travel time and would provide baggage handlers with another couple of opportunities to mangle the bike!
Coming home from the bike shop with a bike box and my bike before a Cuba bike trip
In the end, however, I decided to leave my touring bike at home! The cost and hassle of getting it to the airport in Toronto, getting it from Taoyuan Airport into Taipei and then doing it all over again at the end of the trip – well, just renting a bike there made more sense.
————
Bicycle Rentals
Online trip reports led me to MatthewBike in Taipei. Reviews are very positive, and the price is quite reasonable. The bike shop provides bicyclists with everything they need to do a multi-day bike tour.
Screenshot
For CAN$350. (which included a $50. deposit) I got a Surly Disk Trucker for 16 days. With 700c wheels and 27 speeds, including a reassuringly low granny gear, the steel-frame bike is a touring classic, right up there with my Miyata GT600.
My Surly Disk Trucker rental – break time off Taiwan Hwy 2 N coast
Instead of the drop bar, the shop has installed mountain bike-style riser bars on their Surly bike. It will be my first time on anything other than the drop-bar style. The resulting more upright position may even make the ride more comfortable as I pedal along in non-race mode!
This screenshot from the bike rental website lists what else is included in the rental –
I will be bringing my own helmet, SPD pedals, a handlebar bag, my own panniers, and a cable lock.
Along with the bike and accessories, MatthewBike provides its customers with a list of bike shops around the island where they can take their rental bikes if they have any mechanical problems. Police stations along the route have also been set up to provide cyclists with basic repair tools.
Post-trip comment: MatthewBike was 100% reliable and fantastic. Add my name to the list of people pleased to have rented their bikes from them.
bike lane approaching Kenting
————–
Mapping The Route
The MatthewBike website has loads of information on various bike routes, including Route #1.
Another excellent source of route information is Bike Express Taiwan.
As its website header makes clear, along with downloadable maps and other cycling information, the primary focus is bicycle rental. Online reviews are very positive. Unlike Matthew Bike, Bike Express does not have a store front and delivers rental bikes directly to customers.
I downloaded the Bike Express Taiwan GPS tracks into my Ride with GPS app, which will serve as my route navigation tool. The map segment below shows my day 1 ride from the Ximending area of Taipei’s Wanhua District to downtown Hsinchu and the H.M. Hotel. [Hsinchu is where Taiwan’s TSMC and other computer-related companies are based.]
Click on the map to access the interactive map and zoom in for more detail.
Using the Booking.com app, I have booked accommodation for the first eight days of the ride.
On the plus side, I set off each day knowing I have a place to stay and an additional reason to get there since I will have already been charged for the room!
The one negative is that this boxes me in and makes changing plans more difficult.
Once I reach the East Coast, I will just book the room the night before – or even when I ride into town.
West Coast bike path near Tainan
————–
YouTube Videos and Trip Reports
There are dozens, if not hundreds, of YouTube videos posted by cyclists who have done a fantastic job of documenting their Taiwan cycling trip, some featuring superb still photographs, amazing video clips, and drone clips. You’re left wondering how they managed to do all that while still on a cycling trip! It also leaves me wondering if another trip report is even necessary!
In February, the Globe and Mail published a short article about a Canadian couple’s bicycle trip in Taiwan. It makes for a good introduction and provides some valuable tips for someone looking for a fantastic cycling destination that has somehow escaped their consideration.
The island nation of Taiwan (officially the Republic of China) is best known today for its semiconductor technology, with Taiwan Semiconductor Manufacturing Company (TSMC) producing 90% of the world’s most advanced chips. Even larger than TSMC, with triple the revenues, is Foxconn (i.e., Hon Hai Precision Industry), the world’s largest contract electronics manufacturer. It alone employed almost 700,000 people in 2024, many of them in mainland China, producing iPhones for Apple Inc.
Taiwan currently ranks 21st in nominal world GDP (list here), an indication of the high standard of living its enterprising citizens – about 23 million in 2024 – have achieved in their country. In the list above, the IMF projected Purchasing Power Parity GDP per capita for 2025 would put it in the top 15.
Tainan Road Archway
Politics
Along with economic success, the past thirty-five years have seen the island’s citizens embrace democracy and an increasingly pro-independence stance towards the People’s Republic of China PRC). [See here for a primer on Taiwan’s 75-year road to democracy.]
The island is located about 150 kilometres offshore from the Mainland, where the authoritarian rulers in Beijing claim the island as a province of China. It was to Taiwan in 1949 that the government of the Republic of China and many refugees fled after losing the civil war to Mao Zedong and the Communist Party. To make its point, the People’s Liberation Army has been conducting increased naval and aerial military “exercises” around the island as a prelude to a threatened invasion if Taiwan continues to refuse annexation or “reunification”. Here is Reuters’ news coverage of the latest episode from today, March 17, 2025. It is just the latest in an escalating series of provocations.
In the 2024 Economist Democracy Index, Taiwan ranks 12th. Here are the nations that Taiwan shares the top ranking with –
Meanwhile, the People’s Republic of China ranked 145th. See here for the authoritarian regimes it shares the bottom of the list with. Hong Kong’s fate in the past five years provides a clear indication of what Taiwan can expect if Beijing’s current rulers take control of the island.
[Note: The USA ranked 28th and was categorized as a flawed democracy. In 2025’s Index, it will undoubtedly drop by 20 or 30, and join countries like Hungary, Namibia, and Bulgaria, thanks to the authoritarian impulses of the Trump regime.]
It’s October 29, just two days before “trick or treat” time. Parents are checking the weather forecast to see if the weather this year will be better as their kids make the rounds in Toronto’s Riverdale neighbourhood. Given the number of families with younger children, it is no surprise that our streets have many houses with at least a bit of Halloween decor.
On our early evening walks with our dog Skuggi, I’ve been snapping photos of some of the decorations festooning lawns, porches, and doorways. The Chinese factory workers who churn out the mostly plastic and often tacky stuff by the cargo container load for export – what must they be thinking?
Skuggi and I walked the four or five streets off Broadview from Simpson up to Bain. Some last-minute decorating has only added to the collection of scary figures, pumpkins, skeletons, ghosts, skulls, cob webbing, witches, tombstones, etc that make up one-half of the festival.
We’ll have to wait to see the other half – the costumes worn by the trick-or-treaters as they make their way past the skeletons and pumpkins with their treat bags open. New possibilities have been added to the Zorro, the cowboy, the Indian, the ghost from my youth!
Halloween this year falls on a Thursday. Friday morning will be a live experiment in “sugar highs” as some students at Withrow Ave. Junior Public, Franklin Community, and Sacred Heart will be a bit more squirrelly than usual!
From the Celtic Samhain to the Christian All Souls Day on November 1 and the Hallowed Evening the night before to medieval Britain… Halloween has deep roots, even if what we see these days owes as much to Hollywood and American popular culture. The digital magazine Sapiens has an article titled How Halloween Has Travelled The Globe provides some interesting context.
This early fall, keen on a destination that did not require a day or two to get to the put-in, a return to the French River Delta with Hartley Bay Marina as the put-in spot was an easy choice. We’d get to experience again the Delta’s scenic eye candy and contemplate its many layers of history.
Our previous visit in June 2019 coincided with extremely high water conditions. We wondered what we would find in early October. To create some novelty, we decided to do the channels and outlets of the Delta in the reverse direction we had done them in before –
the Pickerel River from Pickerel Bay
Fox Creek/Lake/Bay
the Canoe Channel/Bass Creek
the Main Outlet (Dalles and Little Dalles Rapids)
the Old Voyageur Channel
the Channel with Boston Falls at its top
Also on our to-do list were visits to
one of our favourite Delta campsites – 634 on Pickerel Bay
the now-off-limits boardwalk portage on Bass Creek
the ruins of the Gauthier Fish Plant on the island near Bad River Point
the reputed Fort at the top of the Fort Channel,
the scenic view from the elevated rock at Devil’s Door Rapids
another look at the remains of French River Village
a paddle up the Wanapitei River to check out the Sturgeon Chutes
The weather forecast looked great and the many scrapes and gouges on our canoe bottom from our 2023 trip down the Savant River NW of Lake Nipigon had been filled with G-Flex the weekend before.
It was time to head up the 400 to the French River.
canoe bottom g-flex and paint under blue tarp
—————–
The Route: Overview Map
2024 French River Delta Overview
You can access our GPS track at Caltopo – see here and choose export for the GPX or KML file.
—————–
Day 1: Toronto to Hartley Bay to A Pickerel River Campsite
Date: September 29, 2024
Distance: 17 km
Time: 11:20 – 5:20: 6 hrs
Rapids: none
Portages: 3
Weather: hot hot hot shirts off
Sightings: a dozen motor boats in Hartley Bay; some paddlers at the end of their trip
Campsite: N45° 57.711′ W80° 45.465′
Caltopo link to our GPS track for the entire 7-day route
the usual shot – this one from the start of our 2023 journey to Savant Lake in NW Ontario
The image above is the usual one we take at the beginning of a canoe trip. We moved the location from our residential street to something a bit more dramatic for this year’s shot!
The view from Broadview at dawn
We set off at 7:00 a.m., taking a couple of minutes to get that shot of our canoe with the downtown skyline in the background. By 11:30, we were paddling away from the Hartley Bay Marina dock ($10 for dock access). We left the car in the marina parking lot ($15 a day). While there may be no-cost options available, we figured the convenience and security of the marina, as well as its proximity to the delta, were worth the cost.
We had lunch on Pickerel Bay at CS634. The next day on our return via the Fox route we would overnight there, to the confusion of the folks back home. They thought maybe we had forgotten something and had to return!
CS634 on Pickerel Bay FRPP
With lunch done, we headed for the Pickerel River. The final 12-kilometre stretch of the river down to Georgian Bay is seldom travelled, just like our next day’s Fox route. Neither has any cottages, and both require some portaging. The rock-lined narrow stretches, as seen in the image below, make for some enchanting paddling.
down a narrow Pickerel River channel – near CS636
Pickerel River – same channel, a few minutes later
We had come up the west channel in 2017 after one easy portage. However, the low water levels this October – and maybe in the years before – nixed that as an option. We walked down the top of the channel; it was completely dry for as far as we could see! Instead, we headed for the east channel indicated on the Maps By Jeff map; it noted one portage.
At 3:00, we had been sitting at the top of the completely dry, overgrown west channel. Over the next two hours, we dealt with three obstacles to our forward progress –
#1 –85 meters 20 minutes
#2 – 80 meters20 minutes
#3 – 300 meters 60 minutes
We spent 40 minutes dealing with two “portages,” rather than the one indicated on Jeff’s Maps (see here). His map has as one portage the first two we did.
While his route turned west to two shorter portages, we continued south to tackle the longest of the three portages. The route Jeff’s map indicates would probably have been less work!
Shortly after 5, we were at the end of the final and most demanding portage. Before we went into campsite search mode, I figured I’d make a video recording of what we had just hauled our packs and gear and dragged the canoe through. The image below shows the last short section and me walking back to the top of the portage.
Walking back to the put-in of the third and last portage on the lower Pickerel
While we stayed with the water and the marsh below, my video was shot from the edge of the elevated, mostly flat rock outcrop, about 2 or 3 meters above. A bit of work would turn it into a usable portage trail.
Our Day 1 campsite was a decent, unofficial one just past the last of the three Pickerel River portages we had done in the afternoon. We left for the next morning, the rest of the paddle down the Pickerel to Georgian Bay.
panorama of Day 1 CS on the lower Pickerel River
Day 1 CS on the lower Pickerel
sunset on the lower Pickerel
Even though we had started around 11:30, we had put in a solid day’s work – 17 kilometres and three portages. The low water conditions – three or more feet lower than on our last visit – meant that in the following days, we’d get to deal with the consequences again.
—————–
Day 2: Down The Pickerel & Up the Fox to Pickerel Bay
Date: September 30, 2024
Distance: 24.1 km
Time: 8:30 -5:00 pm 8.5 hrs
Rapids: none
Portages: 3 on Fox Creek; 1 lift over in the bay
Weather: sunny and warm
Sightings:
Campsite: CS634 on Ox/Pickerel Bay
Caltopo link to our GPS track for the entire 7-day route
We started the day curious about the pictograph that the Maps by Jeff locates in the narrow channel not far from where we had camped. The site was registered by Thor Conway in 1975 and has the Borden location number BlHe-1.
A note on the map reads –
A low-lying rock that juts into the main channel features an image of a man portaging a canoe.
We came to this rock that seemed to fit the description better than anything else. After scanning the north side of the rock and not seeing any fading image “painted” with the red iron oxide powder used by the Ojibwe, we checked the south face.
The image below shows the south face of the rock. Still no image. We considered the map description – man portaging a canoe. For us, it would be the first-ever pictograph with such a depiction.
possible location of the reputed Pickerel River pictograph
Not seeing any iron oxide marks, we looked at the faint white streaks on the rock face. There are a few examples of traditional Anishinaabe rock images painted in white. The Moose and Stars panel at Fairy Point on Missinaibi Lake comes to mind –
Fairy Point – Moose and Stars Panel
Humans are adept at creating meaning – even where there is none. Staring at this rock, the image of a man carrying a canoe can certainly be imagined, especially if told to look for it. Click on the image below to see what we came up with as we stared at the white paint stains!
A bit of post-trip Googling turned up this shot of the same rock in a Passionate Paddler blog entry from May 2008. In the space where we created a man portaging a canoe, there is what looks like a figure T with downward-sloping ends on the horizontal line, which could represent the overturned canoe. The vertical line would be the paddler!
same rock – photograph from 2008
Yet another example of creating meaning where there is none? Interesting to see that the T-shaped marking has almost completely disappeared over the past 16 years. We figure it was done in modern white paint. Surely this is not the painted image that Thor Conway registered!
Maybe we were not looking at the correct low-lying rock that juts into the main channel. If you have seen the actual pictograph, let me know in the comments below!
————
We switched from our failed pictograph search and continued our paddle down the vertical rock-lined channel. Now we were seeing the results of the 2018 Parry Sound 33 wildfire started by a careless construction crew working on the Henvey Inlet wind turbine project. The 120 sq. km fire stretched as far as the Fox Creek route. Along with charred tree trunks – looking less black than we remembered from our 2019 visit – were more signs of the start of another growth cycle.
Parry Sound 33 Fire of 2018
evidence of 2018’s wildfire along the lower Pickerel River
Seeing an elevated rock outcrop, we decided to stretch our legs and walk to the top to see the view it offered. The two images below are what we came up with!
walking up for a hilltop view of the lower Pickerel
hilltop view looking south on the Pickerel River
By 11:00 a.m., we were making our way to the start of our ascent of the Fox route through the many narrow slivers of rock along the Georgian Bay coast. In the image below, we reached a spot where the only way forward was a quick mini-portage to reach the water on the other side.
The Fox route involves three portages – two at the very top and the one we were now approaching. Before we tackled it, we stopped for a lunch break in the neighbourhood’s one shady spot.
Lunchtime on the Fox Route – our first portage awaits
day 2 lunch in the neighbourhood’s only shady spot
We had done the portage in the reverse direction (N to S) in June 2019 in very high water conditions. Well, the end of September 2024 presented us with the opposite – we did it first instead of last in a low-water year compounded by end-of-season conditions! Note: We did notice portage markers above a part of the route we took, but ignored them. We may not have made the best choice!
We got started by dragging the canoe about 30 meters across the grass, as shown in the image below.
That brought us to a small stretch of floatable water that we crossed to reach the next obstacle – another carry across a walkable path up to the put-in. The image below shows Max looking at the faint trail we would use to reach the end of the carry.
All in all, it took us about 45 minutes to get the 230-meter drag-paddle-carry portage done. When we got to the put-in, we saw the boat shell that had been there in June 2019. [See 2019 – The Fox Route’s Third Portage for the same portage in high water and done in reverse.]
Yet more 2018 wildfire evidence as we made our way to the portages at the top of Fox Creek, which would take us to Pickerel Bay.
Both portages were much like we remembered, with the additional benefit of someone having marked the trail with a few of the yellow trail direction signs you can get from Chrismar, the map company. A thumbs up to whoever took the time to put them there! They have made a less-travelled but very scenic route to or from Georgian Bay that much better.
We got to CS634 shortly after 5. Since sunset was around 7:10, we got to work putting up the tent and getting supper done while it was still light. We seem to have been so busy that we did not take the time to get some pix of what we think is one of the park’s best campsites. Take a look at our 2019 report to see what we mean –
Sightings: three cottagers at a Bass Lake property
Campsite: CS730 at the bottom of the Eastern Outlet (Bass Creek)
Caltopo link to our GPS track for the entire 7-day route
Our weather forecast (courtesy of our Garmin inReach Explorer+) predicted rain starting mid-afternoon, so we set off planning a shorter day so that we’d have the tent and tarps up before it arrived.
As the map above shows, we reached Obstacle Island, where we decided to pull in at the official campsite (CS730). It was about 12:30, and the day was done!
On our way there, we took our first break as we neared CS670 at the SE corner of the Elbow. We were surprised to see a still smouldering log lying outside the fire ring. We hadn’t seen any paddlers that morning – and wouldn’t for the next three days.
CS670 and a smouldering log – south of the Elbow
In 2019, we had come up the Bass Creek route and lined our canoe through a narrow 10-meter section. Well, the image below shows what it looked like this October with four feet less water! 10 minutes and 30 meters later we were paddling south to the final Bass Creek portage.
approaching the Bass Creek life-over from the north
Bass Creek lift-over and portage
Once past the lift-over (mini portage), it was down the narrow channel to the longer portage, the last one before Georgian Bay. Bass Creek is definitely the easiest route for paddlers (canoe or kayak) to access Georgian Bay.
We got to the put-in of the 100-meter carry expecting to see the dock that had been there five years ago. It was gone – but now there was a new dock on the north side of the creek with the owner’s name on it, While the property is now private, there used to be a boardwalk used by paddlers instead of the two portages we had just done. In the satellite image above you can make out sections of the boardwalk, as well as the roofs of a few buildings.
dock and south end of the now-private Bass Creek boardwalk
Satellite images of the neighbourhood show that the boardwalk still exists. The images above show the dock at the south end and parts of a boardwalk that paddlers once used to get around the falls. The boardwalk replaced a tramway used by a lumber company in the early 1910s to move equipment from the defunct French River Village up to the Pickerel River via Bass Creek to what would become Pickerel Landing Village. [See here for more info.] Carts ran on the fixed tracks of the tramway, but in time, things fell into disrepair. The tramway was eventually replaced by the wooden boardwalk that is now there.
If you have any more info about the property’s history, let me know in the comments. Most of what I’ve learned about the Bass Creek tramway can be found in Kas Stone’s essential book Paddling and Hiking the Georgian Bay Coast.
More scenic paddling down a narrow channel to Georgian Bay and Obstacle Island, and it was time to stop for the day.
down the channel from Bass Creek to Georgian Bay
We travel with two 10’x14′ silnylon tarps,
one to put over the tent for that extra bit of protection when necessary and
one over our dining area, usually framed on one side by our overturned canoe
This was the one day of the trip when they proved their worth. Given the forecast for mid-afternoon rain, we stopped for the day around 12:30. The campsite was CS730 on Obstacle Island at the bottom of Bass Creek.
The tent and tent tarp went up immediately; just after the dining tarp went up, the rain started coming down and continued steadily for some time. We listened to the raindrops hitting the tarp as we stretched out in our comfy Helinox chairs and sipped post-lunch coffee.
Obstacle Island campsite
Max fine-tunes the tension of the strings of the tarp over our tent
—————–
Day 4: G’ Bay to the bottom of the Old Voyageur Channel
Date: October 2, 2024
Distance: 21 km
Time: 8:50 – 2:50 6hrs
Rapids: 0
Portages: none
Weather: Cloudy w/sunny periods; calm winds
Sightings: no motor boats or paddlers; one person at the property E of the Gauthier Fish Plant island
Campsite: CS830
Caltopo link to our GPS track for the entire 7-day route
We set off from our Obstacle Island CS with a major decision to make – did we head out to the Bustards or not? The two kilometres from Cantin Point to Tarpot Island are the shortest route to the Bustards, and the wind conditions were certainly favourable. However, the forecast for the next day was much less promising – strong winds with gusts up to 40 km. Not wanting to get windbound, we reluctantly decided to pass up on the offshore islands and head west along the Georgian Bay coast to the Western Channel.
We stopped on the west side of Sand Bay to take a photo of the Bustard lighthouses, which were about 4 kilometres away. Max’s Sony RX80 with its 720mm focal length reach captured the following shot.
The Bustard Rock lighthouses on Max’s Sony HX 80
I went to the opposite end and got the view you see below at 24mm. The lighthouses are specks on the horizon!
the smooth, low-lying rock outcrops of Georgian Bay
A Visit to The Gauthier Fish Packing Plant Ruins
Weaving our way through the almost submerged rock outcrops, we passed by a privately owned island with several well-maintained buildings on it. We saw someone there walking from one building to another as we headed to the nearby island to check out what was left of the Gauthier Fish Packing Plant.
front row seats on Georgian Bay – privately owned island
Maps by Jeff note on the Gauthier Fish Packing Plant ruins
Like the fish station at Highland Home in the Bustard Islands, the Gauthier fish packing plant closed about 60 years ago. Kas Stone, in her chapter on The French River Delta in Paddling and Hiking The Georgian Bay Coast, notes the following factors which led to the collapse of the commercial fisheries on the Bay –
overfishing
pollution of the spawning grounds by logging debris
invasion of the bay by sea lamprey and other non-native species
We rambled around the site, noting the boiler and rusting pieces of other machinery, as well as the foundations of a few buildings.
boiler at Gauthier Fish Packing Plant on Georgian Bay
the concrete foundation of a Gauthier fish plant building
Ruins of Gauthier Fish Packing Plant – Georgian Bay
Gauthier fish plant building foundation
The Gauthier plant ruins are just east of the Lodge Channel. Curious about the several buildings at the top of the channel that our topo map indicated, we paddled up the channel to take a look. We found a small community of perhaps fifteen cottages, all looking in good shape. We wondered whether they were all part of a lodge that still existed or were individually owned.
close-up of some Lodge Channel cottages
Checking Out “The Fort” A Supposed Ambush Location
“The Fort” – boulder deposit
Paddling back to the Bay from the Lodge Channel, we made our way up the Fort Channel. We were headed to a landmark identified by Harting as The Fort, a supposed ambush site used by Indigenous pirates to rob the voyageurs of their trade goods. The site – see below – is a jumble of rocks that may or may not look like a fort, depending on how much you want it to be one!
Again, to quote the best book written about the French River:
On the south shore of the West Cross Channel, close to Black Bay, there is a peculiar collection of tumbled-down rocks where several circular openings seem to have been constructed. This was possibly used as a shelter by Natives lying in ambush for the treasure-filled fur-trade canoes that would pass down the channel, which is quite narrow at this point. This could well be the “Fort” talked about in some old reports and after which the Fort Channel is named. [Harting 32]
The story itself left us skeptical. How often could it have been used as an ambush site before the fur brigades realized there would be trouble up ahead? It is no more amazing an ambush site than countless others they could have picked.
Furthermore, just which Indigenous tribe would be doing the hold-up? If it was an Algonkian (i.e. Anishinaabe) people, they would only be ticking off their many fellow Ojibwe who worked with the French.
If it were a Five Nation Iroquois Haudenosaunee tribe from the upper New York State area, it would seem a long way to come to steal goods that could be taken much closer to home. It would also date its use to the 1600s when the Iroquois were still a military power. By 1700, various Anishinaabek (i.e. Algonkian) peoples controlled southern Ontario.
The Journal of the fur trader John Macdonell – found in a collection titled Five Fur Traders of the Northwest– has this entry from June 26, 1793:
See here for a 9.7 Mb pdf file of Macdonell’s Journal.
Macdonnell’s account puts a different spin on the story than Harting’s. For one, it sounds like a one-off ambush and not an oft-used spot; it also makes clear who the attackers were – and also how unsuccessful they were! It would date the attempted ambush around 1740, long after the military power of the Iroquois had been defeated by an alliance of Algonkian-speaking tribes. By 1740, all of southern Ontario was controlled by various Anishinaabek peoples, and it is quite unlikely that the upper New York State Iroquois would have dared venture all the way to the French River Delta.
The fur trader Daniel Harmon has yet another account of the indigenous pirates who ambushed westward-bound voyageurs with their trade goods. His May 24, 1800 diary entry reads:
His account has the bandits as Anishinaabe – Ojibwe or Cree – and implies that the spot was used for an extended period before “the Good Indians” decided enough was enough. While Macdonnell places the incident(s) in the French period, Harmon’s mention of the NW Co. puts it post-Conquest, sometime after 1770. The Montreal-based NW Co. was established in the late 1770s.
We had somehow missed seeing the so-called fort on our 2019 visit, having paddled up the wrong channel! This time, we made sure we got to the site and spent some time examining it.
The Fort – a closer-up view
The Fort – a view from the top
The nearby presence of other boulder and gravel deposits, and even a bay named Gravel, provides a clue to the origin of the jumble of rocks which the voyageurs paddled by and turned into a fort.
Much more fantastical to them would have been the story we tell about a two-kilometre-thick ice sheet covering the area for thousands of years, while subglacial streams moved, broke, and ground the rocks into pieces as small as grains of sand!
from The Fort back to the canoe
Note: The Fort material is mostly a cut-and-paste from our 2019 trip report. See here –
From the Fort location, we headed east on the West Cross Channel to the bottom of the Old Voyageur Channel and CS830, a nice site complete with trails to a couple of vistas of the neighbourhood. As with all the sites we camped at on the trip, this was litter-free.
a messy kitchen table at CS830
hilltop view of the end of the Old Voyageur Channel
—————–
Day 5: From Old Voyageur Channel to Whitefish Bay
Date: October 3, 2024
Distance: 15 km
Time: 9:00 – 4:00 pm. 7 hrs
Rapids: 0
Portages: 3 – low water extended in the Cross Channel
Weather: sunny w/ breeze; stiff in the bay
Sightings:
Campsite: CS803 on Whitefish Bay’s west side
Toilet Box: none found
Caltopo link to our GPS track for the entire 7-day route
We set off from our campsite at the bottom of the historic Old Voyageur Channel on the French River, expecting to have to portage our canoe past La Dalle, the long set of swifts we had come down a couple of times before, enjoying the ride as we did so.
Looking up the Old Voyageur Channel from CS830
However, it was late in the season – October 2 – and water levels were so low that we were able to paddle up the swifts with no effort. We were so amazed by our good fortune that we turned back down to the start of La Dalle and paddled up a second time!
It really is a scenic stretch of the delta made more special by the echoes of the voyageurs in their canôts du Maitre coming down. I’ve always wondered if La Dalle is what Frances Ane Hopkins had in mind when she painted the following scene –
a section of La Dalle on the French River’s Old Voyageur Channel
After our double ascent of La Dalle, it was on to Palmer Rapids and another case of us paddling up the rapids with no sweat! That left only one more obstacle at the very top of the Old Voyageur Channel, La Petite Faucille. It would have been the one set of rapids the voyageurs would have had to do on their way to La Prairie, their camping spot for the end of a long day that began at the very top of the French River.
The following pics show what we found as we approached. There was no water coming over the drop!
the bottom of La Petite Faucille Rapids
La Petite Faucille in very low water
The traditional portage is on river left; having done it a couple of times, we knew the drill and were soon up and over. Before continuing on up to the top of the Old Voyageur Channel, we paddled into the bay to the east of the channel to check out the views. We were not disappointed.
Screenshot
Boston Falls sits at the top of a nameless channel that goes right down to the west cross channel. We had come up the channel in 2019 and were now heading down. Instead of the Boston Falls portage indicated on the Maps by Jeff map, we took a side channel, which took us to a nameless set of falls below Boston Falls.
Like everything else this morning, it was characterized by the lack of water! An easy 70-meter carry over a flat stretch of rock outcrop brought us to the put-in on the other side. Thirty minutes and a couple of dead ends later, we were in the cross channel.
Falls below Boston Falls – a mere trickle of water coming down
another view of no-name falls below Boston Falls
Once down the west section of the Cross Channel, we paddled east towards Devil’s Door Rapids. We had already done the portage around the rapids twice. We wondered what the low water conditions we were experiencing would do to the 1-meter-plus drop we had seen before.
With our canoe at the start of the 50-meter straight up-and-down portage, we scampered up the rock to get a view from above. The 4′ drop was not there, and what was there we could easily ride through. We went back down to the canoe, relieved that a portage was not necessary. Heading to the left side of the rapids, we were through in a second and on our way to the east section of the cross channel.
a view of Devil’s Door Rapids from above
The Cross Channel route to avoid Georgian Bay wind and waves
As we got closer to the open waters of Georgian Bay, we had to deal with strong SSW wind, strong enough that we could not land our canoe when we turned into Whitefish Bay. After first heading to the other side of the bay to a spot where we could land the canoe and not finding anything suitable, we made our way back. This time, we were lucky to come upon a spot where we could land.
We found an excellent sheltered and, from appearances, seldom-used campsite. Like all the others we used, it was tidy and free of litter.
Georgian Bay – Whitefish Bay CS803
Whitefish Bay CS803 – nicely sheltered
—————–
Day 6: Whitefish Bay to Sturgeon Chutes
Date: October 4, 2024
Distance: 24 km
Time: 8:30 – 3:30 pm. 7 hrs
Rapids: 0
Portages: 1
Weather: sunny, some clouds, warm
Sightings:
Campsite: CS647 on the east side of the Wanapitei River’s Sturgeon Chutes
Toilet Box: yes
Caltopo link to our GPS track for the entire 7-day route
Our last full day in the Park and, knowing it would be our last paddling day of 2024, we made it a big one, 24 km up to the northernmost campsite in the French River Delta. That would be CS647 on the east side of the Sturgeon Chutes on the Wanapitei River.
At the bottom of the Main Outlet, the preferred route of the voyageurs on their way to the west end of Lake Superior, we stopped for a moment to look at the Henvey Inlet wind turbines about twenty kilometres away. There are 87 in all, which have been at work since 2019. The Henvey Inlet First Nation, as a 50% partner in the operation, apparently earns about $ 10 million. A year from the electricity generated.
Morning view of the Henvey F.N.:/Pattern Energy wind turbines
We continued up the Main Outlet, seeing evidence of what had been, for a quarter-century, a thriving resource-extraction community. By 1910, however, the lumber boom was over and French River Village faded away, burnt down like the Queen’s Hotel or hauled off to be reused elsewhere, with only a few ruins and a lighthouse remaining.
French River Village ruins
We soon came to Loading Cove, the spot where the lumber would be transferred to waiting ships for delivery to various Lake Huron towns on both sides of the border. One hundred years after the demise of French River Village, nature has seemingly reclaimed the space!
As we paddled past the cove, we looked at the solitary cottage sitting near the outside corner. What we didn’t see were the other buildings behind it screened by the bush. A satellite image of the area shows this –
The following post has more info and some historical images of French River Village:
Across the remains of French River Village is Camp McIntosh, the only still-operating fishing lodge on Georgian Bay in the French River Delta. The other one, Georgian Bay Fishing Camp, closed shortly after its owner’s death. [There is also Bear’s Den Lodge, but it is up in Hartley Bay.]
The McIntosh Camp below Dalles Rapids on the French River
Just above Camp McIntosh are the Little Dalles Rapids. Shortly after we had paddled up to them, Max, the mapkeeper, asked me when they were coming up! He was surprised to hear we were already on our way to Dalles Rapids.
approaching Little Dalles Rapids from the bottom
Our last portage of the trip was the one around Dalles Rapids. The trail is well-used. Max took one canoe pack, one duffel, and the paddles, and walked them 350 meters to the other end; I took the other canoe pack and duffel, and my camera bag, and walked them halfway, using my Garmin watch to calculate the halfway point. Then I went back for the canoe.
For one last time this year, I got to bounce 60 pounds off my left thigh, lift it over my head, and set it on my shoulders. When I got to the halfway point of the portage, Max was just arriving, ready to pick up the packs I had dumped there. Good timing!
canoe loaded at the top of the Dalles Rapids portage
Then it was on up the Main Outlet to access the mouth of the Wanapitei River. We had paddled up the mouth of the river to The Forks the last time we were here, and were looking forward to doing it again.
After a few days on or close to Georgian Bay, it is a totally different experience. Instead of bare rock and scraggy pine, we were entering a deciduous forest mostly free of rock outcrops until we arrived at our campsite for the night at Sturgeon Chutes.
The Wanapitei River below the Sturgeon Chutes
We would camp on the side of the last set of chutes; the next morning, we walked to the upper set along a scenic high trail.
satellite view of the Sturgeon Chutes, the last dramatic set of falls on the Wanapitei River
There are three designated campsites as you near the Sturgeon Chutes. The first one, CS645, is a complete dud hidden under a meter of bush and in severe need of some maintenance. No fire ring or thunderbox was spotted in my quick look at the site. Given how far it is from the chutes, you’d have to wonder why anyone would choose to camp there.
The next one, CS646, is in fine shape with flat space for more than one tent. We put a hold on it while we paddled over to the northernmost one, CS647, on the east side of the Sturgeon Chutes. In the end, its proximity to the chutes and a decent spot to put our four-person tent won the day. The site provides lots of photo opportunities, and the portage trail upriver proved to be a scenic diversion. And as we drifted away to dreamland, the sound of the falls proved to be a non-issue. [Some admittedly find comfort in the constant sound of tumbling water!]
panorama of Sturgeon Chutes – the last drop
a view of the final chute at Sturgeon Chutes
the top section of Sturgeon Chutes on the Wanapitei R.
looking south from the Sturgeon Chutes on the Wanapitei River
We shared our campsite with a fellow paddler whom we had first met after paddling away from our Dalles Rapids portage. Like us, he was heading back to Hartley Bay Marina the next day. We all agreed that Sturgeon Chutes had been an excellent final tent spot, an exclamation mark at the end of an already memorable one-week ramble in the Delta.
—————–
Day 7: Sturgeon Chutes to Hartley Bay
Date: October 5, 2024
Distance: 10 km
Time: 8:40 – 10:30 a.m. – 2 hrs with some time for sightseeing
Rapids: none
Portages: none
Weather: sunny and cool in the am
Sightings:
Campsite: home and home
Before we headed back to our vehicle at the marina, we took some time to walk some of the portage trail, which goes through the campsite up to the top set of chutes. [Jeff’s map has it as a 350-meter carry.] Our reward was a bit of fall colour and some fine views of the river from the elevated trail.
We also paddled over to the other side of the river for a different perspective and got a few shots of the chutes from there. We had expected that the Chutes might attract a few fishing boats, but only one boat motored up during our time there.
heading for a shot from the bottom of the Sturgeon Chutes – a photo by a fellow paddler
the final – and most dramatic – of the Sturgeon Chutes on the Wanapitei River
a fellow paddler above Sturgeon Chutes
a view of Sturgeon Chutes from the bottom
fall morning on the Wanapitei River
The closer you get to Hartley Bay, the more likely you are to have motor boats go ripping by you. Given our experience earlier that week on Sunday morning when we left Hartley Bay for the Pickerel River, we were expecting the worst! The number of cottages and the lodge on Hartley Bay and nearby Ox Bay guarantee it!
Well, it was Saturday morning at 9:00, and we only saw two boats – and they were at a distance! We enjoyed the sun and the wake-free water in Hartley Bay as we knocked off the last four kilometres.
ready for Le Grand Portage
With the canoe strapped down for the Grand Portage to Toronto. We agreed that the trip had surpassed already-high expectations, thanks to
a variety of unexpected paddling challenges
thanks to water levels being much lower than on our last visit
through some eye-candy-level landscape
infused with multiple layers of history that add an extra dimension to savour.
Time now to write that Canoe Tripadvisor review. We’re giving it
—————–
Maps
1. Federal Government NRC Topo Maps – free
If you want to download and make your own paper copies of the relevant bits from the Natural Resources Canada 1:50,000 topos, just click on the following map titles. The links will take you to a tif file at the Government of Canada’s geogratis site –
Note: The Federal Government provides the maps “free,” but is no longer in the map-printing business. Some entrepreneurs have stepped in and set up businesses to print the maps. Most use a plastic material (DuPont’s Tyvek?) instead of paper; individual sheets cost $20. CDN or so.
—————
2. Crawshay’s Topo Canada iOS App – free.
Thanks to its GPS capability, your smartphone is a helpful thing to bring along.
I also brought along my iPhone 6, with David Crawshay’s Topo Canada app installed, and the downloaded topographic sheets above. The app is free, as are the NRC topo maps you must download before the trip. On a few occasions, especially as we paddled through a maze of channels and islands, I fired it up to see where we were. The one thing I did not do was leave my iPhone on all day with GPS enabled.
—————
3. ATLOGIS Canada Topo Maps for Android OS: free/$14.
There is an Android OS app from a German app developer similar to Crawshay’s Topo Canada iOS app. However, it costs $14. Given its usefulness, the one-time cost is a worthwhile investment that will save you time and aggravation. Click here to access the Google App Store page –
Note: The free version of the app may be enough for your purpose.
—————
The above map sources are all based on the Natural Resources Canada topographic maps and are accurate.
However, they lack two essential bits of info:
1. portage and
2. campsite locations.
For this, you will need to turn to the Friends of French River P.P. Map and the Maps By Jeff (the latest incarnation of Jeff’s Maps and Unlostify).
—————
4. Friends of French River P.P. Map – $15.
The official park map for 2023 is the 2021 4th. Edition of the 1:50,000 scale Friends of French River map. It has the new campsite numbers. The waterproof map is not only a good investment, it also provides the Friends with a bit of money to support their work.
The map indicates the relatively few portages in the Park. It also shows the campsite locations, using the revised 2021 cs #s.
Now Out-of-date older maps
In 2021 the FRPP managers decided to retire a few campsites and renumber many others. The result is that pre-2021 Unlostify and the Friends of FRPP maps and trip reports with specific numbered campsites are now outdated. Some campers will be confused as they try to match the number on their pre-2021 map to the one nailed to a tree.
Here is a list of the campsites with their old and new numbers. If you have an older copy of the map, you can note the changed numbers.
Getting a copy of the new park map at the Park Visitors’ Center, along with your backcountry permit, would be the easiest thing to do.
—————
Maps By Jeff – $20.
Another useful map is the Maps by Jeff French River map, available for $20 in a waterproof plastic material. It covers the French River from just east of Highway 69 to Georgian Bay. It has the new campsite numbers.
Here is an image of the map to give you an idea of the look –
If the map’s overall style looks familiar, the reason is the involvement of Jeff McMurtie, who used to be Jeff’s Maps and then Unlostify! The map provides some historical and geological background on notable spots, as well as up-to-date campsite locations and numbers.
—————–
Ontario Parks Online Backcountry Permit
Backcountry camping permits can be purchased online at the Ontario Parks website. Click on the Reservations option in the header and then the “Backcountry ” prompt to the right of Day Use.
Once on the Backcountry page, scroll down and choose French River in the Park folder and then enter the other required info.
Note: In 2024, FRPP changed its backcountry reservation system. You now need to pick a specific site for each night in the Park.
Kevin Callan explains the change in an Explore magazine online article –
For the 2025 paddling season, Ontario Parks has implemented a site-specific reservation model for all backcountry paddling campsites at this Provincial Park, which previously had divided zones to reserve. This “site-specific” style of booking a backcountry site isn’t new. Other parks, such as the nearby Killarney Provincial Park, have already transitioned to this type of reservation when overcrowded by visitors, especially beginner canoe trippers. Source
The change means that you are committed to specific campsites and that last-minute changes to your itinerary due to weather conditions or a decision to paddle an hour more or less are technically not possible. A pre-determined list of campsites is not how my brother and I do canoe tripping! Except for CS634 on Day 2, all of our campsite choices on this trip were made the day of! The fact that we keep our visits to the Delta to May-June and September-October means that there are very few other campers around.
Paddlers will now need information on specific campsites to make sure they do not end up with a dud of a site, of which there are a few in the Park.
The 2025 French River fee structure looks like this:
I was surprised to see a $9.73 (+ GST!) charge for getting the backcountry permit online. Maybe it’s been there for years, and I just didn’t notice before?
Another option is to stop at the French River Park Visitor Center and get your camping permits there. Maps and up-to-date info on matters relating to the park – fires, bear sightings, water levels, campsite closures, etc. – would also be available.
In it, you’ll find detailed descriptions of over thirty excursions, each complete with maps, info on access points and the natural and cultural history of the area, and a list of key points to visit for each excursion. The stunning photographs included in the book will convince any reader to begin their own exploration of the G’Bay Coast. The book is an investment and will add to your understanding and appreciation of a somewhat overlooked corner of Ontario that would draw Canadian travellers if it were anywhere else but in their own backyard! Chapter 6 – French River Delta and the Bustards – is the one I reread for this trip.
The Toronto Public Library has five copies available. See here.
Toni Harting.French River: Canoeing The River of the Stick Wavers
Tired of waiting in line for the one copy in the Toronto Library system of Toni Harting’s French River: Canoeing The River of the Stick Wavers (1996), I turned instead to Amazon and found a used copy. for $20. (shipping included). A week later, I had my own copy of the single best source of information on the French River from top to bottom.
It has everything from geology to history to topography and canoe-specific information. While a few things have changed in the past quarter-century since it was written, it has aged well. Any time spent paddling down the French or in the French River delta will be enriched by reading this well-researched book; Harting points out things that you’d never know otherwise as you paddle by. (Example: the Voyageur Channel is misnamed. It was not used by the voyageurs as a way to get to Georgian Bay!)
BTW -The reference to “stick wavers” in the title refers to the Jesuits with their wooden crosses!
TV Ontario’s Tripping Series – The French River.
Click here or on the image below to access the TV Ontario website. [Note: Set your VPN server to a Canadian address.]
If you are trying to convince someone to share your canoe for a week on the French River or in the French River Delta, this documentary will seal the deal.
Great river-level photography and
use of drone cameras for dramatic overview sequences,
a minimum of talking,
the occasional explanatory text, and
a soundtrack you could use to enter a meditative state
The last third of the film focuses mostly on the delta area from Ox Bay to Georgian Bay.
—————–
Our Other NE Georgian Bay/French River Delta Trip Reports
1. An introductory post to the north and east coast of Georgian Bay-
Prime autumn colour has come and gone here in Riverdale, and my Icelandic Sheepdog Skuggi and I have managed to walk into a few scenes with some of that fall magic. Here are a few from the past month from our rambles around Toronto’s Riverdale neighbourhood, including
Withrow Park and the off-leash area
the playing field and bush below Broadview Avenue and the swimming pool
the trail along the banks of the lower Don River
the off-leash area below The Riverdale Farm,
the woods to the east of Pottery Road (Crothers Woods and Cottonwood Flats)
and Cabbagetown.
We walk across the Riverdale footbridge over the Don River every morning. Here is the view looking north earlier this week. Hidden from view behind the trees is the work being done – a year and a half and counting! – to install a ramp from the bridge down to the Lower Don Trail –
the view of the Don River from the Riverdale footbridge
Looking up the Don from the last set of rapids
The Don River just south of Pottery Road
the off-leash area at Withrow Park
The high trail above the East Don – Crothers Woods/Cottonwood Flats
Nov. 13 – prime colour come and gone!
A stunning sunset as we walked along Broadview Avenue above Riverdale Park East had us lingering for twenty minutes to watch the changing colours light up the western sky.
sunset view from Broadview by the Rooster Coffee House
A clear and sunny early September morning – a perfect time to take my new bike for a spin. It was mid-week, so the route I was planning to do would be mostly free of the joggers, strollers, dog walkers, and even other cyclists that I’d see on the weekend.
The aim was to avoid road traffic as much as possible by sticking to designated bike and multi-use trails. The following sections made up about 80% of the ride –
The Martin Goodman Trail from Cherry Street to the Humber Bridge
The Humber River Bike Trail up to Finch
The Finch (Hydro) Corridor over to Leslie Street
The Don River Trail/Don Mills Trail
Tour de Toronto – mostly vehicle-free
Click on the map above or here to access the downloadable Ride With GPS file.
—————-
An Alternative Somewhat Shorter Route
If going all the way up to Finch is a bit too much, consider going up as far as Eglinton and then cycling a short section of Eglinton Avenue to access the Beltline Trail just before Caledonia Road. Instead of 74 km, you’ll be doing about 43.. Click on the map below to see the route in detail at the Ride With GPS website.
There is a bike path on Eglinton which takes away most of the on-road riding. Note that much of the Beltline is hard-packed fine sand and gravel. I did it in mid-June 2025 with my Trek Madone and 25mm tires and had no issues. The best time to do the ride would be on a weekday morning.
—————-
To The Martin Goodman Trail
Rooster Coffeehouse on Broadview at Riverdale – Km 0
My starting point was the Rooster Coffeehouse on Broadview; the caffeine provided an initial kick. Before I set off, I took in one of Toronto’s best views – the view of the downtown from the Broadview slopes.
panorama of TO downtown from Broadview up from the Rooster Coffee House
Then I made my way down Broadview and across the Gerrard Street Bridge to the Bayview Bike Trail, which goes right to Cherry Street. South onto Cherry and across the Lakeshore Road, and I was on the Martin Goodman Trail. It would take me all the way to the Humber River bridge.
Screenshot
—————-
The Goodman Trail To the Humber Bridge
The Goodman Trail to the Humber Bridge
The Goodman Trail takes you right through the bottom of downtown Toronto. I got off my bike at the parkette with benches and a view of the Alexandra Yacht Club boats in the harbour across from the Toronto Naval Division building. The shot below has me looking back at the way I have come; the Goodman Trail’s blue and green lines are visible on the pavement.
parkette across from the Alexandra Yacht Club
Alexandra Yacht Club boats
Back on the saddle, it was past Ontario Place, the tennis courts, the Boulevard Club, and the Palais Royale on my way to the eye-catching bridge over the mouth of the Humber River. I stopped at Sunnyside Beach on my way to get a shot of the bridge and the collection of condos that have been built to the west over the past two decades.
The Humber Bridge and condos to the west
When I crossed the Humber Bridge, I stopped at the parkette on the SW point for a short break. Out came the Clif Bar and the water bottle.
Looking west from the Humber Bridge Parkette
Humber Bridge from the SW point
—————-
Up The Humber River Trail
from the Goodman Trail up the Humber
The ride up the Humber River Trail to Weston Road and Finch is mostly off-road except for the following sections:
km 16-17.5 on Steven Drive, Riverwood Parkway and Humber Valley Road
km 19.5 crossing the Old Mill Bridge on Old Mill Road
km 21 up to Lundy Ave. to Old Dundas Street, and then left to the trail continuation
km 24.7 crossing Eglinton Avenue to the NE corner of Scarlett Road
km 28.2 to 28.9 – up Weston Road to a left turn onto Cardell Avenue
km 35.3 – 37.9 up Weston Road to Finch Avenue and then east on Finch to Norfinch Drive
Looking back at the Old Mill subway station
A very pleasant trail, with views of the river, some nicely shaded stretches with mature trees on both sides of the path, and the occasional bridge to go over or under. On this Thursday mid-morning, I had the trail mostly to myself.
Humber River view
bridge over the Humber River
a shady stretch of the Humber Trail
Thanks to the number of paved side trails, more than once I chose the wrong one and ended up having to double back. Fellow cyclists out for a leisurely pedal and more familiar with the trail helped me get back on track!
from N of Old Mill to under the 401 on the Humber River Trail
I expected that getting north of the 401 would be complicated, but it presented no problem. However, before you get to the 401, the trail ends at a set of stairs that take you up to Weston Road. See the map below.
After a two-block stretch of Weston Road, you are back on the trail. Those are the stairs in the image below – I pushed my 19-kg. e-bike up the trough on the right side of the steps.
The metal steps up to Weston Rd.. from the Humber Trail
Weston Road – Stairs to Cardell Avenue
Once under the 401, there is more parkland trail before you come up again to Weston Road. 600 meters further up, and you are on Finch Avenue, ready to start the next section of this Tour de Toronto.
The Humber Trail From the 401 Up to Weston Road and Finch Avenue
Humber River Trail approaching Albion Road
—————-
Along Finch Avenue and The Finch Corridor Trail to Leslie
Finch Avenue from Weston Road to Hydro Corridor on the east side of 400
In planning the route, the stretch from Weston Road to the Finch (Hydro) Corridor Trail was another one which had me wondering about the level of traffic. I would find that while there was indeed bumper-to-bumper traffic across Finch all the way to the 400 ramp, the sidewalk/bike path on the south side had me zipping by all the stalled cars. It was relatively stress-free, and soon I was at the start of the west-to-east section of my ride.
The image below shows the start of the Hydro Corridor Trail, a functional but not terribly scenic way to cross the top of the city.
However, there were exceptions! The trail through the Lord Park Reservoir was one of them. I had no idea that the spot even existed. The view below prompted a Wow as I stopped to capture it.
G Ross Lord Park Reservoir – looking east from the road across it
I followed the Finch Hydro Corridor Trail all the way to Leslie before turning south. Along the way, you do have to cross a few streets – 17 in all. Most are minor with no traffic, but still require a stop to make sure all is clear before zipping across.
Check out this BlogO article from 2018 for more images of the Trail.
the hydro corridor across the top of Toronto
As I approached Yonge Street above Finch Avenue, I came out on the north side of Hendon Avenue. I walked it over to Yonge Street and then to the south side of Bishop Avenue to access the trail continuation.
hyrdo trail Yonge-Bishop gap
—————-
Down the East Don Trail
The ride down the East Don Trail back to Riverdale and the Rooster Coffeehouse is one I’ve done dozens of times. Like the ride up the Humber, there are stretches of shaded pathway thanks to the bush and mature trees lining the sides of the trail. Occasional glimpses of the river, a few bridges to cross, and, at least on a weekday, relatively few other trail users to watch for.
The top part of the East Don Trail – from Finch down to Sheppard
The scenic top section of the East Don Trail is one of my favourites. It ends up at the NW corner of Sheppard Avenue. From there, the trail continues on the SE corner, so dismounting to cross the intersection is the easiest way to get there.
Now I was on the north end of the Betty Sutherland Trail, which goes under the 401 and ends up at Duncan Mills Road. It is an essential route for cyclists to deal with the 401 without cycling down Leslie Street or Don Mills Road.
Screenshot
Unfortunately, the section of the Sutherland Trail under the 401 is closed! I went as far as I could, passing over the initial barrier, a steel fence which some enterprising citizen had turned into a bridge which allowed passage over a two-meter ditch that the fence had stood in front of. I got as far as the signs you see below and the barrier on the north side of the 401 cyclists’ underpass. No workers were evident as I looked around for a possible way forward. Not finding one, I turned to my left and up a path that took me to Havenbrook Blvd., which goes right to Don Mills Road.
———–
July 2025 Update: Cyclists report holes in the fence on both sides of the 401 closure that they have used to access the southern section of the Betty Sutherland Trail. It all depends on
if you want to disregard the posted signs,
if workers are actually on site, and
if the gaps in the fences are still there.
———–
Sutherland Trail trail closure signs
Shutting a major cycling artery for three years – wow! That is, if they will actually keep to the 2026 finish date…
Betty Sutherland Trail – 401 underpass closed until 2026
The good thing about Don Mills Road, as opposed to Leslie Street, is that it does not include on-and off-ramps to/from the 401. That makes it somewhat less hairy an adventure!
For most of my ride, I had my assist level set at 1 (Eco) or 2 (Tour); this was one time when I shifted up to 3 (Active!) so I got to speed up my crossing on the 401 on Don Mills Road.
(The Giant Revolt e-bike has five different assist levels, with level 5’s Turbo apparently quadrupling your power. Multiplying my FTP of 140 watts by 4 would put me up there with the Tour de France riders!
As a Class 1 e-bike, it is pedal-assist only and has a maximum assisted speed of 32 km/hour. Anything beyond 32 km/hr is you pedalling hard – or going downhill!
Class 2 bikes have a throttle and the same 32 km/hr speed limit;
Class 3 bikes have a throttle and a maximum speed of 45 km/hr.
internet-sourced graphic
In Europe, the maximum assisted speed level is 25 km/hour. See here for more info.
This internet-sourced map highlights the best and worst major highway crossings in Toronto:
Once down to York Mills Road, I cycled east over the bridge on the designated bike lane and then made my way to the Don Mills Trail (aka the Leaside Spur). I had found out about it the evening before and was keen to try it out. It allows another 3+ kilometres of traffic-free riding with an easy crossing of Lawrence to the trail continuation.
I had initially planned just to cycle over to the Lawrence/Leslie access to the park trail (see the route in red on the map below). However, I ended up following the Don Mills Trail continuation.
south end of Don Mills Rail Trail over to Leslie
The rail trail comes to a stop just before Eglington; the satellite image above shows a rail line that stops its progress. I backtracked a few meters to a dirt trail and then sidewalk running along the edge of a property over to Leslie, and then cycled down Leslie to the first road going into the park and its bike path.
Don Mills Trail – York Mills to Lawrence on down towards Eglinton
from Eglinton to Broadview Ave. on the Lower Don bike trail
At Pottery Road, I would usually just continue on the Lower Don Trail to the Riverdale Footbridge across the Don River and end my trip that way. However, like the 401 underpass on the Betty Sutherland Trail, this section of the Don Trail has been officially closed since May 2023. Originally slated to reopen in July 2024, that date slipped by with very little work having been done. The new official opening is July 2025, but skepticism is certainly warranted. It does make me wonder how many other such trails are currently shut down in the name of making our city more liveable.
While the Lower Don Trail is closed, cyclists have been using the Bayview Extension Path to access Corktown Common and the Waterfront Trail. This blog post provides the details.
Instead, I headed up Pottery Road to Broadview Avenue and the final stretch back to Riverdale. [Full disclosure – my assist level for the ride up Pottery Road was 3! Over the past 40 years, the ride up Pottery has served as a test of my relative fitness. I could always just turn the assist level to 0 to get a current assessment!]
My 75-kilometre Tour de Toronto took me a bit under four hours, and I got to experience my city in a way that speeding by in a vehicle does not allow you to. Definitely a worthwhile ride – and one I plan on repeating when the fall colours up the Humber and down the Don become more prominent.
As for the quality of the workout, it was definitely less demanding than the same ride on my Trek Madone would have been. However, it was still a workout, as well as an enjoyable way to spend a few hours on a sunny fall weekday.. Here are the stats –
Note: the Heart rate zones are those of a 74-year-old! Your zones will involve highe.numbers.
—————-
Some Resources For the Ride
Bicycle Park & Rail Trails In Ontario
The two volumes of Dan Roitner’s Bicycle Park & Rail Trails in Ontario have in-depth coverage of 135 trails across the province. Googling my way into his website opened up a world of from-my-front-door bike adventures.
It also prompted me to buy digital copies of his two books. A month later, I also bought that Giant Revolt E gravel e-bike with the wider 40 mm tires that I have already rolled over a few hundred kilometres of Ontario gravel trails. Roitner’s guides provided the inspiration.
Click on thislink or the header below to access the extensive resources on his website –
———–
Ride With GPS Map Data
Click on the link below to access my route as mapped by Ride With GPS-
Play around with the various map views – the default RWGPS map view, as well as various Google Map views.
If the 75-km length of the route described in this post agrees with you, you might consider the following ride. However, while it is the same length and is also mostly off-road, it is not a loop. See the post below for details!
Update: While I have paddled through Dog Lake and into the Missinaibi River system a few times over the past 45 years, I only recently delved into the history of the Cree and Ojibwe people who live(d) in the area. Curious about why we had never seen any local Indigenous people on our trips through the area, I searched for some population stats.
It was our canoe trip down the Little Missinaibi River ending in Missanabie at Ernie’s Campground and Cottages that prompted the research. Click on the following title to get the back story.
On googling “Missinaibi 62” I learned that this is a reserve owned by the Michipicoten First Nation. An Apple Maps satellite view of the reserve shows four properties which may be used on an occasional and seasonal basis by those living on the main reserve at Michipicoten, a 126 km car ride away.
Missanabii Cree F.N -owned Island View Camp
To the east of Missanabie Village, I assumed (wrongly) that there was a Cree community somewhere. The band’s omission from Treaty No. 9 consideration was rectified in the 2019 land settlement indicated on the map above. Oddly, the band office is still in downtown Sault Ste. Marie (see here for details on a new building it purchased in 2023.)
Before it purchased Ernie Martel’s property in Missanabie in the early 2020s, the only collection of Cree F.N.-owned buildings in the Missanabie area was the Island View Camp on Dog Lake. Of the 476 members of the Missanabie Cree F.N., very few would seem to live on the territory they were awarded. (The number is 3 according to this Federal Government census source from June 2024.)
The political leaders of the First Nation were hopeful that 10 to 15% of its members (presumably including those leaders) would move to the reserve from the various urban centers where they now live. Former chief Glenn Nolan put it this way –
‘An opportunity for us to reconnect with that physical space and allow us to become a community once again’ (source)
Time will tell if 50 to 75 F.N. members – they would have to be either true believers or those with little at stake holding them back – will follow their leaders and abandon
established homes,
employment,
access to medical facilities
educational opportunities, and
all the conveniences of and familiarity with an urban lifestyle in Wawa or Sault Ste. Marie or Toronto
to build from scratch an uncertain future on their new reserve and what is left of nearby Missanabie after the Martels’ departure. The humble estimate of how many would make the move is an admission that it is a dream of nation that very few (3 in 2024?) hold or want to bring to life.
My continued research led to this eye-opening study which deals with the impact of Treaty No. 9 and the establishment of the Chapleau Crown Game Preserve on the indigenous families who lived in the area, either on a permanent or seasonal basis.
It led me down the proverbial rabbit hole. Faced with a half-dozen different Indigenous communities and their stories, I figured I would examine each one in turn and clarify for myself the situation from various perspectives, Indigenous and non-. Well, it did not turn out as expected.
What follows is where I got to before I shelved the project!
In an introductory section, I planned to consider the evidence as presented in
First Nations accounts,
government sources, and
academic studies
Then I would move on to examine individual First Nations, those in the
Chapleau area
Missanabie area
Michipicoten area.
A conclusion would wrap it all up!
What you will see are the few maps I worked on as I researched the patchwork of reserves. You’ll also see a lot of copy and paste of Wikipedia articles and material from various F.N. websites and other sources that I was compiling to draw from and incorporate into a finished post!
But ah, the best-laid plans of mice and men often go awry…!
What I did put together may encourage someone keen on untangling the various threads of what is a multi-layered story of how an expanding Ontario dealt with the Indigenous people eking out a subsistence living in northcentral Ontario, a territory being buffeted by dramatic changes from the mid-1800s. Some of these include”
the building of Railroads through the area
the lure of pulp and paper and mineral resources
the attraction of admittedly marginal farmland
These factors would change forever the relationship to the land that the 600 to 800 Treaty No 5 and Treaty No 9 Cree and Ojibwe living in the Michipicoten/Missinaibi/Chapleau area had known. [4000 is the estimated population of the entire Treaty 5 and Treaty 9 area in 1905.]
C. other sources – historians, archeologists, academics,
Ernest Voorhis. Historic Forts and Trading Posts of the French Regime and of the English Fur Trading Companies. Department of the Interior Ottawa.1930.
Would 300 to 400 (60 to 80 per band) be a reasonable estimate for the Indigenous population in the Michipicoten/Missinaibi/Chapleau area on the eve of the 1905 Treaty No. 9?
Where they chose to live had been altered in the preceding 20 years by the coming of the railroads, which replaced the rivers as the determining factor on where to establish communities. Now fur traders could use railroad stops as places to collect furs.
The transcontinental CPR railroad with stops at Chapleau and Missanabie had existed since 1885.
A bit further to the north, the Canadian Northern (pre-CN) line with a stop at Peterbell on the west bank of the Missinaibi had already impacted Cree and Ojibwe settlement patterns.
By 1914 the Algoma Central was finally completed from Sault Ste. Marie to Hearst.
the Missinaibi area as recorded by a 1901 Ontario Govt map with only the CPR
Between the early 1880s and 1914, three major rail networks redefined the relationship they had had with the land since the early fur trade era going back to the 1670s on James Bay. In those days families would set up band spring/summer settlements next to HBC fur trading posts.
Northern Ontario railroads – 1915
With the coming of the railroads, Cree and Ojibwe fur trading post locations were abandoned for new settlements on the side of the railroad. The cohesion of pre-fur trading post communities and even those centred around trading posts was overturned by the new settlement patterns and a transition from a barter economy to a wage economy.
——————
Chapleau Area First Nation Reserves:
Map of Chapleau area with the various F.N. land indicated –
from the town of Chapleau’s website, a page on its three First Nations communities –
Not mentioned is Chapleau 61, a reserve which belongs to Michipicoten F.N., an Ojibwe band whose main reserve (Gros Cap 49) is on the north side of Michipicoten Bay. Not clear is if anyone lives on Chapleau 61.
————–
Brunswick House First Nation:
Band No. 228 Traditional Name: Wapiscogamy House. Alternate Names: New Brunswick House Band of Ojibway
All of the names this band gives itself derive from the fur trade, beginning with Wapiscogamy House, one of the first inland fur trading posts set up by the Hudson Bay Company. It does seem odd to find an Ojibwe band based 200 kilometres from James Bay. You’d figure they would be Cree unless they moved into the area in the late 1700s. Perhaps the non-Indigenous distinction between the two is no more than artificial labels that don’t apply.
It is unlikely that their ancestors were living at this location before the British set up the post in 1777. [it was located about 1 kilometre up the mouth of the Pivabiska River, which is about two hundred kilometres up the Moose and Missinaibi Rivers from Moose Factory]. It is in the James Bay lowlands and below Thunderhouse Falls.
It was far too far from Moose to be adequately provisioned or protected, and it came to a sudden end, when it was razed to the ground by Indians sent to attack by the opposition traders at Michipicoten, and the post personnel barely escaped with their lives. source
The quote reveals Cree (Moose Factory) and Ojibwe (Michipicoten Fort ) hunters and fur traders getting caught up in the fur trade war between the HBC and the Montreal traders – i.e. the North West Company.
The article quoted above goes on to explain the significance of Brunswick House in the Hudson Bay Co. strategy to keep the furs flowing down to James Bay –
A second post, established at Brunswick Lake in 1788 was more successful. New Brunswick House Post was in operation for nearly a century, and became the major inland post on the Missinaibi system, comparable in its time with Fort William, the Northwest Company’s inland headquarters at Thunder Bay. During our survey we collected over 1500 artifacts from the site – they give a good representation of the types of goods present on late 18th and 19th century major fur trade posts.
—————-
More info on the H B Co. Posts on the Missinaibi River –
The three main posts, all at times called Brunswick House or similar were
Wapiscogamy House: In 1776 Thomas Atkinson from Fort Albany, Ontario went 200 miles upriver and established Wapiscogamy House on the west bank of the river. It was rebuilt in 1781, named Brunswick House, closed in 1791, and re-opened from 1800-1806.
Missinaibi Lake House: In 1777 John Thomas was sent from Moose Factory to build a post at Michipicoten on Lake Superior. He selected a better location at the outflow of Missinaibi Lake and called it Missinaibi Lake House. It was occupied each summer until it burnt in 1780. The site was re-occupied from 1817 until about 1821. It was reopened in the early 1870s and in 1879 renamed New Brunswick House. When the railroad was built just north of the lake in 1912-13 operations were moved to the new town of Peterbell and the post was closed in 1914. Around 1980 there were left a few cellar holes and collapsed buildings.
Macabanish House: In 1788 William Boland established a post between the other two on Micabanish Lake on a tributary west of the river. Its success led to the closing of Wapiscogamy House. In 1799 it was named New Brunswick House and the lake renamed Brunswick Lake. It was the chief post until 1879 when it, and its name, were transferred to Missinaibi Lake. Around 1990 the clearing where it stood was visible from the air.
Brunswick House First Nation gets its name from this and the one on Missinaibi Lake. [source]
—————-
Voorhis Map of Trading Post Locations In N Ontario
74 Brunswick House
Fortified post of Hudson’s Bay Co. on Missinaibi river. Built
1744. this post was abandoned in 1790 and New Brunswick
House was substituted, built 1788, at north end of Brunswick
lake. The latter was operated until about 1900. Location of both
forts shown on Devine map 1857 (No. 12), and Arrowsmith 1857
(No. 8) and 1832 No. 101 and White’s map (No. 24). Brunswick
House was situated on the north bank Missinaibi river near outlet of Opasatika river. New Brunswick house was nearly 100 miles
further upstream.
—————-
Facebook Page – BHFN – Wapiscagamybout Brunswick House First Nation – Wapiscagamy
Brunswick House First Nation – Wapiscogamy has a population of 763 members with approx. 121 living on-reserve and 642 off-reserve. We are also affiliated with the Wabun Tribal Council. Traditionally, our members were mainly trappers and fur traders. However, we are currently involved in pursuing opportunities in mining, renewal energy, starting our own blueberry farm and providing educational, health and employment & training opportunities for our membership. Brunswick House First Nation was originally known as “Wapiscogamy” House. We were originally from Missinaibi Lake and hunted and trapped as far south as the Great Lakes and north up to the Moosonee area for 7,000 years. Led by Chief Meshaway, we were a hard-working independent people with deep-rooted traditions who prospered in fur harvesting. Once the Europeans came and treaties were signed, this all changed, especially with the new railways coming through our lands and the forming of the Chapleau Crown Game Preserve by the Provincial government in 1925. For 21 years, our people had no land base resulting in rampant poverty, unemployment, and health and social issues. The people roamed from town to town along the railways and many of them suffered from hunger or succumbed to sickness as a result of being unable to provide for themselves as they once did.
Adding to these problems, the displacement of families due to residential schools and the Sixties Scoop had devastating effects on our people. Many lost their identity and culture and became scattered and unknown to each other. We have been working towards bringing our community back together. The negative effects of alcohol and substance abuse have made this very difficult. The healing process has started, and we hope to reconnect to our language and culture that have been displaced for all our people. We will continue to strive to be the strong, proud and prosperous people we once were.
Brunswick House FN was established through Treaty #9 which was signed by government representatives and First Nation leaders in 1905 and 1906. In late July 1906, treaty commissioners met with the First Nation people who lived in the area of the Hudson’s Bay Company post called New Brunswick House on the north end of Missinaibi Lake.
In 1925, the Chapleau Game Preserve was established as a 7,000 square kilometer area for the protection of wildlife. The new game preserve surrounded Missinaibi Lake, including the land that New Brunswick House had been allocated. When the preserve was created, hunters and trappers including First Nation people who followed a traditional lifestyle were no longer allowed to pursue their subsistence activities in the area. As a result, the people of New Brunswick House had to relocate to a new land base outside the game preserve.
For the 22 years following the relocation, the band had no consistent land base. In fact, the community’s lands were changed three times. The first was to near Kapuskasking to about 50 acres of land. This attempt at establishing a community was thwarted when a local pulp mill operation declared it had the superseding rights to the area.
The community was relocated a second time to an area known as Loon Lake (now called Borden Lake), near the town of Chapleau. This relocation was contested and the community was forced to move elsewhere.
In 1947, a 36 square mile land base was finally allocated to Brunswick House First Nation in the township of Mountbatten. Mostly swamp land, it was the traditional trapping ground of then leader of Brunswick House First Nation, Chief Joe Davis.
In 1970, one square mile of the land base was traded for an equal portion 10 kilometers east of the town of Chapleau on Highway 101, off of Borden Lake. The final move to the community’s present location was made due to health reasons and to gain improved access for members to essential health and education services.
Time Line –
1906 Treaty No.9 commissioners meet at the “new” (since 1790!) Brunswick House HBC post at the north end of Missinabi Lake.
1925 Chapleau Crown Game Preserve was established; BHB lost its hunting area since it was no longer permitted. How many people were in the band at that time?
1926-1947 failed relocations to 50 acres reserve in Kapuskasing area and then to Borden Lake area east of Chapleau
1947 36 sq. mile reserve in Mountbatten Township allocated. 76A on map Note in Wilson to the effect that they did not have timber rights!
1970 one sq. mile of Mountbatten reserve exchanged for 1 sq. mile of Chapleau/Borden Lake land – I.R.76B [Ontario Govt booklet has 1973.]
———————-
Government info
Historical Notes
After the arrival of the Europeans in the 17th century, the Ojibway economy, which had been based on hunting, fishing and gathering, expanded to include trapping for trade as well as for subsistence purposes. During the fur trade era, trading posts became part of the cycle of movements for Indian people, and some groups or Bands became associated with particular trading posts. The Ojibway people who traded primarily at the New Brunswick House posts at Brunswick Lake and Missinaibi Lake became known as the New Brunswick House Band (ancestors of Brunswick House First Nation people).
The James Bay Treat of 1905 – Treaty No. 9 was signed with the New Brunswick House Band on luly 25, 1906. An Ontario Order-in-Council, dated February 13, 1907, confirmed a selection of Indian reserves, including New Brunswick House No. 76, which was set aside for the Band and surveved at 17 280 acres.
On June 1, 1925 the Ontario government established the Chapleau Game Preserve which surrounded (and did not explicitly exclude) the New Brunswick House reserve and was closed to all hunting and trapping. The Ontario government subsequently purchased reserve land from the federal government in 1928. In 1947, the federal government purchased a tract of land in Mountbatten Township from the Ontario government and established the Mountbatten I.R. No. 76A. The Band moved to its present reserve after 642 acres of the Mountbatten reserve were exchanged in 1973 for an equivalent area of land closer to Chapleau.
The account begins with a discussion of trading post communities, which were different than the traditional pre-Contact band communities whose families would meet annually at a certain spot for the May to September season. Trading post locations were set up with a different objective than traditional summertime band gathering points.
This account does not mention any details about the years between 1928 and 1947. The First Nation’s account mentions Kapuskasing and the Borden Lake site east of Chapleau.
Neither account provides information on the number of people in the band in 1906 or 1928 or more recently.
The H.B.C. trading post on Missinaibi Lake …from Voorhis
Fortified post of Hudson’s Bay Co. on Missinaibi River. Built 1744. this post was abandoned in 1790 and New Brunswick House was substituted, built in 1788, at the north end of Brunswick Lake. The latter was operated until about 1900.
Chapleau Ojibway First Nation is an OjibwaFirst Nation located near Chapleau Township, Sudbury District, Ontario, Canada. The First Nation have reserved for themselves the 67 ha Chapleau 61A Indian Reserve, 64.7 ha Chapleau 74 Indian Reserve and the 799.3 ha Chapleau 74A Indian Reserve. In September, 2007, their total registered population 39, of which their on-reserve population was 30 (24 on their main Reserve).
History
The people of Chapleau Ojibwe First Nation live on the only Ojibwa-language reserve in the Chapleau area. Their historical kinship and relationship with the land therefore draws them west to the shores of Lake Superior and south to the shores of Lake Huron, rather than north into Cree territory to the shores of James Bay. As such, much of their traditional territory was ceded to the Crown under the 1850 Robinson Treaties. These treaties cover all land whose waters drain into the north shores of lakes Huron and Superior. Chapleau Ojibwe forefathers were not, however, signatories to the Robinson Treaties, partly because William Benjamin Robinson did not take the time to meet with inland First Nation communities and partly because inland First Nation leaders were reluctant to travel as a result of a cholera outbreak in 1849.
After visiting Chapleau in 1905, the Treaty 9 commissioners reported that it would not be necessary to negotiate a treaty with the Indian people of Chapleau as they belonged to bands residing at Moose Factory, English River and other places already under treaty. Treaty 9 covers all land in the Chapleau area that drains north into James Bay. Since large reserves had already been established in other parts of the province for the bands from which people at Chapleau had immigrated, the commissioners recommended that a small area be set aside for Chapleau Ojibwe so that they could build small houses and cultivate garden plots. The Chapleau Ojibway Reserve was established in 1950.
Governance
The First Nation is led by Chief Anita Stephens and two Councillors: Johanne Wesley and Joshua Memegos. Chapleau Ojibway First Nation is a member of the Wabun Tribal Council, a regional tribal council affiliated with the Nishnawbe Aski Nation.
From the Wiki article – The First Nation have reserved for themselves the 67 ha Chapleau 61A Indian Reserve, 64.7 ha Chapleau 74 Indian Reserve and the 799.3 ha Chapleau 74A Indian Reserve.
What a bizarre spin on the word reserve! Who is the writer kidding? It implies that the Ojibwe were the ones who chose these specific pieces of land. It whitewashes the historical reality of them being forced to accept marginal land without much recourse.
Currently the community, whose land base is outside Chapleau, has several buildings and homes near highway 101/129. Elder Therese Memegos recalled that Chapleau Ojibwe FN was moved three times before it was permanently established at its present location.
Originally the community was based on the shores of the Chapleau River. This first community had a large population, with several homes and buildings including an Anglican and Catholic Church. “There was a fairly large community on the shores of the Chapleau River. It had more people with several family names such as Cheese and Quakegesic, as well as Memegos. Just before I arrived to this area the community had declined. The younger people moved to other communities and only a few older people lived along the river. In time these elders passed away until there was only about nine members in the community,” said Elder Memegos.
Before the decline, the people of Chapleau Ojibwe led a traditional lifestyle. They visited the community only in the summers and lived with their families on traditional trap lines and hunting grounds in the winter. Through her Father-in-Law, Elder Memegos had learned that the Cheese family was a prominent family in the community. She indicated that Simon Cheese was known as the first Chief of the First Nation, but she is not certain if the government at the time recognized him as a community leader. At that time, traditional community leadership was passed down through family ties.
In 1990, Chapleau Ojibwe became one of the founding First Nations of the newly created Wabun Tribal Council. The community accomplished this through the efforts of past leaders including Chief Joanne Nakogee and Chief William Memegos.
————–
From Akwesasne to Wunnumin Lake Booklet
Historical Notes
After visiting Chapleau in 1906, the Treaty No. 9Commissioners reported that it would not be necessary to negotiate a treaty with the Indian people of Chapleau, as they belonged to Bands residing at Moose Factory, English River and other places already under treaty. Since large reserves had already been established in other parts of the province for the Bands from which the people at Chapleau had immigrated, the Commissioners recommended that small areas be set aside for the Chapleau Cree and Ojibway so that they could build small houses and cultivate garden plots.
‘The Chapleau Ojibway reserve was contiguous to the land purchased by the Robinson Treaty Indians, and within the boundaries of the territory described by the James Bay Treaty of 1905 – Treaty No. 9. The reserve was officially established in 1950.
Using Hudson Bay Co. records and treaty pay lists, Schreyer explores the historical connection of the inland Cree trappers between Moose Factory and the headwaters of the Missinaibi River.
The Chapleau Cree have historic ties to Moose Factory and to the waterways of the Moose-Missinaibi River. Their ancestors often traveled this river during the seasonal cycle of the fur trade, the rivers and lakes were central to their way of life. Sometime before 1885, a Hudson’s Bay Company (HBC) trading post was established at Chapleau on what is now called Mulligan’s Bay.1
The paper changed my understanding of the upper Missinaibi as Ojibwe space. Schreyer includes this HBCo entry to establish the Cree connection –
The Indians Anishanaubaie, Mecowatch, Cunnaeshish, Neecousim arrived with their winter hunts consisting of 329 >/2 M B chiefly beaver The reason they assign for killing these animals is that Intruders had come from Lake Superior quarter making a havoc through their Lands and they could not see any reason why they should nurse them for otlhers to kill and carry them to Michippicotten: or perhaps to Private Traders o’r Americans at Sault St. Marys. (HBCA B.135/a/136, fo.35b-36, underlining in original text
Chapleau Cree First Nation (Cree: ᔕᑊᓗ ᐃᓂᓂᐗᐠ, šaplo ininiwak) is a Mushkegowuk CreeFirst Nationlocated by Chapleau Township, Sudbury District, Ontario, Canada. The First Nation have reserved for themselves the 108.1 hectares (267 acres) Chapleau 75 Indian Reserve and the 1,016.8 hectares (2,513 acres) Chapleau Cree Fox Lake Indian Reserve. As of 2019, their on-reserve population was 57[1] compared to 2011 with 79 and 2006 with 92.[2]
The flag of the tribe bears the text in Cree: “ᔓᑊᓗ ᐠᕆ ᒪᑫᔑᐤ ᓴᑲᐃᑲᐣ” (“šaplo kri makishiw sakahikan”), which refers to its main reserve, Chapleau Cree Fox Lake.
Whose idea was it to put a positive spin on the Ontario Government setting aside the land where their reserve would be located? In the Wikipedia entry above we read that the First Nation have reserved for themselves…
St.John’s Residential School in Chapleau – 1907-1948
Screenshot
information about the Residential School In Chapleau from the Truth and Reconciliation website – click here.
Wikipedia also has an entry on the school – see here.
———————-
Missanabie Cree First Nation:
Population
1905 90 at the time of Treaty No. 9 talks
2018 476
2024 (October) 642… registered of which 637 were off-reserve (source)
band office in downtown Sault Sainte Marie
96 members lived at Missanabie in 1906 (treaty No. 9) but they were not considered a separate band, but rather included in the Moose Cree of James Bay.
a population of 476 in 2018, three of whom live full-time in the Missanabie area where it has a fishing camp – Island View Camp. see sat images below for the location
Missanabie Area with Island View Fish Camp/Lodge
Island View Camp owned by the Missanabii Cree First Nation
In 1906, under the terms of Treaty 9, the Crown promised to set apart reserves for each band based on one square mile of reserve land per family of five, or 128 acres per person. From 1906 to 2018, there never have been any lands set apart for the use and benefit of the Missanabie Cree people, and as a result, the First Nation suffered and continues to suffer significant damages. With no land base for over 100 years, and their traditional livelihood of hunting and fishing undermined with the creation of the Chapleau Crown Game Preserve, people began to leave the Missanabie area in search of economic opportunities to support their families. Areas of settlement were spread across Canada and the Missanabie Cree people have been living without their own land base in rural areas such as Sault Ste. Marie, Wawa, Thunder Bay, Toronto, Sudbury, and London, Ontario. Many went as far as the East and West Coast making Missanabie Cree First Nation a unique Band.
The Missanabie Cree First Nation filed a claim with Canada on the basis that they have an outstanding entitlement to land under the terms of Treaty Nine, and that both Ontario and Canada, who were signatories to the Treaty, have breached their treaty obligations by failing to set aside land for the Missanabie Cree. Canada accepted the TLE claim for negotiation under the Specific Claims policy.
While discussions remain ongoing with the Ontario government, in 2011, Missanabie Cree First Nation successfully concluded an agreement with the Government of Ontario for a land transfer of 15 square miles of Crown land in the Missanabie area and has successfully had this land designated as a reserve in 2018 under the Additions to Reserve Policy.
The Missanabie Cree were also successful in negotiating with the Government of Canada for loss of use compensation under their Treaty Land Entitlement claim which was recorded the largest per capita settlement in the history of Canada. The Government of Canada has also included 5 additional square miles, where its location has yet to be determined.
Missanabie is part of the James Bay Treaty (Treaty #9), is a member of the Mushkegowuk Council and a political-territorial affiliate of the Nishnawbe Aski Nation.
————-
Wikipedia Entry
Missanabie Cree First Nation (Cree: masinâpôy ininiwak, ᒪᓯᓈᐴᔾ ᐃᓂᓂᐗᐠ) is a “Treaty 9” Nation. The nation is named after Missinaibi River and Lake, around which the traditional territory of the nation is located. The name “Missanabie” means “Pictured Water”, referring to pictographs found on rock faces along Missinaibi River.
The tribe’s mother tongue is Swampy Cree language, also referred to as the “n-dialect” of the Cree language.
Historical Timeline
Evidence and records suggest that by as early as the 1570s, members of the Missanabie Cree had settled in the areas surrounding present day Missinaibi Lake, Dog Lake and Wabatongushi Lake. According to Elders’ testimony and anthropological evidence, the Missanabie Cree had utilized these lands from time immemorial to hunt, fish and trap for food, for ceremonial purposes and to provide for the cultural, spiritual and economic well-being of their people.
In the 1660s Father Allouez confirmed that the Cree people regularly traveled between Lake Superior and James Bay.[2]
In the 1730s Cree speaking people with summer encampments at Bawating (Sault Ste. Marie) gathered to fish, trade and do ceremonies.[3]
In 1904 the Indian Affairs Department recognized Missanabie Cree as an Indian band to be ‘treated with’ by Treaty Commissioners for the purpose of adhesions to Treaty 9 scheduled for 1905.
In 1905 Canada and Ontario enter into Treaty 9 with various Cree and Ojibwa groups to obtain surrender of 130,000 square miles (340,000 km2) of land.
In 1906 the Crown did not sign formal adhesions to Treaty 9 with the Missanabie Cree First Nation. The Crown did not set apart any reserve for 98 members of the First Nation living at Missanabie.
In 1925 the Chapleau Crown Preserve was created which abrogated Missanabie Cree’s treaty rights to hunt and fish for subsistence living.
In 1929 Missanabie Cree’s request for land was turned down by DIAND.
In 1951 Missanabie Cree were formally recognized by DIAND as an Indian band.
In 1992, under the Indian Act, the first Chief and Council are elected by the Missanabie Cree First Nation.
In 1993 Missanabie Cree First Nation submitted specific claim for outstanding Treaty Land Entitlement (TLE).
In 1996 Missanabie Cree First Nation received a letter from Canada accepting the claim, with the condition that Ontario, also a signatory to Treaty 9, be at the table. Ontario began a legal review of the claim.
In 1998 Missanabie Cree and Canada begin preliminary meetings in April.
In 1999 jointly funded studies began. These included genealogical, traditional use, site selections, and loss of use. Legal review by Ontario was completed in June. A letter from Canada stated that negotiations could begin, if Ontario came to the table.
In 2000 the Ontario Native Affairs Secretariat sent a letter indicating Ontario would be presenting its position.
In 2001 preliminary discussions of the negotiation process began between First Nation and both levels of government. The development of a work plan and negotiation framework continued.
In 2006 Ontario agreed to a land transfer of 15 square miles (39 km2) with conditions attached. The transferred land was to be credited towards the eventual settlement of the land claim (to be determined through legal action). Land area was selected. Discussions with Canada continued over additions to Reserve process and loss of use compensation.
In 2008 Missanabie turned down an offer of $15 million from Canada.
In 2011, on August 17, The Missanabie Cree First Nation and the Government of Ontario signed an agreement to provide the Nation with 15 square miles (39 km2) of land as an initial allotment of a total 70 square miles (180 km2) to which they are entitled under Treaty 9.[4]
—————-
Not everyone was happy with the Land Transfer to Missanabie F.N. -
201680 on-reserve of which 10 are not “registered Indian” source 10 of whom speak Ojibwe
2006 55 on reserve of which 10 are not “registered Indian” and none of whom speak Ojibwe
Screenshot
This F.N. includes the following reserves –
Gros Cap 49
Gros Cap 49A
Chapleau 61
Missanabie 62
Gros Cap F.N. – I.R.49 and 49A
What is the story behind the loss (if that is what it is) of the shoreline part of the reserve? And just what is 49A doing in the middle of non-reserve land? The most useful land was either sold off or not part of the original reserve. The Gros Cap Ojibwe have little access to Lake Superior from the looks of the map. They get the exposed shoreline west of the spit that creates a nice harbour on the east side!
And what’s with Hiawatha Drive on the bottom left of the map below? Who picked that name? Hiawathawas a legendary Five Nations Iroquois – ie. Haudenosaunee – hero whose name was mistakenly chosen by Longfellow for his 1850s epic poem loosely based on Ojibwe tales and legends. He thought Nanabush and Hiawatha were the same person!
The Ojibwe defended themselves from Five Nations Iroquois attacks in the second half of the 17th C before soundly defeating them by 1700. See The Iroquois Wars for some historical background. To the Ojibwe, they were the Nadoway, “the Big Snake”.
Michipicoten 49A-Gros Cap 49A
———
Chapleau 61 Reserve – a Michipicoten F.N. reserve
Do any Michipicoten Ojibwe have permanent residence on the Chapleau or Missinaibi reserves?
Michipicoten F.N.’s chapleau reserve IR#61
No buildings are visible in the satellite image below. The location shows the need for access to an urban center with all that it has to offer – possible employment, shopping, education, and health care. Not clear is what purpose this land serves the Gros Cap Ojibwe living close to Wawa and up Hwy 17 from the much larger and vibrant center of Sault Ste. Marie.
The label should read Chapleau 61.
————
Missanabie 62 – a Michipicoten F.N. reserve
Missanabie 62 – a Michipicoten F.N. reserve
The Satellite image below shows four properties on the shoreline of the Missanabie reserve. The camps may used on a seasonal basis for fishing or fall-time hunting by residents of the Gros Cap reserve near Wawa. The Gros Cap Ojibwe likely objected to the land settlement given to the Missinaibi Cree F.N.
the satellite view using Apple Maps
For forty years I was under the impression that Missanabie 62 was a reserve with people on it. Every time we passed through I wondered how come we never saw or met any of them.
—————-
Michpicoton First Nation Schedule of Federal Government Funding For the year ended March 31, 2013
annual money received from the Federal government and annual expenditures: available for the years 2001 to 2013 after which no data is provided – see here for the source.
Screenshot
Is the money only for the 62 on-reserve people? How or where do the other 1350 off-reserve Gros Cap people access the funding? Do the political leaders (the chief and six council members) live on the reserve or off-reserve? Are their salaries included in one of the categories above?
The Ojibway people living on the north shore of Lake Superior (ancestors of Michipicoten First Nation people) subsisted by hunting, fishing and gathering.
As the fur trade moved into the Lake Superior area, they expanded their economic activities to include hunting and trapping for trade purposes. By the early 19th century, Ojibway hunting ranges had evolved into well-defined trapping territories.
Fort Michipicoten was at one time the site of a French post, said to have been established around 1700. The old post was taken over by the Hudson’s Bay Company in 1821 and became for many years the principal trading post on the north shore of Lake Superior. Representatives of Michipicoten signed the Robinson-Superior Treaty in 1850, and a reserve was set aside for the Band out of the land ceded. The Gros Cap reserve was first surveyed in 1853. On April 10, 1855 Michipicoten entered into a treaty with the government to cede a one square mile portion of its reserve land.
French fort on Michipicoten Bay, lake Superior, at the mouth of Magpie River, on the south side. It was one of the old French forts said to have been built long before 1750 (possibly about 1700) and spoken of as an old fort in 1765. It was one of the chief French forts on Lake Superior and is mentioned by Bougainville in his list of 1757 as corresponding to Fort “Kamanistigwia” at the northwest limit of Lake Superior. It commanded the route by way of Missinaibi Lake and river to Moose River and James Bay. During the French regime, the posts on the north shore of Lake Superior constituted the main source of fur supply from the west and northwest. In 1739 Beauharnois granted to Marin and Douville a congé de traite at the post of Michipicoten.
After the cession of Canada, the North West Company took over this fort. A. Henry wintered there in 1767. At the date of union1821, both the North West Co. and the Hudson’s Bay Co. operated posts at Michipicoten. In 1821 the Hudson’s Bay Co. took over the old fort and maintained it until about 1900 when it was closed.
For many years this factory was the principal Hudson’s Bay Co. post on the north shore of Lake Superior, from which a number of smaller posts in the interior were supplied. The route to James Bay occupied about 16 days. It was a superior post with many large buildings situated on the south side of the river about half a mile from the mouth. Its location is shown on the Arrowsmith map of 1796 and 1832 (No. 101).
See the Maps and Info About The Routesection in the previous post for full coverage. The following 1:50000 topographic maps cover the Greenbush to Kenoji route. The links take you to the Canadian Government’s Natural Resources Canada server.
Campsite: Greenbush north shore up from the dock, inland about 30 meters, not a great site
See NRC’s Toporama (here) for its current interactive coloured mapping and print what you need.
This trip report continues from where The Savant River from Jutten to East Pashkokogan ended. East Pashkokogan Lake marks the end of the Savant River system; it is also where we turned east. We had started the day in McCrae Lake; we would end the day halfway down Greenbush.
Day 8 – East Pashkokogan To Greenbush CS
As we paddled into East Pashkokogan Lake and into the southeast bay with its portage trail to Greenbush, we remarked yet again on the low water levels. Among other things, it made the start of the portage seem much closer to the end of the bay than it appears on maps. The sandy bottom meant we had a bit of mud to deal with before reaching the grass and the start of the trail. The oil drum is the “Welcome” sign! We stood it up again to make it more visible.
We saw evidence of mining exploration in the area over the past 60 years. [This page of the Ontario Geological Survey’s Mineral Inventory has details.] The 2.5-meter-wide trail to Greenbush from the north end of East Pashkokogan’s SE Bay was one indication. That 40-year-old rusted oil drum at the beginning of the trail was another!
the East Pash side of the P into Greenbush
The portage is visible on satellite images!
It is an Australian company, Midas Minerals, which currently owns the property, which it acquired in early 2023. Describing itself as a “precious metals and critical minerals exploration company”, it has a web page dedicated to The Greenbush Lithium Project, which covers a 102 sq. km. area. Of the project, the Midas managing director Mark Calderwood notes –
“Planned outcrop sampling should determine vectoring of mineralogy within these pegmatite swarms to prioritise new lithium-bearing targets. The Greenbush Project represents the first move out of Western Australia for the Company as it applies its extensive lithium expertise to identify additional projects.” [source]
The 2.5-meter-wide trail was in excellent shape with very little deadfall to deal with. The image above is of the start of the trail with the alders hiding the trail behind. In less than an hour we were chillin’ on the far side. Some planks line the last 15 meters to Greenbush.
Zooming in on the above satellite image shows a clearing on the Greenbush side with a couple of light-coloured rectangular shapes. I was expecting to see a structure – a 10’x15′ cabin or a Woods canvas tent, and perhaps a boat shell. I figured it would have served as a base for the mining exploration crew working in the area.
Well, there was no structure to be seen in September 2023! However, what looks like the frame for the floor remains. A flipped-over boat shell is parked on top of it.
With the canoe reloaded on the Greenbush side, we hauled out the Nalgene bottle and reached into our pockets for the zip-loc bag with our individual daily servings of the ultra-gorp that Max had created for the trip.
Greenbush Lake is the headwaters lake of the Misehkow River system. Back in 2013, we had bush-planed to Rockcliff Lake and paddled down the river to where it merges with the Albany River. The five-day trip on the river remains one of our Wabakimi favourites.
Now we’d finally get to paddle its very top, beginning with the 9.5 km. from our put-in to a campsite our map indicated on the north shore about halfway down the lake. It took us two hours to get there; we pulled up to a rough dock around 5 p.m. A post-trip look at a satellite view of Greenbush actually showed the dock! The campsite – probably used by locals during moose hunting season – is about 30 meters into the bush from the shore and somewhat sunless and without a view.
It was definitely one of those “it’ll do” sites that you sometimes accept at the end of a long day. The next morning – an hour into the day – we’d paddle by and check out a much nicer site! See the pic below.
————–
Day 9: From Greenbush Lake To Metig Lake
Date: September 8, 2023
Distance: 18.4 km
Time: 9:50 a.m. to 4:30 p.m.
Rapids: Portages: two possible portages – P20 from Greenbush to Little Metig and P21 from Little Metig to Metig. Unable to spot the portages, we lined/ran both these stretches of the Misehkow River.
Weather: sunny, cloudy
Campsite: Metig Lake south shore point, possible for 2-3 x 4-person tents
See NRC’s Toporama (here) for its current interactive coloured mapping and print what you need.
Day 09 Greenbush to Metig
A late start to the day – 9:40! – saw us paddle northeast for about 4 kilometers before turning to the east and southeast for the Greenbush outlet and its farewell set of rapids. On the way, we checked out the northernmost CS on the map above. Its lake view made it much more inviting than the one we had used the night before. A couple of plywood tables, tin cans, and a toilet seat a few meters in the bush are signs that locals make seasonal use of the spot for fishing/hunting.
We checked out one more marked campsite before leaving Greenbush. It was the westerly one of the two last sites on the lake. It has a fire pit and would make a decent spot to stop for the night.
Shortly before noon, we were at the top of the rapids out of Greenbush. After an unsuccessful search for the portage trail on river right – see the Paddle Planner map below for its supposed location – we did what we had done with almost every set of rapids so far on this trip. We headed down the river. The map needs to be revised to be an adequate guide to what is involved.
It has the portage bypassing the easiest section of the rapids;
it does not note the complications of the bottom half of the rapids.
The Friends of Wabakimi portage info has been the source of some confusion. Here is a comment by Jon Ontario from the Trip Reports Forum. He did the reverse of what we did – he came up the river from Little Metig Lake. Here is what he found –
Also didn’t find the portage from Little Metig to Greenbush and waded the river which I wouldn’t recommend. Portage should start where the river comes into Little Metig but I thought it was farther upriver based on the FOW map. [source]
If this section of the river should have a portage anywhere it is around the bottom stretch where we spent most of an hour.
Paddle Planner’s Friends of Wabakimi-sourced P info
Here is a satellite image of the rapids. I’ve annotated it with info from our GPX track to provide some context for what we faced. More water in June than the mid-September water levels we had may change the narrative!
It took us an hour to get down the Misehkow’s first set of rapids to Little Metig Lake. Unfortunately, the image below, taken from the very top, is the only one we took as we made our way down.
The image I wish one of us would have taken is the one where we each put on a 20-kg. canoe pack before we continued wading our way down the river, pulling and pushing our reluctant canoe along. Having the canoe packs on our backs rather than in the canoe did make a difference; it was also a first for us in all our years of canoe tripping!
the top of the rapids out of Greenbush
So after quite the workout, there we were in Little Metig Lake. Metig is one possible English spelling of the Ojibwe word for ‘wood’ or ‘tree’.
On a map produced by an Ontario government survey team after its 1900 visit to the area, the name Wood Lake appears. Not yet mapped is Little Wood (i.e. Little Metig Lake). (See here for the entire map.)
from Green Bush Lake to Wood Lake – 1901 Ontario Survey team map
We headed for a campsite indicated on the map below just above the start of two portages:
a long one circumventing the entire one-kilometer stretch of river, and
a shorter one that oddly ends up not below but above a set of rapids.
We spent a half-hour looking for the portage but finally gave up. It was about 2:30 and lunch was definitely in order! Despite what we had just dealt with getting into Little Metig, we figured we had little choice but to accept more of the same low water/boulder garden drama in the stretch to Metig Lake. It is about 1 km from the campsite around the corner to the open water of Metig Lake. And then we’d be done.
local garbage dump at Little Metig CS
The CS is located in a spot popular with locals – likely from Osnaburgh First Nation – who come here seasonally for fishing or hunting. On the 1900 map above, the spot is labelled ‘Fish Trap,’ so they have clearly been coming here for a few generations. The garbage dump on the edge of the site was by far the worst we saw on this two-week trip. Maybe it will appear in some future archaeologist’s report as a midden.
We pushed off from our lunch spot and headed downriver, expecting the worst. We were down at the bottom in fifteen minutes!
Given our experience, the purpose of a 600+ meter portage seems questionable. Even if water levels were higher and the current swifter, the three spots we lined could still be dealt with the same way, maybe even more easily with more water. Most of those 600 meters are made up of the easily paddled mid-section. Turning again to Jon Ontario’s experience, this time going upriver from Metig to Little Metig, here is what he found –
Great route, very enjoyable even in low water. Cleared trails as I went. Most were pretty good except the one between Little Metig and Metig Lake. The Little Metig end was a mess and after looking at the river section it avoids, I would definitely wade the river…it looked quite easy. [source]
It sounds like he was able to find the 600+m portage trail up to Little Metig. He notes that the trail was not one of the better ones! He also refers to what I assume is the garbage dump at the campsite on the Little Metig end and notes that, in retrospect, he would have waded the river instead of doing the portage, since the river “looked quite easy”. We’d have to agree with his assessment, especially for those paddlers going downriver!
Welcome to Wabakimi Provincial Park!
From Little Metig Lake and the Crown Land to the west of Wabakimi Provincial Park, we were now sitting on Metig Lake and in the Park and would be for the duration of our trip over to Burntrock and down the Palisade. See below for info on getting Park back country permits.
Not too long after crossing the western half of Metig Lake, we pulled up to a campsite on the southernmost point. We had covered about 18 km. and dealt with two sets of rapids – not a bad day’s work. Off came the L L Bean boots and wet socks; on came the dry stuff!
Metig Lake CS locations
Metig Lake CS
————–
Back Country Camping Permits
Ontario Parks is responsible for Ontario’s provincial parks. See here for the 2024 Wabakimi back country fee schedules – one for non-residents of Ontario and another for residents.
Non-Residents:
Residents of Ontario:
When it comes to Wabakimi, you are not reserving a campsite. Instead, you are registering for a specific number of nights you will be camping in the park. It took a phone call to the Park Super for me to figure out how to make an online booking for Wabakimi since it does not appear in the list of parks under Backcountry.
To register online, go to the Ontario Parks website here. At the top of the page, clicking on Reservations will open the window to various options.
Choose “Reserve Online”; the Ontario Parks Reservations page will open, showing some options.
Choose the one at the far right of the page – Backcountry Registration – clicking on it will open a list of parks, including Wabakimi. Enter the required info, and you are on your way! Note: You will have to wait until 2 weeks before your arrival to register.
You can also arrange your permit by phone. The toll-free number is 1-888-668-7275.
The current Park superintendent is Shannon Lawr. He can be reached at 807-475-1634.
————–
Day 10: From Metig Lake To Muskiga Lake
Date: September 9, 2023
Distance: 13 km
Time: 8:15 – 6:20 p.m. ( 10h! 4.5h on portages)
Portages: 5 portages totalling about 2.7 km.
1) 325 m Misehkow P on river left
2) 255 m / 55 min into Davies L;
3) 850 m 1h30m into Timon L;
4) 250 m / 35 min No Name Lake
5) 1000 m / 1h37m (includes resting time) into Muskiga L
Weather: overcast, cloudy with sunny periods
Campsite: Muskiga Lake
See NRC’s Toporama (here) for its current interactive coloured mapping and print what you need.
We had so far been spectacularly unsuccessful at finding any portages and had stuck to the river, lining, bumping, and floating our way down as gracefully as possible. We knew that this approach would not work on the day we had before us. Of the 5 portages to be done 3 go from lake to lake overland with no river in sight! On the plus side, we were now in Wabakimi Provincial Park. We figured it would mean that the portages would not only exist but be in better shape. The ones from Davies to Muskiga – portages of 800, 243, and 974 meters – were the ones we were most hoping would have seen some recent attention.
———–
Last winter in planning the trip, I sent an email to Bruce Hyer of Wabakimi Outfitters to see if he had a contact in the Savant Lake area who could do a shuttle for us. Unfortunately, he didn’t. And while we did not take him up on his offer of trip notes for our route for a minimum fee of $275 (more for complicated routes), we did note his comment that back in 2020 the portages from Rockcliff to Burntrock had been redone. That was certainly a welcome bit of news!
———–
We set off from our tent spot around 9 a.m. An hour later, we were approaching our 1st P of the day. Shallow water slowed things down, but we found the trail head on the left-hand side of a much narrower stretch of the Misehkow River. We may have strung a short length of prospector’s tape on a branch to make it a bit more obvious
Deadfall in the water made the take-out a bit awkward but we were happy to see some evidence of recent chainsaw cuts.
P22 was walkable, and 40 minutes later, we were on the other side, sitting on the banks of the Misehkow. We figured if the crew had gotten to this one on the very edge of the Park, they would have done the ones leading up to it!
Off we went, paddling a short stretch up the Misehkow to access the next portage trail (P23 in our route count). It starts just a bit up the creek coming from Davies into the Misehkow and it took a few minutes to find.
P23 – into Davies Lake from the Misehkow
looking up the stream coming from Davies Lake
We walked up the stream shown in the image above and found the trailhead on the right. The image below, taken 15 minutes later, looks down Davies Creek to where we had come from. Our portage into Davies Lake from the Misehkow came out to about 210 meters – the FOW count is 175m. I guess it all depends on what you take as the starting point, which may vary depending on water levels.
Now we were on Davies Lake, and it was noon. We paddled over to the south side of Davies and found the start of the next trail, the 800-meter portage into Timon Lake. We were looking at one of the day’s two long hauls, our P24. It is marked on the FOW maps as an 800-meter carry. As before, we saw some reassuring signs of recent trail work.
Before pushing on, we stopped for lunch. I got the water boiling and prepped all the food while Max got a head start on the portage by hauling one of the canoe packs and a duffel halfway to Timon.
———–
What we do not have much of for this day are photos and a video or two. They would have clearly conveyed the current state of the trails. This was one of those days when we slipped into “gotta git ‘er dun” mode and forgot that as well as doing, showing what we were doing was one of our objectives!
———–
With lunch over around 1:30, it was time for more hauling. By 2:30, we would be on the Timon side of the portage.
Our GPX track shows a distance of 916 meters for this portage. Knowing how precise and obsessive the Wabakimi Project’s Phil Cotton was about trail measurements, it seems our number is off by 116 meters! Phil had the measurements done by tape, not trusting the GPS to provide the 100% correct number! Maybe lower water levels meant different takeout and put-in spots.
Still to go were two portages, including the single worst one of the entire trip! A short paddle down to the east shore of Timon, and we found the trail, which, 250 meters later, had us on the edge of a shallow and small nameless lake. We also found an empty gas can and a paddle, probably left by the Park trail crew.
We spent about an hour getting there from Timon.
The final stretch of trail to No-Name Lake from Tmon Lake
A quick paddle along the north shore of the nameless lake and we were at the start of our final Portage of the day.
———–
From One Watershed To Another
The Misehkow
On leaving Davies, Timon, and the nameless lake and heading east to Muskiga, we were also crossing a height of land. The water from the three lakes just mentioned flows into the Misehkow, which then flows northeast for 100 kilometres to merge with the Albany.
The Palisade
Meanwhile, our portage took us into the Palisade River’s watershed. Muskiga Lake empties into Burntrock Lake, and the Palisade River flows into the Ogoki River at Kenoji Lake. Thanks to the Waboose Dam at the east end of the Ogoki Reservoir, created in the early 1940s, 98% of the water from this upper Ogoki River flows south to Lake Nipigon and Lake Superior via the Little Jackfish River.
The Cree word for “swamp” is muskek, and that would describe the wetlands we crossed on our way to aptly-named Muskiga Lake from Davies Lake. The portage trail was often no more than a one-foot wide rut in the ground, but at least it was there and leading us to the eventual put-in on Muskiga Lake.
We had a few reasons for dividing this final portage into three sets of 300-or-so-meter carries, with breaks at each end and further punctuated with short breaks at each halfway point!
the 1 km. length of the trail,
our increasing fatigue level,
a lack of drinking water, and
my still-iffy right leg from a tumble a few days before.
It took us 2 1/4 hours to do. Unable to get the canoe up on my own, we came up with a system that had me underneath the yoke without straining my lower leg. The portages themselves were not a problem.
———–
H.B. Proudfoot And the Route From Kenoji To Osnaburgh House
As for that rut through the muskeg, it has been walked for at least a couple of hundred years. Back in 1900, a Survey Team was commissioned by the Ontario Government to catalogue the resources – mineral, lumber, agricultural, hydroelectric – of Northern Ontario.
Party #7’s leader was H.B. Proudfoot, whose team spent the summer rambling around the north end of Lake Nipigon. Among other routes, his team essentially did our trip from Greenbush to Kenoji in reverse. It was one of their local Anishinaabe – i.e. either Ojibwe or Cree – guides who showed him the way to Osnaburgh House and the Hudson Bay Co. post there.
From Wahbahkimmug (i.e. Wabakimi) Lake we travelled to Osnaburg House. The portage route thither runs from a long bay at the northeast of Wahbahkimmug Lake (referring to the Ogoki Outlet Bay), follows Pike River (i.e. the Ogoki River from Wabakimi Lake to Kenoji Lake) , running out of the above lake. through Pike Lake (Pike is the English translation of Kenoji), up the Palisade River and then by a series of lakes and rivers to the Albany River and Lake St. Joseph. There are twenty- three portages, all of them well marked and good, with the exception of a few muskeg portages, which were very wet and hard to walk over. Between Pike Lake and these muskeg portages the scenery is grand, granite cliffe from fifty to one hundred feet high. (source ,p186)
Proudfoot and his team also produced a map of the area they surveyed. Included is his route from Pike Lake up to Osnaburgh House on the Albany River system. Missing from the map- but used in his report – is the name he came up with to describe the river they ascended from Pike Lake to Burnt Rock Island Lake.
A Brief Tangent!
TheThunder Bay, Nipigon, and St. Joe Railway
The jagged line running up to the Albany River was the proposed route of the never-built Thunder Bay, Nipigon, and St. Joe Railway. This promotional brochure, published around 1899, a year before the Proudfoot crew had completed their survey, was based on information gathered from the Geological Survey of Canada’s fieldwork by Robert Bell and his crew in the early 1870s.
It promised would-be settlers with farms! homes! farming lands, grazing lands, dairy lands, sheep lands, spruce lands, gold, silver, iron, copper, limestone and marble. (See here for the brochure.) This was perhaps Ontario’s attempt to siphon off some of the tens of thousands of settlers heading for the Prairies!
It includes this map of the route –
———–
Now we were walking the last of those muskeg portages! Luckily for us, they were dry and fairly easy to walk on. At 6 p.m., we were done. Fifteen minutes later, we pulled up below the only Muskiga Lake campsite indicated on our map –
Muskiga Lake CS
————–
Day 11: From Muskiga Lake To Burntrock Lake
Date: September 10 2023
Distance: 7.3 km
Time: 9:20 – 12:45 (3h 25m)
Rapids: 2- lined/ran + Portages: 1 x 160 m (20 min) then another 40 m (30 min)
Weather: overcast
Campsite: up the hill; usual 1 good 4-person spot, maybe 2; room for more 1-2 person tents
See NRC’s Toporama (here) for its current interactive coloured mapping and print what you need.
The bush behind our Muskiga campsite – a lot of lichen for those woodland caribou
We were expecting an easier day than our five-portage haul of the day before. We took another look at our map, which included the Paddle Planner/Wabakimi Project Portage info. While there were four of them, they were all relatively short and bunched together. We figured we’d be sitting in Burntrock by noon.
While we did get the timing right, the reality we saw on the river did not always match what the map showed. As shown by the actual portages we did (the red lines on the map), a couple of them didn’t really match up between our take-outs and put-ins. Water levels may have been different; we may have had to take out in a different spot.
—————
The first two mini-challenges of the day (our P27 and P28) took us about 45 minutes to get past.
As we approached the first one of the day, we were faced with a long stretch of boulderly river bed with not enough water to float the canoe.
The highlighted section of our GPX track shows the stretch where we ended up hauling our canoe and gear to get to the other side and open water.
P27 – the first portage out of Muskiga Lake
Then it was an easy paddle down a floatable section of Muskiga Creek to the 2nd of the mandatory portages (our P28). 20 minutes later, we were at the put-in on the downside of P28. On both portages, we had seen evidence of chainsaw cuts on deadfall crossing the trail. We did wonder how long ago the crew had passed through, given the alders on the side of the trail, which needed a haircut.
Neither the NRC topo nor the Garmin Topo maps make it clear, but there is a 750-meter stretch of the Creek you can paddle once you put in. It takes you directly to the third portage into Burntrock from Muskiga.
The red lines on the satellite image below show the route we portaged to reach the end of Muskiga Creek and enter Burntrock Lake.
our P 29 and P30 into Burntrock Lake
P30!
P29
As you can see, the Garmin Topo Canada map is a bit off on P30! The Portage involves an awkward take-out at the edge of the beaver dam shown in the image below. Then it is up and over a rock dome to the other side and an equally awkward put-in. We got it done fairly quickly and then took some time to take in the view.
We also looked for an alternative 177-meter portage that matched the one shown on the Paddle Planner map. The thought was that maybe it was meant to avoid the rather steep take-out and put-in of the 35-meter one we had just done. We did not find anything.
our canoe sitting in Burntrock Lake just around the corner from the beaver dam
—————
The Palisade River Headwaters
Whatever the case with that Paddle Planner portage info, we were on Burntrock Lake and only had some flat water paddling to deal with. We were also officially on the Palisade River now. Burntrock is the largest of the lakes in the Palisade River system. However, the Palisade’s actual headwaters lake (another of the countless no-name lakes of the Canadian Shield!) lies a few more kilometres to the west.
Palisade River headwaters – see here for a view of the entire river
—————
Evidence of Wildfires Past and Present
Coming into Burntrock Lake also brought back memories of a 2011 canoe trip route we had to alter in a hurry because of a massive wildfire which had just started on the east side of the lake. The fire history map shows the extent of that 2011 burn. It also shows that the area has seen many significant fires in the past 30 years, perhaps none as big as the 2023 fire (263 sq. miles or 681 sq. km), which had us consider cancelling our trip until the Park reopened the Burntrock area again in mid-August.
For the remainder of our canoe trip, we would paddle past long stretches altered by one wildfire or another. Along with the still-standing charred trunks of some skinny black spruce, we would also see new growth, signalling the start of a new boreal forest cycle. However, with climate change, the new normal will see many more fires in the north. Tinder-dry deadwood on the forest floor, more lightning strikes, heat domes, wind storms ….the 2023 fires in Alberta, Saskatchewan, and northern Quebec were not one-off events.
fire history overview of the Wabakimi area – map source
burnt rock, burnt trees, and new growth on Burntrock Lake
—————
The map below indicates two Burntrock Lake CS locations, a surprisingly low number for a lake I always figured was a popular trip destination. While we never got to it in 2011 due to that fire, it was nice to finally have made it! Five kilometres later – about an hour’s paddle – from our put-in by the beaver dam, we came to the site located on the south side of the lake, not far from the Palisade outlet. It was time for lunch – and we were already done for the day!
————–
Day 12: From Burntrock Lake Down The Palisade River To The Big Bend
Date: September 11, 2023
Distance: 16.5 km
Time: 9:30 a.m. – 5:45 p.m.
Rapids/Portages:
1) P31-P32 290 m (30 min);
2)P33 – lined this one
3) P34 120 m (40 min); very scenic spot
4) P35 290 m (30 min + lunch/rain 1.5 hr);
5) P36 280 m (40 min).
Weather: Overcast, cloudy and sunny plus a light shower at lunchtime
Campsite: lots of room for 1/2 person tents, some 4’s, but not hammock-friendly
See NRC’s Toporama (here) for its current interactive coloured mapping and print what you need.
Day 12 – From Burntrock to the Palisade’s Big Bend
With its elevated view and room for our 4-person tent, our Day 11 Burntrock campsite scores an A. Now it was time to move on. The day’s moderate goal – a tent spot on the Palisade’s Big Bend where it curves south.
We had five potential portages to deal with on our way there and ended up doing all of them except the one labelled P33 in our numbering scheme. We would see increasing evidence of past wildfires as we made our way, beginning with the fire from 2011.
Burntrock Lake – towards the P out of the lake
—————-
The First Portage(s) Out of Burntrock…290 meters
We paddled up to the top of the rapids and the first possible portage of the day, hoping we would be able to line our way down. Low water levels and too many rocks to coax our canoe downriver nixed that idea. Figuring the next set of rapids would not be much different, we turned around and went into the small bay and the trailhead of a carry that bypassed both of the portages. At 290 meters, it was a bit longer than the sum of the other two, but it meant we’d only have to empty and load the canoe once.
—————-
P33 – Less than two kilometres down from our put-in, we came up to another constriction in the river (see the very middle of the sat image below) and another choice to make. This one was easy – we started off on river left and lined our way down. More water would have been nice, but we were down in a couple of minutes.
P33 – lined
It looked like there was the beginnings of a beaver dam at the top.
looking down the rapids at P33 – an easy lining job
—————-
Portage #2 of the Day (our P34) ….100 meters
Another kilometre and a ninety-degree turn to the east, and we were at the take-out for the next bit of hauling – a 120-meter carry which bypasses a set of ledge falls and an impassible stretch of river near the bottom.
P34 bypasses these ledge falls just to the south of the very top of the portage. The water then flows into a mini-lake before squeezing out through some big boulders at the bottom. This was one of those instances when the Federal Government’s topo map did not correspond to the reality on the ground.
We shifted into tourist mode and walked across the rock outcrop to check out the mini-lake and the surroundings. We agreed that if we had more time, this would make an excellent spot to set up camp on a nice sunny day. See the satellite image above for the rock outcrop on the south side of the mini-lake where a tent would fit in nicely! Very scenic, with plenty of space to ramble and point the camera at eye-catching views…
a panorama of the mini-lake in the middle of P34
one of the many scenic sections of the Palisade below Burntrock
Max standing on the big boulders near the bottom of what P34 bypasses
—————-
Portage #3 of the Day (Our P35) ….140 meters
We pushed off around 12:10 and decided to knock off one more potential portage or, if there was enough water, a lining job before we stopped for lunch. It was about 4 kilometres down from our put-in, and we were there by 1:00.
We found a beaver dam at the top, and then what looked like enough water to float down beyond, so we went for it. Within three minutes, we were at the take-out spot indicated by the broken white line. From there, it was 140 meters to the put-in.
P35 – portage options
The NRC topo map view of the portage shows the river too far to the left. Importing the KML file into Google Earth yields an accurate satellite view of our route.
The Paddle Planner data indicates two portages – one around the top and a second from the wider puddle section of the river to the end.
I got the canoe, while Max packed a canoe and a duffel. It had started raining during our 140-m traverse, so while I stayed at the put-in, set up a tarp and got the lunch fixings ready, Max went back for the rest of the gear. By 1:30, we were stretched out under the tarp and sitting in our Helinox camp chairs.
Our late lunch and the extended rain shower meant we did not get going again until after 2:30. When the rain stopped, we snapped a few photos of the waterfalls next to where we had lunch. The sun had come out again, and we were set to go.
—————-
Portage #4 of the Day (Our P36) ….250 meters
As the photo of the top of the next set of rapids indicates, there was no debate about whether to line or not! After a quick look, we headed back to the spot where the portage began and shouldered the packs, the duffels, the paddles, and the canoe one last time for the day. In forty minutes the 250-meter portage was behind us.
P36 – last P of the day – top end
satellite view of the day’s last portage
As we paddled away we stopped for a moment to look up the river. It was a bouldery mess and would have been impossible to line.
the bottom of P36, the last set of rapids for the day
—————-
We pulled up to the tent site around 5 p.m. There is a solitary tent icon on the map but there is room on the site for a Friends of Wabakimi convention! Most of the sites are on flattish sections of rock outcrop; a few more sheltered spots can also be found. The images below show our setup.
our tent site on the Palisade’s Big Bend
getting the supper fixings out at our Palisade Big Bend CS
Over the past dozen years, we have spent over 100 days canoe-tripping in the Wabakimi area. We have rarely seen other paddlers. At this Palisade Big Bend campsite, we would experience a first-ever – we got to share our campsite with a fellow paddler!
Even more amazing, it was the same solo canoe tripper we had met at Washago at the very start of our journey up to Savant Lake two weeks before!
waiting for the train at Washago
He had gotten off the train just west of Collins and over the past two weeks had paddled down the Nemo River and made his way up the Palisade for an eventual de Havilland Beaver pick-up on Burntrock Lake.
We actually knew he was going to be there because we had exchanged a couple of Garmin inReach emails in the days before. With supper done, we had lots of Wabakimi-related reconnaissance and impressions to share over tea. It is always good to meet a kindred spirit on the river!
————–
Day 13: Down The Palisade To Kenoji Lake
Date: September 12, 2023
Distance: 14.3 km
Time: 10 a.m. – 3:15 p.m
Rapids: 4/4 – lined all – 1) 200 m (40 min); 120 m (10 min); 3) 120 m (~10 min) Portages: 0/4 – see rapids
Weather: mostly sunny
Campsite: at the bottom of Palisade and top of Kenoji Lake, room for 2-3 x 4 person tents, more room for 2 person tents, hammocks welcome; survey marker
See NRC’s Toporama (here) for its current interactive coloured mapping and print what you need.
We had a fairly light day coming up as we prepared to leave our Big Bend campsite. The weather was forecast to be clear, with some sun. We would end up lining and floating past the four potential portage trails on our way to a campsite that we had stayed at back in 2011, the summer of the massive fire that had scorched the east side of Burntrock Lake.
It was a late start – 10:00 – as we headed south down the Palisade.
The three overriding impressions of the day were
the visible impact of the various wildfires that have scorched the area
the increasingly dramatic vertical rock lining the river
the mostly futile search for the reported (reputed?) pictograph sites on the river.
For the first time ever, we got a photo of us paddling! There we are with the backdrop of the emerging new generation of tree growth amidst the scorched but still-standing spruce.
morning on the Palisade – heading south from the Big Bend
impressive vertical rock face on the Palisade
As we approached our first potential portage of the day, we deked into a small bay ringed by a ten-meter-high rock wall. We figured the spot may have attracted an Anishinaabe shaman or a young man on a vision quest. As part of the ritual of seeking medicine or good favour from the manitous, they would “paint” (a mixture of iron oxide powder and fish oil) onto the rock pictures or signs from their cultural image bank. Clan totems, canoes,, moose and other animals, vertical lines, hands…these are a few of the pictograph types we have seen over the years.
checking out the Palisade rock face for pictographs
Our diversion did turn up something that looked to be painted – and not a natural rock stain. A couple of horizontal lines with a vertical line through the middle is what it looks like.
click on the image to access an “enhanced” view
In this case, the painter’s intent was unclear to us. For more information on pictographs and their place in Anishinaabe – mostly Ojibwe but also Cree and Algonquin – see the following post –
We paddled out of the mini-bay towards our first potential portage of the day (P37 in our trip count). The carry is marked as 100 meters. We took a look at the top and decided to line it. It was followed by a paddle-able middle section and then finished with another set of rapids at the bottom. The satellite image below makes it clear.
Note: We did this in the second week of September 2023 in what seems to have been a low-water year. A different year, a different month, and the conditions a paddler will deal with will not be exactly the ones we dealt with. Base your decisions on how to deal with the challenges of the river on what you see and not just on what you’ve read!
P37 – after checking out the vertical rock in the mini-bay
P37 – the first rapids of the day
We lined the top on river right, paddled down the middle section, and lined down the boulder garden at the bottom. Low water levels made the lining a bit of a challenge. We got it done in 15 minutes. The 100-meter portage would be a good option.
There we are 15 minutes later paddling away from the day’s first challenge.
—————-
About a half-hour later, we came up to our next potential portage – P38. We got out on river right to take a look at what was involved. It was an easy CI ride, and we got it done without hitting any of the poorly placed boulders!
P38 – 15 minutes lining
P38 from the top
Once at the bottom, we paddled for a few minutes before finding a lunch spot on river right. As we sat there, we looked across the river at another snapshot of the regeneration of the post-burn forest. Given the height of the new growth, this looks like it was a part of the 2011 fire.
old burn/new growth across from P38
—————-
After lunch, we came up to P39. One of us stood up in the canoe, took a look, and made the call to run it. A minute later, we were paddling away from what we figured was a C1 set of rapids. Again, YMNV!
P39
—————-
How The Palisade River Got Its Name
We were now coming to a section of the river where a few pictograph sites are said to be. We were looking forward to finally seeing them. We had paddled up this section of the Palisade from Kenoji Lake in 2011, but were clueless about the presence of rock images on the river. We had either paddled right past them or been on the other side of the river as we headed to Scag Lake.
The reported presence of pictograph sites on this stretch makes sense, given the more-than-usual vertical rock face lining the river. The river got its name because of this. It was H.B. Proudfoot, the surveyor in charge of Exploration Party No. 7, who came up with the name in 1900. In the Report of the Survey and Exploration of Northern Ontario published the next year, he wrote in his contribution to the report –
At Kenojiwan Lake, the first lake down this river, on the north-easterly outlet of Wahbahkimmug Lake, the route to Lake St. Joseph is encountered. I did not ascertain the name by which this river is known to the Indians, and have called it the Palisade River. [Report, 174]
Elsewhere in his trip summary he wrote – *… we proceeded north up the Palisade River, which flows south, and as its name implies is enclosed by bare steep rocks.” Yet another passage reiterates the reason for the name Palisade and notes the impact of fires –
From Greedy Water Lake we proceeded north up the Palisade River, which flows south, and as its name implies is enclosed by bare steep rocks. The timber has all been burned for some years, with the exception of a few clumps, which have escaped the fire.
—————-
Looking For The Palisade Pictographs
We had a few pictograph locations on our map that I had gleaned from various sources. As we paddled away from P39, we first rambled around the top of the two-kilometre straight stretch of the river. The reason: I thought there was a pictograph site there that we had missed back in 2011.
Palisade pictograph alley
Here is a pic from 2011 of the rock face that I was looking for. I was sure there was a pictograph on that rock that we had not seen because we did not know to look for it. Well, on this day we paddled around actively looking for it. We came up empty!
paddling past the stretch of rock cliff face on one side of the Palisade River
Heading down the river, we paddled very slowly past those stretches of rock face that seemed like probable spots to host rock images. There are two reported sites in this section of the river. See the map above for their supposed locations. We were down at the bottom of that 2-km straight stretch and had yet to see a single pictograph! We even doubled back a couple of times to make sure our two sets of eyes hadn’t missed anything.
Palisade rock face
We wondered how we were not seeing what others had seen. We wondered whether the purported locations actually existed and whether we were looking for something that wasn’t there.
Finally, after we made a 90º turn to the south, we came to panel after panel of faded and almost-gone images and morphs. Most were no more than 10 centimetres long and 3 cm wide. There were images from just above the waterline to high enough to be beyond the reach of someone standing in a canoe while he applied the red paint.
Most of the following images come from the highlighted section of our GPX track.
Palisade Pictograph site – click on the image for an “enhanced” view
close up of Palisade rock face with pictographs
close-up of the main panel of pictographs at the Palisade site
another nearby pictograph panel
smudges and a hand image at a Palisade rock painting site
more smudges and almost-gone pictographs on Palisade rock
close-up of what may be a caribou image that appears in the previous shot
All the images above came from the main site. A bit further south, we noticed this almost completely faded, simple rendition of what may be a moose. I’ve exaggerated the red colour to make it pop out of the rock. A rectangular body, horns, and legs seem to be there. Or – maybe my mind has imposed an explanation that suits my expectations?
One last location as we continued our way south along this dramatic stretch of vertical rock –
Palisade River pictographs
close-up of lines drawn on Palisade rock face
Two vertical lines drawn on Palisade rock
After the last of the pictographs, we paddled over to the other side of the river to get a panorama of the stretch of rock we had just been examining so intently.
—————-
Just around the corner from the rock pictured above, we paddled to P40. It was the last potential portage of our trip, and once past it, we would officially be on Kenoji Lake. We were through in a couple of minutes, running what we could and lining what we couldn’t.
The above-sea-level elevation of Burntrock Lake is 370 meters; Kenoji is 350 m a.s.l. The 20-meter drop in elevation is distributed fairly evenly among the eight sets of rapids in between.
looking back up the last set of rapids on the Palisade
—————-
We pulled up at our campsite shortly after 3:00. It had been an excellent five hours on the river, a nice mix of scenery, mostly easy-to-deal-with rapids, and an occasionally rewarding search for pictographs!
We had camped at this site back in 2011. While it looked different than what we remembered, we found the 100-year-old survey marker soon after arriving.
Our last campsite of the trip was nicely sheltered on the edge of a clearing with a good view of the lake to the east. With our tent up, we converted the canoe into a tabletop and set up our plush Helinoxes (almost 1 kg each).
We also got another chance to see the results of pulling and pushing a canoe through one boulder garden after another. Already booked is a May 2024 session in the backyard with West System’s 650 G-flex epoxy and a coat of Interlux white.
camp set up on Kenoji Lake
————–
Day 14: Bush Plane Pick-Up On Kenoji Lake
Date: September 13, 2023
Distance: 6.3 km
Time: 9:30 – 12:00
Rapids: 0 Portages: 1 – 1950s era de Havilland Beaver! – the Red Baron?
Weather: sunny and warm, and not a breath of wind.
Campsite: Mattice Lake Outfitters cabin – nice and cozy
See NRC’s Toporama (here) for its current interactive coloured mapping and print what you need.
Kenoji to Mattice Lake by De Havilland Beaver
We woke up to a cool but windless day; earlier in the morning the mist over the lake obscured everything. As we sipped on our coffee and broke camp, the mist was gradually lifting and soon the sun would burn away what was left.
Morning mist on Kenoji – the view from our CS
We had an 11:30 pick-up on the lake with Don Elliot of Mattice Lake Outfitters, our long-time go-to Wabakimi source for de Havilland Beaver service, vehicle shuttles, occasional accommodation, and advice on conditions in Wabakimi Park.
We paddled with no sense of urgency to the open part of Kenoji Lake, passing the outpost belonging to Pipestone Fly-In Outposts, one of a half-dozen the enterprise owns in the Wabakimi area. Another is nearby on River Bay at the east end of Wabakimi Lake, and a third is downriver on Oliver Lake.
If we had three or four more days, we would have paddled almost all the way back to Armstrong Station via Wabakimi Lake, Lower Wabakimi Lake, and then on up the Caribou River to Caribou and Little Caribou Lakes. From the take-out spot, it is a 6 km-long gravel road walk back to Armstrong.
87 km from Kenoji to Little Caribou Lake take-out spot with Armstrong, a 6 km. walk away
Short on time, we went with the $1000. CDN bush plane option, a seeming extravagance but one every canoe tripper should experience at least once. We’ve noticed that the older we get, the easier it is to rationalize!
Paddling up to the de Havilland Beaver
uploading your gear to the plane in the middle of the lake
watching as the pilot straps your canoe to the pontoon struts
flying over the terrain you have spent days going through at a much slower speed –
As the credit card commercial says –Priceless!
Kenoji Lake Waiting Room – listening for the sound of the Beaver
the de Havilland Beaver instrument panel
Wabakimi from the air
We were at the Mattice Lake Outfitters Lodge on Mattice Lake shortly after noon. We walked up to the Reception building to say hi to the owners, Annette and Don Elliot. They have taken good care of us over the years, supplying
shuttles,
Park backcountry camping permits,
parking,
bush plane inserts, and
pick-ups on various Wabakimi lakes.
This time, we had arranged a “cabin” for the night before our train ride back to Toronto the next morning. The cottage had all the amenities, including Wi-Fi. We were no longer off the grid!
under the wing at the MLO dock – The Beaver has landed!
The main focus of MLO is the three fishing outposts it currently owns. They are all located on or near the Ogoki Reservoir to the NE of Armstrong. Guests are flown in from the Mattice Lake airbase for a week or two of amazing walleye and pike fishing.
MLO dock
Don Elliot’s personal plane
the Mattice Lake Outfitters dock, reception building and workshop to the left
The MLO reception building and the workshop on the right
Mattice Lake Outfitters Lodge on the lake includes three or four cottages. In the image below, the one we got for the night is on the left. The fire was on when we stepped inside, after depositing our canoe packs on the porch.
Mattice Lake Outfitters Lodge and our cottage for the night
After a lunch made up of what remained in our food bag, we went back outside and unpacked all the tent pieces, tarps, sleeping bags, empty packs. Instead of waiting until we got home two days later, we would let the sun get everything good and dry before we hopped on the train.
Mattice Lake Outfitters Lodge parking
————–
Day 15: Visiting Armstrong Station’s NORAD Radar Base
Date: September 14, 2023
Weather: sunny!
See NRC’s Toporama (here) for its current interactive coloured mapping and print what you need.
We woke up to a beautiful, sunny day and the news that the VIA train from Winnipeg was running late. Instead of the 10:57 arrival, it was expected sometime around 2:00. We were not surprised!
After a breakfast of the last of the oatmeal and a couple of cups of coffee, we packed everything in the canoe packs and duffels and tidied up the cottage.
Then we accepted the Elliots’ offer to use one of their vehicles to go into Armstrong and visit a site we had long been curious about. That would be the NORAD Pine Tree Line radar station out by the airport.
The Pine Tree Line was a string of 44 radar stations set up after WWII in the early 1950s. It was meant to serve as an early warning system against Soviet bombers crossing the North Pole.The Armstrong radar station was operational from 1954 to 1974. By then, improvements in radar technology and the shift from bomber to missile-delivered bombs meant the radar stations were no longer needed.
We drove up to the entry gate guardhouse, seen in the image below, and then followed the road up to the hilltop where the radar towers were located. After the Canadian Military left the site, a private company, D & L Estates, turned the barracks near the entry gate into a housing complex, complete with a restaurant, some hotel units and a grocery store.
By 1993, the D&L Estates was no more, and the site was abandoned. Apparently, some salvage work was done, and some of the more useful bits and pieces were hauled away. Thirty years later, the rest is still there, derelict, crumbling, vandalized, a forgotten piece of Cold War history.
guardhouse at the entrance to the radar station site
satellite image of Armstrong Pine Tree Line radar station
standing in front of the search radar tower
For a comprehensive look at the Armstrong radar site, check out this report – Canadian Forces Base Armstrong – by Bruce Forsyth. You’ll see where I got my information on the site! Forsyth included historical photos of the site, as well as photos from as recent as 2021. A Wikipedia article – CFS Armstrong – also provides an excellent summary.
On our way back to MLO, we stopped at Gail’s Grill and Bakery for a bite to eat. I took the opportunity to examine the photos on the wall of the restaurant again; they feature images of Armstrong from the past. Below is a photo of the CN rail station building that used to be.
Armstrong CN railway station – built in 1932/torn down in the 1980s?
If you’re curious about Armstrong, check out Day 12 –Exploring Armstrong Stationfrom our Kopka River trip report. It has more historical images of old Armstrong and a few of what is there now.
The VIA train pulled in around 2:00 p.m. and after hoisting our canoe and the canoe packs into the baggage car, we bid Don Elliot farewell. We did mention to him that we might not be making the long journey up to Armstrong again – but in retrospect, that may have been too hasty a thought to entertain. There is more Wabakimi to paddle!
A little less than a day later, we were in Washago, only an hour late! A quick retrieval of our vehicle from a helpful local who allowed us to park our car on his property for two weeks, and we were on our way to T.O. What a change in scenery!
————–
Wabakimi is a premier canoe-tripping destination, definitely worth considering for that next paddling adventure. It is more isolated, less frequented, and less groomed than most other places in Ontario. For some ideas on possible Wabakimi-area trips, take a look a some of the trips we have done over the past dozen years –
Head to the northwest of Lake Nipigon and you’ll find a 25,000 sq. km paddlers’ dream canoe country known as Wabakimi. For every 100 paddlers who visit Algonquin or Quetico Parks, this area sees maybe 1! The map below shows its approximate boundaries –
Highway 599 on the west side
the Albany River to the north,
the Little Jackfish River to the east,
and the Kopka River and Lake Nipigon to the south.
Its core is Wabakimi Provincial Park, which includes most of the upper Ogoki watershed. From its headwaters in Endogoki Lake, the Ogoki River merges with the Albany some 480 km. downriver. It was back in 2010 that we first heard about Wabakimi. Since then we have made it our destination of choice for a half-dozen memorable two-to-three-week canoe trips.
Wabakimi water we’ve paddled – six trips from 2010 to 2023
——————
Accessing Wabakimi Canoe Country
There are different ways of getting to a put-in on one of the many lakes and rivers, which serve as a starting point.
It can be accessed by road (Highway 529 from Thunder Bay to Armstrong or Highway 599 from Ignace to a put-in on Savant or Pashkokogan Lakes).
Since the Canadian National rail line runs across the southern edge of Wabakimi Provincial Park, a VIA train drop-off somewhere along the line is another way to access the lakes and rivers of Ontario’s second-largest park, as well as the surrounding Crown Land and other smaller parks.
Bush plane service is a third (and the priciest) option. Both de Havilland Beaver and Otter services can be arranged from Mattice Lake or Mackenzie Lake, just south of Armstrong.
Between the western border of Wabakimi Provincial Park and Highway 599 is a large strip of Crown Land running all the way from the CN tracks north to Osnaburgh Lake. Mineral exploration and continued logging are probably why it is not yet a part of a larger Wabakimi Park. The two major rivers in this area are the Pashkokogan and the Savant. Both flow into the Albany River system and include a series of lakes, large and small.
However, the area is included in a 720,000-hectare (2780 sq. miles) zone designated by the Ontario Government’s Ministry of Natural Resources and Forestry as Caribou Forest. Its boundaries are the CN tracks in the south and Lake St. Joseph in the north, with St. Raphael Lake and Wabamini Park as its western and eastern edges.
Double-click to enlarge
A very positive description in the Canoe Atlas of the Little Northwas what led us to focus more closely on the Savant Lake area. Published in 2007, the book has provided the seeds of many a canoe trip!
We read this –
It sounded pretty enticing! After studying the topographic maps more closely and following the river system to its headwaters lake, we were also motivated by the thought of paddling it right from the very top to the bottom. A couple of years before, a similar thought had led us to the headwaters lake of the Ogoki River system. The Savant-area satellite images had us thinking that this would be different!
Once at the end of the Savant, we planned to head east on Greenbush Lake and, after a couple of long portages that separate the height of land between the Misehkow and Palisade river systems, paddle down the Palisade to Kenoji Lake. There, we would get picked up by a de Havilland Beaver for a return to Mattice Lake and the next-day VIA train ride from Armstrong Station.
If May and June of 2023 made clear one thing, it was that you don’t have to be up close to a wildfire to be impacted. Toronto, Chicago, New York City – tens of millions of people living far from western Canada and northern Quebec inhaled the smoke carried thousands of kilometres by the wind currents. Air quality index numbers and images of orange skies over major metropolitan areas became part of nightly weather and newscasts.
Given the fire map above, it appears northwestern Ontario escaped the worst of the fires in 2023. However, our original mid-July departure date had to be pushed back when the Palisade River section of Wabakimi Park that we planned to paddle through was closed. The circle on the above map is where we were headed. Here are the two wildfires of concern up close – the fact that the 263 sq. mile fire (labelled Sioux Lookout #33), which started on June 11, is just a tiny red dot on the Canada map brings home how massive the northern Alberta and Saskatchewan burns were.
map source – lots of additional info, including fire history
Wabakimi Park officials reopened the western corner of the Park in early August, and we were finally able to book our VIA train tickets. Unfortunately, it was so close to our departure time that VIA was unable to fit our canoe in the baggage car! Then Max pulled a back muscle, and to be on the safe side, we pushed our departure date back another two weeks.
A month later, we were finally on our way!
Given that 2023 was likely not a one-off occurrence but rather the beginning of a new, more extreme “normal”, it left us wondering. On the macro end, we wondered what the future held for those northern Canadian communities, some of which are focused on resource extraction and many of which are isolated First Nations. On the micro level, for canoe trippers drawn to the lakes and rivers of the boreal forest, the increased possibility of wildfires adds another dimension to trip planning and emergency preparedness.
Getting The Latest Wildfire Info
The map image above is from the interactive map at the Natural Resources Canada Wildfires website, which provides current wildfire information as well as a historical overview of Canadian wildfires.
The Ontario Government also has an interactive map showing current wildfire locations in the province. See the website Ontario Forest Firesand select the interactive fire map for the latest information.
Having A Satellite Communication Device
We also left home with our Garmin inReach Explorer+ satellite device, which allows two-way email communication. It also provides the folks back home with our every-ten-minute GPS location. The SOS button is a third key feature of the device.
Our local contact would be Don Elliot at the Mattice Lake Outfitters base camp near Armstrong. If not an SOS situation, his float plane would be an email contact away if an extraction were necessary or possible.
The Switchback Travelwebsite has a good review of all the best current device options. Our vintage 2017 Garmin no longer makes the list, but it works just fine at the cost of three ounces of extra weight and bulk, which add up to the equivalent of an extra Clif Bar!
Finally, we had not only our planned route but maps for a Plan B exit off Hwy 599 at Fitchie Lake and a Plan C northward paddle down the Misehkow River.
We decided to skip the long drive up (18 hours to Armstrong or 19 to Savant Lake) and take the train to the Savant Lake VIA stop. It leaves Toronto twice a week for Vancouver, and canoes are welcome in the baggage car. For that quintessential Canadian experience, the train will stop and let you off anywhere along the track!
Our past train travel experience had been positive, and we hoped that we would be spared the long waits and delays that passengers can expect on a rail line owned by CN on which their freight takes precedence over VIA, which rents access to the tracks.
The journey begins
However, this time we did something different. Instead of getting on at Union Station in downtown Toronto, we decided to drive up to Washago, the first stop north of Toronto, and put our canoe and gear into the baggage car there. The certainty and peace of mind of seeing everything being loaded before we took our seats was worth the effort. As for our vehicle, a fellow paddler (and one of the very first Friends of Wabakimi!) provided us with the email address of a friend of his in Washago. We soon had a place to park our vehicle for a couple of weeks.
Our rush-hour drive north to Washago had us contemplating the contrast between the sixteen lanes of traffic on the 401 and the absolute stillness we knew we’d have during the two weeks of our trip. [Spoiler alert! We would meet one paddler and two boats with guys fishing at the bottom of a set of rapids, and we would hear four other motorboats on Savant Lake. That was it for traffic on the water we paddled!]
——————
VIA Rail: Washago To Savant Lake
It is a two-hour drive from Toronto to Washago. Max dropped me, the canoe, and the baggage off on the side of the tracks, then drove off to park his vehicle. He was back sooner than expected, thanks to the ride he got from the folks hosting his car!
Washago VIA Waiting Room
As for our VIA tickets, they cost us $ 335 + HST each. So – $750. for the two of us. Another $200 -$100. each way – covered the cost of putting the canoe in the baggage car. [ Note: getting your tickets a bit ahead of time is a good idea. We had to change dates when we were informed that there was no more room for a canoe on our original choice of dates.]
The 25-hour round-trip would mean we would be spared the cost of a couple of motel rooms ($300) and the wear and tear of 18 hours of driving each way. You can drive from Toronto to Banff in 36 hours!]
[See here for the complete Toronto to Sioux Lookout schedule.]
Over the next hour, more passengers arrived at the VIA stop. That small shelter you see in the image above is what passes as Washago’s VIA passenger waiting room these days! One of the arrivals was a fellow paddler and, amazingly, he was also headed to Wabakimi! His solo trip had him paddle down the Nemo River to an endpoint on Burntrock Lake 17 days later.
The following morning, we would watch from our VIA train window as he unloaded his stuff on the side of the tracks about 20 kilometres west of Collins. 14 days later, we would share a campsite with him on the Palisade River! He is the only paddler we saw in our two weeks.
waiting for the train
Also waiting for the train were members of the Stayner Mennonite community. They were seeing off a few of their members, who were on their way to another settlement in the St. Boniface area in Manitoba. I tried my German on one of the elders, but he was quick to let me know that his German dialect was far from the north German that Max and I learned as kids from our mother, who was from the Hannover area. While I had thought that Mennonites spoke Plautdietsch (i.e., Low German), he said that his German was a Bavarian dialect. Some googling may turn up an explanation. But in the meantime…
Waiting for the westbound VIA train
The VIA train arrived at Washago Station, only a half-hour late. Within five minutes, the two canoes, gear, and packs were in the baggage car, and we were ushered to our economy-class seats. Having done the ride before, we came prepared. Our carry-on duffels had our sleeping bags and synthetic down jackets for the overnight chill of the often-set-too-low air conditioning. Since the dining car is now limited to passengers in the sleepers and berths, we also had a bag filled with snacks, drinks, lunch and supper. We were ready for the 25-hour ride!
Parry Sound – a shot from the train/ the second VIA stop from Toronto
We only arrived 2 1/2 hours late to the Savant Lake Via stop. Waiting for us was our shuttle provider, Jonah Belmore of the Ojibways of Saugeen First Nation, north of the small community of Savant Lake at the junction of the VIA Rail Stop and Highway 599. We had been put in touch with him by John Kehayas, the current owner of the Four Winds Motel.
Jonah would get to spend 3 1/2 hours driving us on logging roads to the southwest of Savant Lake as we figured out just where we wanted to be dropped off. It turned out that the area had been his grandfather’s trapping territory. We could not have had a better and, as you will find out if you keep reading, a more patient guy to get us started on our adventure.
Jonah’s email address: j_belmore@outlook.com
——————
Maps and Info About The Route:
We used the Natural Resources Canada topographic maps – both the archived maps and the up-to-date ones found on the Natural Resources Canada Toporama website.
David Crawshay’s free Topo Canada iOS App for iPhone enables you to download all of the above to your iPhone. While leaving the iPhone on all day to use as your primary GPS device would require a power bank for daily recharging, it is very useful to make a quick confirmation that you are indeed where you think you are! Download Crawshay’s app here.
There is an Android OS app from a German app developer similar to Crawshay’s Topo Canada iOS app. However, it costs US$14. Given its usefulness, the one-time cost is a worthwhile investment that will save you time and aggravation. Click here to access the Google App Store page –
Note: The free version of the app may be enough for your purpose.
Toporama is NRC’s modern version of the archived topo sheets. It is a seamless map of the entire country and allows you to extract additional information and features from the map.
Access the Toporama website here. Note that in Crawshay’s Topo Canada app mentioned above you can choose the Toporama option instead of the archived sheets.
———
Info on Rapids and Portages – Wabakimi Project Maps
For specific portage and campsite info, we turned to the Paddle Planner website; its data is mostly taken from the Wabakimi Project maps, a few volumes of which we have bought over the past decade.
Volume 2 of the Wabakimi Project Map collection covers the Savant River. [See here for an overview of the entire set.] My copy (labelled version 1.1) was published in 2011 with individual map pages showing a 2010 copyright. It is not clear if any updates have been made since then. The cover of the internet-sourced image on the left has a 2015 publication date and version 1.0!
Friends of Wabakimi has a PDF-formatted copy of Vol 2 available for CDN$39/US$32. The money supports the group’s various Wabakimi Park initiatives. I have been a member since its inception.
If you’re new to Wabakimi, the Friends website is a comprehensive resource which should answer most of your questions and provide you with the contact info to get answers to the rest! This Wabakimi Park page introduces the area; the Resource Links page points you to useful contacts in planning your own trip. It is definitely worth checking out.
———
Paddle Planner
The Paddle Planner website (see here for access levels, ranging from free to outfitter) has information from the Wabakimi Canoe route Maps. Here, for example, is what you will find if you zoom in on the Savant River system headwaters that we had Jonah Belmore shuttle us to:
paddle planner map view – portages and campsites indicated
On a Paddle Planner map, you will find portage information, campsite and outpost locations, access points, and points of interest. For the Wabakimi area, much of it comes from the Wabakimi Project maps, though it will also have data from paddlers who have contributed trip reports.
Note: on less-travelled routes, the portage info may well be out of date. As our Day 1 notes will show, this was the case for our proposed put-in from logging road 702 to access the headwaters lake of the Savant River system!
———
Our Route GPX and Kml Files:
You can see the route on the Caltopo website. To download the file, click on the Export option on the top left-hand and then choose the format in the Export Selection window.
Well, maybe not “grief and pain” but let’s just say things did not unfold as planned!
To The Unnamed Headwaters Lake(#1)
After loading our canoe and packs in the back of Jonah’s truck, we headed up Highway 599 to access Logging Road 702. Our destination was the spot (#1) at the top right of the map above. Our route started in the nameless headwaters lake of the Savant River system. From there, we would make our way down to Jutten Lake before portaging into Savant Lake.
As we drove up, we learned of Jonah’s family connection to the area – his grandfather’s trapping grounds – and that whatever trails used to be there were quite overgrown or gone completely. Jonah was not familiar with most of the portage trails we were counting on. The only one he did confirm was the one we were most concerned about – the 460-meter carry from Jutten Lake to the south arm of Savant Lake.
When we arrived at the proposed drop-off, we looked for possible trails that paddlers or fishermen had used to reach the lake. Finding nothing, we walked through the bush – really the boreal version of a jungle! – to get to the shore of the headwaters lake. A half-hour or so of hauling would have gotten us, our canoe, and our gear down to the shore. However, given that we had just spent 28 hours on the train, I suggested an alternative – i.e., maybe easier – put in at its southern end where a minor logging road crossed.
To the bridge between the Top Two Lakes (#2)
Back we went southwest on 702. Jonah knew the spot to turn off, and we were soon close to the alternative put-in spot, with the side of the truck taking a whipping from the overgrown alders on the side of the road. Deadfall forced us to walk the last 50 meters to reach the bridge. When we got there, we got to peer into still denser bush with no water in sight! This was not the alternative that two tired canoe trippers were hoping for.
To Jutten Lake’s South End Bay (#3)
Recalling Jonah’s comment about the usable portage trail into Savant Lake from Jutten, I asked him if he could get us to Jutten Lake. The answer was a “yes”. The maps above and below show the seldom-used side roads that he used to get us there!
Three hours after leaving the VIA stop at Savant Lake, we were sitting on the south shore of Jutten Lake next to a boat shell. We thanked Jonah for his patience and noted that he now had all the necessary details for a believe-it-or-not story that began with “These two guys from Toronto…”
Note: Jonah Belmore [j_belmore@outlook.com] does shuttles along Highway 599 for canoe trippers. A recent one had him drop off paddlers at the north end of 599 for an Otoskwin River trip. We were fortunate to have had him do the shuttle.
Jutten Lake – Day 1
There I sit, looking at a map to find the nearest campsite on Jutten. It was on the eastern tip of the island, just 2.5 kilometres from where Jonah had dropped us off.
the put-in on Jutten Lake
Paddling over, we found a well-used camping spot, and soon our tent was up. We hadn’t had anything to eat since 7 a.m., and it was past 3, so we decided to have an early supper. As we went over the snap decision to scrap our Savant headwaters route, we recalled our misadventure on the upper Ogoki just a couple of years before. It may be that we made the right decision to forego the probable slog our original put-in entailed. This is not to say that I don’t look back with regret at having dodged the challenge. Maybe some keen reader of this post will do what we didn’t!
It was an early night on Jutten Lake, and by nine, we were dealing with our sleep deficit. The 2.5 inches of my new Thermarest NeoAir pad were a definite upgrade from that VIA train seat.
Weather: sunny and windy, Alberta and NWT smoke haze during the day
Sightings: boat traffic coming from or returning to Cliff & Rona’s Lodge; don’t forget the eagle (we see at least 1, sometimes ,2 each day for the first 5 to 7 days)
Campsite: 1 x 4p; easier to find 2p areas plus possible hammocks.
The day’s two maps start at the bottom and end halfway down (i.e., at the north end of) Savant Lake.
Day 2 – Savant Lake up to Trading Post Bay
Day 2 – Jutten to S of Lodges
We set off from our Jutten Lake campsite in good spirits shortly after 8 a.m. A solid night’s sleep certainly helped, as did the knowledge that the 460-meter portage into the South Arm of Savant Lake that we had worried about was actually a well-used trail. The afternoon before, it had been our shuttle driver Jonah’s knowledge of the portage and of how to access Jutten Lake from logging road 702 that had finally gotten us to a put-in spot.
P 01 took a bit more than an hour. Since we were travelling at maximum trip weight, we did not do the 460m (or so) portage in our usual carry-and-a-half mode. This mode has Max take one canoe pack, a duffel, and the paddles to the end, while I take the other canoe pack and duffel halfway, then return for the canoe and my canoe bag. If we arrive at the spot where I left my packs, we know our halfway-point estimate was fairly accurate.
P 01 – Jutten to Savant Lake
The GPX track above shows a less ambitious approach to P 01! – i.e. more short hauls and breaks!
P01 – 460m from Jutten to Savant Lake
Savant Lake’s South Arm (396m a.s.l.) is 11 meters lower than Jutten Lake (407 m).
When we got to the put-in on Savant Lake, we knew that our only portage of the next couple of days was done. We were at the top (i.e., south end) of a 43-kilometre-long lake that we would have to paddle down before having to portage around any of the dozen or so sets of rapids we couldn’t run or, at least, line.
Savant Lake top to bottom
The lake hosts four fishing/hunting lodges or outposts. The first one, Wildewood, is located at the top of a deep, narrow bay, which we crossed about a half-hour after pushing off from the end of the portage into the South Arm.
The original plan had been to get to the narrow channel at the north end of the South Arm and look for a campsite there. The thinking had been that the first day and a half getting to Savant Lake would be enough of an effort to make a campsite there an early-afternoon reward. Well, since we had decided to forego the first ten kilometres of the original route, we kept going for a few more kilometres.
Halfway down the lake, there are a couple of lodges on the west shore:
We were within a few kilometres of the lodges when the NW wind picked up, and the sky got darker. Some bad weather was approaching. We headed for a nearby island campsite indicated on our map and set up the tent with the insurance tarp over it. We had also rigged up the second tarp over our camp chairs and our canoe/dining table. And then the rain came down – torrential sheets of it that blurred our view of the lake.
Nice and dry underneath our tarp, we tended the pots on top of our two butane stoves and watched as three motorboats passed by from the south. The soaked fishermen had lingered just a bit too long and had paid the price!
under the tarp on Savant Lake – note the rain pounding the lake!
Later that evening, the rain would stop, and the sun would appear. So too would the fishermen heading back to their favourite walleye or pike spots! This boat traffic on Savant Lake would be the most activity we would see and hear in two weeks.
As we headed down the lake to the North Arm, we looked across to Cliff & Rona’s Wilderness Camp. It includes the main lodge building, four cabins (indoor washrooms and electric lights), and the usual fish-cleaning hut.
This satellite image of Cliff and Rona’s Lodge gives a full view of the infrastructure:
Cliff and Rona’s
There is another lodge – the Cat Track – not far from Cliff and Rona’s, but we were not able to see it as we paddled by. The satellite image below shows that it is a lot more than a solitary outpost.
Cat Track
Trading Post Bay:
An hour’s paddle north of the lodges, we came to a small bay with the name Trading Post. Our map indicated a campsite on the west side of the bay. A quick look convinced us we would not have camped there! A small creek comes out at the northwest corner of the bay. We walked along the shore and went inland a bit to check out the flat area to the east. We found no evidence of human activity, not really a surprise given the two centuries nature and the occasional wildfire has had to reclaim the space.
Savant Lake – Trading Post Bay
The trading post must have been a very minor one, probably set up by the upstart North West Co. or an independent fur trader to intercept furs going down to the Hudson Bay Co. post at Osnaburgh House. The trader would then have to get the furs to Fort William, the NWCo’s inland headquarters on the western shore of Lake Superior. From there, the voyageurs would haul the season’s trade back to Montreal in their canots du Maitre.
With the merger of the two fur trading companies in 1821, this post no longer would have served a purpose. The 1930Ernest Voorhis report on fur trading posts mentions 612 major and minor forts and posts across the country. This Savant Lake location is not one of them.
Savant Lake must have two hundred islands, large and small, speckled across its length. We stopped for lunch on the shady side of one island on our way down the lake. A couple of hours later, we would find our home on the east side of another island in the lake’s north arm. Along the way, we paddled past Turtle Island and its outpost, with one cabin which can accommodate four guests.
Day 3 shady lunch spot
our loaded canoe
All day, we had noticed the smoky air blown our way from the wildfires in northern Alberta and the NWT. The left side of the image below hints at the hazy sky we saw as evening approached. The island campsite – labelled Falcon Island on the Wabakimi Project map – was a decent one, nicely tucked away with ample room for our four-person tent.
Day 3 was in the books, and we were slipping into trip mode.
Another Route To Access Savant Lake:
Over the years, I have more than once watched a series of YouTube videos posted by Wintertrekker (aka Hoop at the Canadian Canoe Routes forum). It describes a canoe trip he did in the Savant area in August 2013 and was posted the next year. It is probably the dormant seed that finally resulted in our Savant trip in 2023!
The first two parts of the series cover his accessing the North Arm of Savant Lake from what must be the Fitchie Lake put-in, though he does not specifically mention where he left his vehicle.
The remaining episodes detail his canoe trip down the North Arm of Savant Lake and then a portage into the Little Savant River system, which he followed down to Velos Lake before returning via the Savant River to Fitchie Lake and his vehicle.
It was the initial stretch of his route that sounded somewhat brutal, involving way too many portages for the first few days of a canoe trip! According to the Paddle Planner calculations, that would be 11.2 km of portage trails and 33.4 km of paddling to get to the North Arm of Savant! [When I tabulated the distances, I came up with 2.5 km of portage trails and 19.3 km of paddling. While the PP portage figure probably factors in multiple carries, the paddling distance seems somewhat high.]
Paddle Planner data on a Topo Canada map – Fitchie Lake to Savant Lake
Our Day 3 campsite was not far from Neverfreeze Bay, where you come out onto Savant Lake if you take this route. The Paddle Planner data comes from Volume 2 of the Wabakimi Project’s Wabakimi Canoe Route Maps (2011). Not only did the W.P. crews map the route, but they also reestablished or created portages and campsites. Their work had probably been done in 2008.
Reading this Friends of Wabakimi trip report about taking this route the very next year (2009) makes it clear how difficult it was to find some of the portage trailheads. Four years later, Hoop noted blowdowns already impacting the portage trails.
Closer to the present, it sounds as if those trails have disappeared, in part because few canoe trippers are using them. One Canadian Canoe Routes forum member, Darl_h commented about his 2020 experience –
Glen (i.e. Hoop) was the inspiration for last year’s trip and we were flummoxed at Fitchie Lake (off Hwy 599). We scouted three different ways out of Fitchie towards Neverfreeze through Shallow Lake and deemed it too much for us. The old HOOP videos make it look so clear, not anymore.
The major attraction of Fitchie Lake is being able to leave your vehicle at the put-in. It also eliminates the need for a shuttle, since you can (as Hoop did) create a loop that brings you back to the start point. The only negative is the rough portages to reach Savant Lake. Worrying about your vehicle sitting there for two weeks unattended is also not a plus! Somehow our Jutten Lake insertion on Day 1 didn’t seem so bad.
Our goal on this day was a modest one – to deal with one set of rapids or a possible portage and set up camp on Jabez Lake. The tent is already down in the image below and the canoe packs are being readied for loading.
packing up at CS 03
As we headed down the North Arm of Savant Lake, we could not help but notice the lingering smoke. In the image below, it is the smoke and not blown-out highlights that you are seeing! Also noteworthy were the vast wild rice fields in shallower stretches of water on our route.
wild rice bed in Savant Lake North Arm
An early version of the lake’s name was Savan, a Canadien (i.e. French Canadian) word for “swamp”. While most of Savant Lake certainly does not fit the “swamp” image, perhaps the association with the rice fields was the source of the name?
————–
1857 Thomas Devine Map of Northwestern Canada – Savan Lake
Re: the 1857 map. The CPR was still twenty-plus years in the future, and the Geological Survey of Canada had yet to do any work in the region. The Albany River system is fairly accurately drawn, thanks to its importance as the location of several Hudson Bay Co. posts and as one of its major water routes into the continent. Lake Savan is drawn equivalent in size to Lake Nipigon. The map shows the Savant River flowing into Pashkokogan Lake. White Earth Lake, that is, Wabakimi (from Waab white + aki earth), is located far to the east of Lake Nipigon. Also on the map is the Tickameg River, which Robert Bell of the Geological Survey of Canada would call the Ogoki in a mid-1870s field report.
————–
The wild rice fields would also explain the number of migratory birds we saw in the vicinity; the grain makes an excellent food source. This was something the Ojibwe families living in the area certainly knew. The wild rice – manoomin in Ojibwe – even figured in some versions of the Ojibwe Migration myth. One account from Minnesota reads like this –
Ojibwe people arrived in present-day Minnesota in the 1600s after a long migration from the east coast of the United States that lasted many centuries. Together with their Anishinaabe kin, the Potawatomi and Odawa, they followed a vision that told them to search for their homeland in a place “where the food floats on water.” The Ojibwe recognized this as the wild rice they found growing around Lake Superior (Gichigami), and they settled on the sacred site of what is known today as Madeline Island (Mooningwaanekaaning). source
The Migration story and the focus on seemingly miraculous food bring to mind the Exodus myth and the manna, which sustained Moses and the Israelites for forty years as they wandered around the Sinai desert.
————–
An Alternate Route To Velos Lake
As we approached the day’s only possible portage, we passed by a bay on river right from which you can access an alternative route to Velos Lake. A 550-meter portage leads to Little Savant Lake, the headwaters of the 30-kilometre-long Little Savant River system.
the portage into Little Savant Lake, the Little Savant River’s headwaters
The Little Savant River ends at Velos Lake. Accounts of canoe trippers going up or down the river are scarce to non-existent. The series of videos by Wintertrekker mentioned earlier is one. Part 5 of his YouTube upload provides the details.
the Little Savant River system from top to bottom
————–
Our One Possible Portage of the Day!
Since our portage into the south end of Lake Savant at the start of Day 2, we had been spared the potential drama and extra work that rapids and a portage often provide. Well, just after the possible turn-off to the Little Savant portage, the outlet rapids at the north end of Savant Lake were coming up.
We approached the portage marked P02 on the satellite image above. Perhaps it was the late-season water levels but we did not see a CII set of rapids as we scanned downriver from the top. We were down in a few seconds and, after a wrong turn to the left channel, headed back to the main channel and continued on down the river. It is always a plus when you can avoid a 100-meter portage!
The thing to remember is that often the portages are meant more for those coming upriver than those, like us, going down. Historically, upriver travel on the Savant would have been done by locals or by fur traders wanting to access
Sturgeon Lake and the English River system to get to Fort Garry/Winnipeg
Wabakimi Lake and then the Wabinosh River to Lake Nipigon
P02 on the Savant River.
A highlight of the day was spending some time with a few trumpeter swans – or maybe they were tundra swans – in the area of the rice fields. This was the first time on all our Canadian Shield canoe trips that we had seen these birds. Back in 2020, another bird highlight had been paddling into a white pelican convention in Wabinosh Bay on Lake Nipigon. We watched from afar as the swans flew ahead of us, perhaps leading us away from vulnerable young ones. Over the next day, we would see more of them.
tundra or trumpeter swan and reeds on Savant Lake
————–
Our Jabez Lake Campsite
Jabez outpost with a dock
As we entered Jabez Lake, we encountered a motorboat with a couple of fishermen who were staying at the lake’s outpost. They were, as is 99% of the time the case in northwestern Ontario, vacationing Americans keen on fishing. It turned out that Max had dined in the small-town restaurant of the guy from Ohio! They were staying with their wives at the outpost, just across the water from where we decided to stop for the day. While we were only a kilometre away from their camp, our view was blocked by the islands in the way and the outpost’s tucked-away location away from the shore.
There are two campsites on Jabez Lake. We headed to the more northerly one and eventually figured out where it was. The actual site is a bit in from the shore, so it is not immediately obvious. The GPS track shows that we landed in four different spots before finally locating it on landing #5!
The site is a bit of a scramble up the hill to access a fairly flat area with a nice covering of lichen. Our hand saws took care of some deadfall, and we soon had a clear path to the tent from the shore with our canoe/dinner table set up in between.
That lichen-covered and mostly flat spot you see at the end of the video is where our four-person tent ended up for the night.
Videoed later that evening, here is the walk up from the shore of Jabez Lake – note the hazy sky thanks to smoke from out west – to the flat area where we had pitched our tent:
The smoky haze of Day 4 continued into the evening. The images below capture the scene after 7:00 p.m.
Jabez Lake at 7 p.m. sun and smokey haze
A couple of hours later the sun was gone but the haze remained
See NRC’s Toporama (here) for its current interactive coloured mapping and print what you need.
Day 5 – Jabez to Savant Falls
I walked back up to our tent spot for a last look for any stray tent pegs before we started a full day of rapids and potential portages. Still visible this morning was the smokey haze from the west.
Our objective for the day: Savant Falls and a possible tent spot there.
First up was the set of rapids and a reported portage labelled P03 on our map and on the satellite image below. Our hasty and failed attempt to find the beginning of a portage trail led us back to the river.
What we found were three separate ledges and a not-so-easy-to-line boulder garden thanks to the low water level. According to the two fishermen we had talked to when we came into Jabez Lake, water levels were 2 feet lower than usual though it was unclear what their time frame was. The GPX track below shows our route down this section of the river.
In the image below, Max is looking back at the top of the rapids. We had lined our way down to that point on river left by hopping from boulder to boulder. No wet feet yet!
the top of the rapids (P03) below Jabez Lake
In the next image, you can see the middle section – about 100 meters or so – that we were able to float down. Now we are faced with another boulder garden and not enough water. Some scraping, pulling, and pushing would be required!
Max looking at the next stretch of the rapids below Jabez Lake –
Here is the final section of the rapids that we faced before we got to the bottom. The canoe bottom we had fixed up and painted in July was paying the price of being hauled over and past the rocks you see below. On the plus side, our socks were still dry! It had taken us about 35 minutes to deal with P03 with the most time on the last stretch.
At the bottom of the rapids on river left we spotted a boat with a motor and a full can of gas, undoubtedly left for the guests of the Jabez Lake fishing outpost. We followed the 125-meter trail from the boat back up to the top of the rapids we had just come down. It was in good shape and would be used by canoe trippers coming upriver. It would also have been a less stressful way for us to make our way downriver!
Our 35 minutes with P03 were followed by a few seconds on P04, an easy 5-meter run. The portage trail indicated on the sat image above may be for those coming upriver.
Noted on the first map are a few swifts. The low water level meant we often did not know we had floated through a set. As we paddled through a narrow section of the river, we passed by the best campsite of the trip so far. A fire pit is visible from the water and a quick visit revealed an elevated site with a nice view and room for multiple tents.
nice campsite on the Savant River
Then it was on to the next rapids. P05 avoids a narrow top channel with a 2 1/2-foot drop and some badly placed boulders. We lined our way around and then floated down to the boulder garden at the bottom.
P05 and P06 Savant River
After a failed search for a potential portage on river left, we went back to the river. Twenty-five minutes later we were through the turbulence indicated in the satellite image below and back to cruising speed.
P05 and P06 Savant River
We stayed with the river and floated right past the next two indicated portages – P06 and P07, both of which were easy Class 1 runs. The blue-coloured dot in the image below is the campsite we saw as we paddled by.
P07 Savant River
By now it was about 12:30 – we had started around 8:30 – so we were thinking lunch spot. But first, we wanted to deal with two more potential portages – P08 and P09. We spent five minutes lining the C1 stretch with just not enough water past P08 and then another ten to avoid P09.
P08 and P09 Savant River
On a point just around the corner from these rapids we finally stopped for lunch. We were happy with the way the day had gone so far. We had avoided doing any portaging and figured that we had come out ahead by staying with the river and lining our way down.
Savant Falls and P11 – the portage around it – was still about 10 kilometres downriver so we knew we had two more hours of work before we got to a campsite there. Halfway there was a set of rapids and P10. Also on our map were notes about a few swifts along the way. When we got to P10, Max stood up and took a quick look. We were down in a few seconds and heading to a nearby set of swifts.
P10 Savant River
On to the one portage of the day which was not optional – P11 around Savant Falls. The satellite image below lays out the neighbourhood. We found a well-used trail and a half-hour later we had beached our canoe in front of a boat shell a bit down the shore from the portage put-in.
P11 Savant Falls
Up went the tent – a tight squeeze thanks to its four-person size and the four trees framing it. The second tarp also went up shortly afterwards and a good thing too, since it started pouring not too much later.
We leaned back in our Helinox chairs and watched the rainwater drip off the edge of the tarp. With a 35mm film canister shot of whisky each we celebrated the fact that we had avoided all but one of the potential nine portages of the day’s route.
Savant Falls CS area to the east of the Portage trail
As a bonus – the next day was allocated as a rest day! We could take some time to check out the Falls and follow its course from the top to its dramatic bottom.
It was supposed to be a rest day but the decent weather had us change plans. Instead of staying put, we decided to head over to the “shortcut” portage which would have us camping on Velos Lake that afternoon.
Savant Falls on the Savant River system
But first – some time to walk up the path on river left to to see Savant Falls from various perspectives. There is a 7-meter drop over a 120-meter distance from top to bottom with the most dramatic drop being the very last one.
trail alongside Savant River by Savant Falls
The rough trail led us to the top of the falls section and the very first ledge, a gentle half-meter drop.
Savant Falls from above – the last chute
Savant Falls – the final drop
Savant Falls – the bottom
And here is a photo from August of 2008 of those same falls taken by a member of Phil Cotton’s Wabakimi Project trail-cutting crew. There is definitely a higher volume of water tumbling down!
A YouTube video from August 2013 by Wintertrekker also provides some excellent Savant Falls video – and keep watching to hear his assessment of the Savant River as a canoe-tripping destination.
Note: Anything by Wintertrekker (aka Hoop on the myccr forum) is worth watching. This 17-part series is all about the Savant and Little Savant Rivers and first alerted me to paddling possibilities just west of Wabakimi Park.
The changing nature of Savant Falls serves as a reminder that the low water we faced this September – and the amount of lining and running we were able to do on the river – may not be the case next year or the year after. As always, let present conditions be your guide and do not rely solely on some account from the past.
—————-
With our tour of the Falls done, it was time for the 5-km paddle over to what we called the “short-cut” portage. It knocks off a few kilometers of paddling and trades one possible portage for the definite 90m- one that we took to get to the south shore of Velos Lake.
At the Velos end of the carry, I approached the gently sloping rock outcrop along the shore in the image below with the canoe over my head. I had one thought: “Let’s make this an elegant and bump-free put-in”. Down to the water’s edge, I went – and then in a bit further to make sure the nose had some water to break the drop. The green slime lining the shore should have provided me with enough of a warning. As I dropped the canoe to my right thigh, my right leg slid on the algae and I skidded down the very slippery slope and collapsed into the water. So much for that elegant put-in!
For the next few hours, I could barely put any weight on my right leg. Whatever it was – a severe strain, a ligament sprain, a muscle pull – it was worrisome.
Day 06 Velos Lake CS
We set up camp and took advantage of some sun to lay out a few things on the rocks to dry, including my boots and clothes! Shortly after my fall, I swallowed an extra-strength Advil while we had lunch and sipped on some fresh, filtered coffee underneath our dining area tarp. And just like the afternoon before, by 4 p.m. the rain started falling fairly heavy for a couple of hours.
Depending on how I stepped down on it, the right leg was feeling very weak. For the first time ever on all our canoe trips, we considered
a possible extraction back to Mattice Lake courtesy of Don Elliot’s Beaver bush plane service or
a route change that would have us get to the Fitchie Lake take-out by Hwy 599. We figured we could send Jonah an email and see if he could pick us up there and bring us back to the VIA stop at Savant Lake.
On the plus side – nothing seemed to be torn, and no swelling or bruising. We figured we’d wait until the morning and go from there. More Advil and a Robaxin 750 and the headlamps were turned off – and I got to play out the various trip scenarios in my dreams overnight! I didn’t sleep that well.
We woke up to a very windy morning. The northwest wind was blowing across the lake and walloping our tent and tarps. The foam had blown right up to our tent from the shore. The tent is usually the first thing to get packed away at the start of each day. This morning it stayed up since we were not yet sure what we would do after breakfast.
Velos Lake – windblown foam
We hunkered behind the canoe and tarp, which we had set up as a windbreak, and had breakfast. My walk to the other end of the portage trail and back to test my leg was encouraging; I was not feeling the pain of the afternoon before. The light calf stretches and the Robaxin/Advil combo were helping.
canoe as a windbreak on Velos
Increasingly concerned about that wind, on our way back along the portage trail from our second walk, we looked for a more sheltered tent spot. On a positive note – our inReach weather app forecast subsiding winds in the afternoon. We sat comfy in our Helinox chairs behind that windblown tarp, had more coffee, and bided our time. Every once in a while I would do some stretches and walk a few meters to see how the leg was doing. It was holding up pretty well!
At 1:00 we finally set off, having decided that the NW wind was no longer an issue. We were itching to cover some distance after the previous half-day that had seen us move less than five kilometers, an uncharacteristically slack day on the river for us. We are canoe trippers at heart – and not canoe campers!
five sets of rapids – and possible portages – from Velos into McCrae
A short paddle down Velos Lake brought us to the four-kilometer stretch of river with five potential portages that would take us into McCrae Lake. The first one was indicated as 274 meters (we are always amazed at the very precise measure!). Given my gimpy right leg, hopping in and out of the canoe or lining it would be awkward. We were hoping to be able to stay with the river and stay in the canoe as much as possible. As our GPX track above indicates, we mostly did that, occasionally lining to deal with low water.
As with most of the other portage info in this report, the following info comes from the Paddle Planner website. It, in turn, has borrowed heavily – if not exclusively – from the Wabakimi Project maps which were produced fifteen years or so ago.
P13
There is apparently a 274-m portage trail on river right as you leave Velos Lake. We took a standing look from the canoe and decided to stay with the river. The highlighted section of our track was the 300-meter stretch through the rapids which we spent less than 15 minutes on. Complications at the top and bottom gobbled up most of the time; we floated down the middle section at 5 k/hr. The few times we had to line, Max was able to git ‘er dun with little help from me, intent as I was on not slipping on a rock and aggravating my leg further!
Next up were a couple of sets of rapids in a narrow stretch of the outlet on the way to McCrae.
P14 was easily dealt with. We spent a minute at the top and then floated our way down toward P15.
P15 required a bit more effort. We spent about ten minutes lining/floating down this short 60-meter-long set of rapids, with the end stretch taking up most of our time. Not enough water and badly arranged rocks – the bain of a paddler’s plans for an easy day!
P16 – Savant River above McCrae
At the next narrowing of the river, we came to more rapids and a potential P16. Again, staying with the river we instead spent five minutes on a mix of lining and running this 80-meter stretch of river. From the bottom, it looked like it may have been easier had we taken the left channel around the island instead. We never did look for that 21-meter portage trail which would certainly be handy for those coming upriver.
Finally, just one more set of rapids and we would be in McCrae Lake! Things had gone surprisingly well, given the support Max was getting from me!
Our luck held out. It was a bump and grind mostly down the middle of the river to the bottom of the rapids. Sitting in a fishing boat was an American couple: we had provided them with some entertainment. In our brief chat, we learned that they were one of four couples staying at the McCrae Lake Outpost with its two cabins. They said they had been coming here on and off for 40 years!
While we could have paddled a few more kilometres before calling it a day, our paper map indicated a couple of campsites not far away. On the way to the island site, we changed our minds and decided to head for the one on the point instead. It was a good choice. The site looks like it has been used by locals for fish harvesting and comes with all the usual amenities – the fish gutting tables, drying racks, etc. Unlike a couple of other similar sites, it was also fairly litter-free.
We set up our tent in a sheltered spot on the edge of the site and then wandered down to the shore with our Helinoxes. While it was cool and windy enough to slip on some warm jackets, the sun was out.
As we sat there and took in some late afternoon sun, 200 meters across the lake we spotted a couple of moose munching on the grasses and reeds. My 200mm lens got the first shot; Max’s HX80 with its 720mm reach, snapped the other two.
Early that afternoon when we set off for McCrae Lake, the state of my right leg was foremost in my thoughts. We had come into the lake with so little drama and minimal effort that I was feeling much more positive about any upcoming challenges. Time for another Advil!
Other than the moose photos, we also got a couple of shots of these old guys on the shore. They seemed to be contemplating something as they stared to the west where the moose had been.
The Savant River system ends at the outlet of Lake McCrae; a set of rapids and a set or two of swifts and you are in East Pashkokogan Lake. We set off for the north end of McCrae; on the way, we stopped to check out the island campsite. It is located about 25 meters from the shore and is nicely sheltered. Then it was on to the bottom of McCrae Lake and a possible portage.
Had we wanted to, we could have headed for the portage locals call the Icehouse to access Pashkokogan Lake and Highway 599 or the Pashkokogan River. (See here for a 1970s Fed. Govt topo which indicates the portage.)
the Icehouse Portage option to access Pashkokogan Lake.
The map above shows the location of the Icehouse Portage to access Pashkokogan Lake. However, we were headed to the Savant River’s final potential portage (P22 in our trip count) which would bring us to East Pashkokogan Lake.
We never did look for the indicated portage. Instead, we paddled up to the rapids and saw that a 20-meter mini-portage would get us around the top ledge and we could line and run the rest. 35 minutes later we were in East Pashkokogan Lake.
The images below capture the top of the rapids out of McCrae Lake:
the end of the Savant River as it tumbles down into the channel leading to East Pashkokogan Lake
P18 – from McCrae into East Pashkokogan L
the rapids and swifts into East Pashkokogan Lake from McCrae
The rapids are followed by a couple of swifts. An easy float down the stretch you see in the image above, a lining job through a shallow boulder garden, and we were in East Pashkokogan Lake. We stopped for lunch and celebrated our descent of the Savant.
We also revisited our decision to bail out on the first eight kilometers from the headwaters lake off of Logging Road 702. We would have to be content with having done most, but not all, of the river! Doing that initial stretch would have made it complete. Here is a snippet of the Wabakimi Project(Vol. 2) map with what is involved – and what we decided to pass up on:
the first eight kilometers of the Savant River system to Jutten Lake
Perhaps this trip report will inspire some paddlers to embrace the challenge!
—————–
Route Options From East Pashkokogan L.
Sitting in East Pashkokogan Lake, there are dozens of trip possibilities. A few are listed below:
Into Pashkokogan Lake and an exit at Hwy 599
Into the Saint Raphael Park area after crossing Hwy 599
Up The Pashkokogan River To Fitchie Lake & a Hwy 599 return to Savant Lake
Down The Pashkokogan River to Osnaburgh Lake and The Albany River
Into Greenbush (The Misehkow Headwaters) and Down The Misehkow
Into Greenbush and On To Burntrock Lake and The Palisade River
See the Paddle Planner website for an overview of the possible trip extensions. The trip reports posted on the Canadian Canoe Routes forum will also provide valuable info.
Where We Were Headed
Our route would take us into Greenbush Lake, the headwaters of the Misehkow River system, and then, after a couple of rough one-kilometre portages, into the Palisade watershed.
Since I uploaded this post in 2023, a new biography of Tappan Adney has been published. My thanks to his great-granddaughter, whose comment below prompted me to check out the Amazon site! Click here to access more info –
Tappan Adney Amazon site info
————–
Edwin Tappan Adney (July 13, 1868 – October 10, 1950), commonly known as Tappan Adney, was an American-Canadian artist, writer, and photographer. (source)
So begins the Wikipedia page providing a brief outline of Tappan Adney’s life and why he is still remembered 75 years later. It was the time he spent in Woodstock in New Brunswick’s St. John Valley that had the greatest impact on his life. In his early 20s, Adney befriended Peter Lewis Paul, a member of the Wolastoqiyik First Nation, and learned how to build canoes in the Wolastoqiyik way. [These “people of the beautiful river” are also known by their Mi’kmaq name Maliseet.] He would also learn the Wolastoqiyik language and become a strong advocate for their culture.
Adney died in 1950, leaving unfinished his life’s major project. As John McPhee writes in his The Survival of the Bark Canoe (click on the title to access a PDF file of the book) –
Adney so thoroughly dedicated himself to the preservation of knowledge of the bark canoe that he was still doing research, still getting ready to write the definitive book on the subject, when, having reached the age of eighty-one, he died. Over the next dozen years or so, Howard I. Chapelle, curator of transportation at the Smithsonian Institution, went through Adney’s hills of paper and ultimately wrote the book, calling it The Bark Canoes and Skin Boats of North America. (p.7)
The Adney/Chapelle book was finally published by the Smithsonian in 1964.
Along with the material for the eventual book, he constructed exact replica models of about 130 canoe and kayak styles and forms at a one-fourth or one-fifth scale. McPhee’s book includes a section on some of Adney’s models and traditional construction techniques.
Adney Wolastoqiyik (Maliseet) Decorated Canoe
Adney’s book and models remain the primary sources of information on the construction and development of the bark canoes of the Indigenous Peoples of Canada and the northern U.S., in particular the Anishinaabe (i.e. Algonkian) cultural family to which the Wolastoqiyik belong.
This Mariners’ Museum slide show presentation provides an introduction to a few of Adney’s canoe replicas. [The models are on display at the museum in Newport News, Virginia.]
Downloadable copies of the book are readily found online. Seehere for the Gutenberg site, where it is available in various file formats. The Internet Archive site also has copies for free download or to borrow.
———————
Adney’s Missinaibi Visit:
Missinaibi and Little Missinaibi Lakes – and rail access
In 1930 a 62-year-old Adney spent some time in the Missinaibi region. Five years before the area framed by the CPR, Algoma Central, and CN tracks and the Chapleau River on its eastern side had been designated as the Chapleau Crown Game Preserve. His main motivation was undoubtedly to learn more about traditional Ojibwe and Cree canoe building from the local people who still remembered the old ways.
Adney map indicating Cree and Ojibwe areas in the Missinaibi region SW of James Bay
While I have yet to find possible journal entries he made about this trip, his sketchbook images and photographs are available online, thanks to Montreal’s McCord-Stewart Museum.
Other than his continued interest in birch bark canoe construction, he also visited some of the pictograph sites found in the Missinaibi area. With him, he had an Ojibwe and a Cree paddler as guides. Along the way, he made sketches of the images found at the rock painting sites. Receiving the most attention were the pictographs
at Missinaibi Lake’s Fairy Point site,
on the east side of Missinaibi Lake’s Whitefish Bay, and
at two sites on nearby Little Missinaibi Lake.
These drawings and notes of the various sites are the oldest we have of Anishinaabe rock painting sites in northeast/north-central Ontario. Of these sites, Fairy Point is the most significant.
———————
The name Fairy Point comes from what was thought to be the English equivalent of the Ojibwe term maymaygweshiwuk, who were the mischievous elf-like creatures who lived in the dramatic vertical rock faces of lakes and rivers of the Canadian Shield. They acted as intermediaries who would connect the manitous with the petitioning shamans and vision questers who left their painted images as a part of the ritual connection.
Gelatin silver film negative Edwin Tappan Adney Fairy Point, Lake Missinabie, ON, 1930
As far back as 1875, Robert Bell of the Geological Survey of Canada used the English translation Fairy Point in his report of his route up the Missinaibi River and the Lake from Moose Factory and James Bay to his Michipicoten destination. It does seem strange that he makes no mention of the collection of pictographs at Fairy Point, given that they are one of the largest in northeast and north-central Ontario.
Gelatin silver film negative E.T. Adney Tip of Fairy Point, Lake Missinabie, ON, 1930
Gelatin silver film negative Edwin Tappan Adney, Rock paintings near the tip of Fairy Point, Lake Missinabie, ON, 1930
Fortunately, when it came to the pictographs, Tappan Adney would not be so silent – or so unimpressed. He seems to have spent a couple of days at the Fairy Point site, sketching the images which make up the various panels. As well, he took some photographs, including the ones above. They represent the oldest still existing- and perhaps first – visual records of the pictographs in the Missinaibi area.
The entire McCord-Stewart Museum collection of Adney sketches, photographs, and other artifacts (81 items in all, some going back to his time in the Klondike Gold Rush in the late 1890s) can be accessed here.
———————
What follows are individual pages from Adney’s sketchbook. Whenever possible, I also included photos of the same panel of images taken by my brother and me on our last visit in 2016.
The Chiniguchi River system is sandwiched between Wanapitei Lake and the Sturgeon River. Before the 1900s, the Anishinaabe, especially those Ojibwe registered with the Wanapitei Reserve (now called Wahnapitae First Nation), would have known the area as the hunting grounds of individual families and would have used various points along its length to travel north to the Montreal River system or east to Lake Temagami.
Chiniguchi River system, top to bottom
A highlight of a mid-September 2022 canoe trip up the Chiniguchi River and down the Sturgeon River was the time we spent taking in the rock images painted by Anishinaabe shamans or vision questers on vertical rock surfaces on Matagamasi and Chiniguchi Lakes.
describing what we saw and, more importantly, the pictograph images we came away with. While the “paint” (a mix of iron oxide powder and perhaps a sturgeon-based glue) is fading and some images are all but gone, they provide an entry point to traditional pre-Contact Anishinaabe culture and beliefs.
—————-
The Matagamasi Lake Pictograph Site:
The Most Well-Known Images
looking up Matagamasi’s NW arm on an overcast September afternoon
An hour or so after leaving the put-in spot at the south end of Matagamasi Lake, we were paddling along the vertical rock face looking for the images “painted” by some Anishinaabe shaman or vision quester some two or three hundred years ago. On display were:
a human figure with outstretched arms,
an animal figure (“wolf-like”?), and
a smudge – perhaps an otter or beaver skin image? – a few inches higher and to the left.
A drawing and comments by Selwyn Dewdney from his 1965 visit served as our guide.
Dewdney sketch from Rajnovich’s Reading Rock Art
The main pictograph panel at the Matagamasi site
See here for a similar image from Cliff Lake above Lake Nipigon.
———
Selwyn Dewdney’s Account
The first edition of Selwyn Dewdney’s Indian Rock Paintings of the Great Lakes was published in 1962. (Click on the title to access an online copy.) Five years later, a second edition appeared in which Dewdney presented details on another 160 pictograph sites. It included this passage on pictograph sites in the Gogama area in general and Matagamasi in particular –
[Click here to access a PDF file of the additional 2nd. Ed. material.]
———
The Cross Shape To The West
We noted a cross-like shape just to the west of the panel with the three images. It is perhaps a simple drawing of Animikii (The Thunderbird) or of the symbol that the strange newcomers to the land, especially the men in black robes, seemed to attach much power to.
a cross drawing to the west of the main Matagamasi pictograph panel
The image below is from the west end of the Anishinaabe world – a pictograph on the Bloodvein River in Manitoba with similar cross or thunderbird paintings.
Bloodvein pictograph site below Bushey Lake cross and thunderbird figures
———
More Pictographs To The East
We then paddled over to a campsite on a point on the other side of the lake; I was under the impression that this was the total number of images to be seen!
On our way to Wolf Lake the next morning, we luckily passed by the rock face again for another look at the small collection of images and smudges we mistakenly thought made up the site. Well, we found more!
Given the note on the Ottertooth map (The Middle Tracks) describing the site as the second largest in the Temagami area, this certainly made sense!
Looking west to the picto site and the turn to the NW arm of Chiniguchi’s Matagamasi Lake
Matagamasi pictograph site overview – a view from the east
We came to the site further east and found a few pictographs we hadn’t even looked for the previous afternoon.
The East Panel:
Matagamasi pictograph site – easternmost face overview
As we approached, drawings of animals – a moose?- and a canoe with paddlers and other difficult-to-say markings popped out of the rock.
Matagamasi Pictograph site – the easternmost face
Matagamasi -easternmost face
A bit further down, we came across what looked like a set of four vertical lines. They are often described as tally marks, and the guess is that something is being counted.
Could it be the number of days the vision quester has been out?
Or perhaps it is nothing more than exposed bits of the underlying iron oxide rock stain?
tally marks – or iron oxide rock stain just to the west
We paddled back to the panel of images/shapes we had seen the afternoon before.
————–
Back To The Main (West) Panel and More
Matagamasi pictograph – a human figure with outstretched arms
As we continued west, we spotted the marking pictured below. It is about 15 cm. long and is either a faded “painted” image or a natural rock stain. The absence of more natural rock stains nearby makes the former more likely.
Possible pictograph to the west of the human figure image
more reddish stain on vertical rock
more rock stains looking like pictographs?
—————-
The Pictograph Site On Chiniguchi Lake
Once on Chiniguchi Lake, we followed the shoreline as it bends gradually to the north-east. A moderate wind from the north-west meant we had to put more oomph into our strokes as we approached the next point of interest on our Chiniguchi tour.
The rock face pictured below hosts a humble collection of almost-gone pictographs. Among them, we were able to discern a couple of canoes, some geometric forms, and perhaps a very simple rendition of a Thunderbird image.
Chiniguchi Pictograph site overview from the south end
The Chiniguchi Lake pictographs – click on the image to access one with an exaggerated reddish hue
———–
A Site “Rediscovered” in 2008
The Ottertooth map (The Middle Tracks) includes this note about the site – (Rediscovered 2008).
You have to wonder how the site could have been forgotten, given its location next to a popular campsite on a frequently visited lake!
Then again, Selwyn Dewdney was not aware of the site in the mid-1960s, despite his many contacts and the interviews he conducted with local people, both Indigenous and non-.
Chiniguchi Lake pictograph panel
———–
An Attempt To Draw The Images From The Rock
Accentuating the red hue in Adobe Lightroom – an attempt at an app pictograph researchers use called DStretch – resulted in this view:
The Horned Snake (Michi-ginebig) played a significant role in Ojibwe mythology. If it is indeed a Michi-ginebig image, it looks like the painter started strong with lots of paint and then ran out near the end! Then again, it could be two images – a U-shape and, let’s say, a flat-bottomed canoe with two paddlers! The human impulse is to create meaning, even when there is none.
The cross with a horizontal line on the top pointing to the left could be a crude representation of Animikii, the Thunderbird, next to Gitchi-Manitou, the most powerful spirit. From the beak pointing to the left to the horizontal line in the middle representing the wings…
looking SE at the Chiniguchi Lake pictograph site
———–
Creating Narratives To Fit The Images
red hue accentuated!
To the left of the images discussed above are two vertical slash marks joined at the bottom and forming a V-shape.
A little bit further on are more marks that I did not get a good overview photo of – two zigzag lines and what may be a human figure. If you see the zigzags as serpents, creating a story connecting them in their role as messengers of the manitous as they bring medicine and wisdom to the petitioning shaman, would be easy enough!
Norval Morrisseau – (1962) Serpent Legend – delivering wisdom to the shaman
The location of the west-facing Chiniguchi Lake pictograph site
A more detailed account of our canoe trip from which these map and pictograph images were taken can be found here –


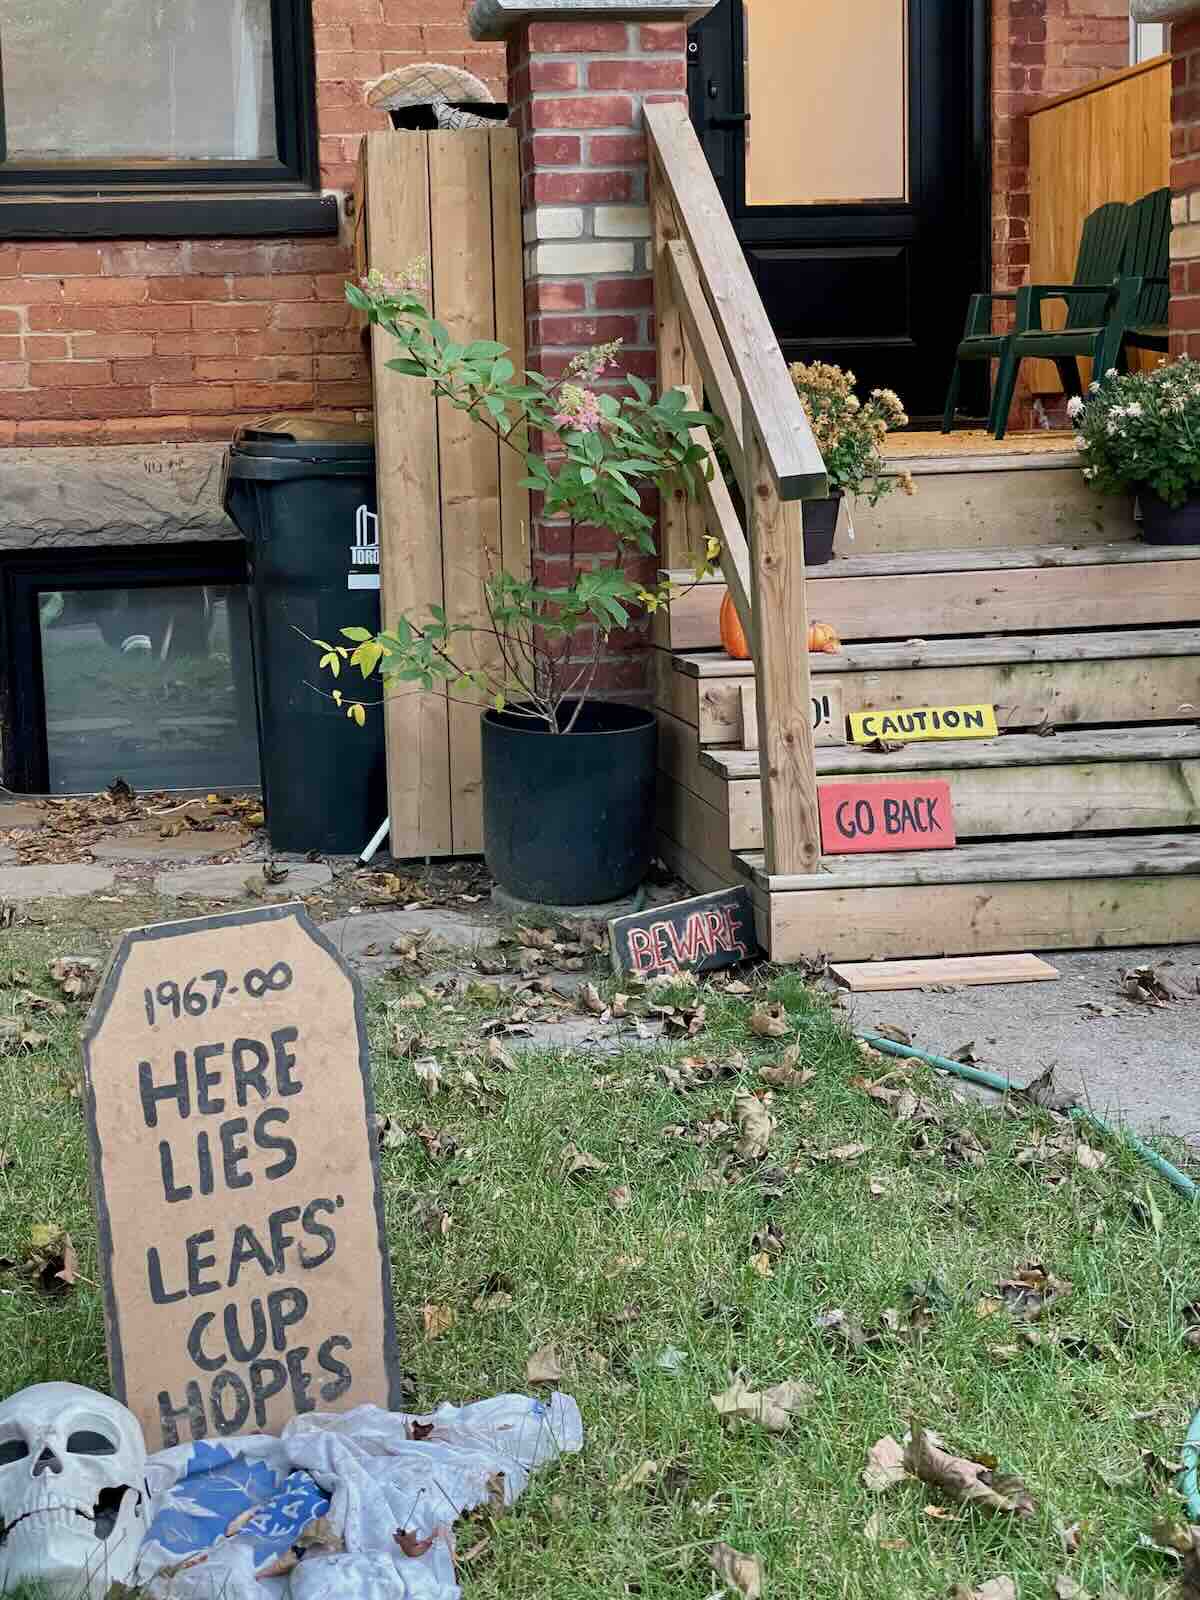


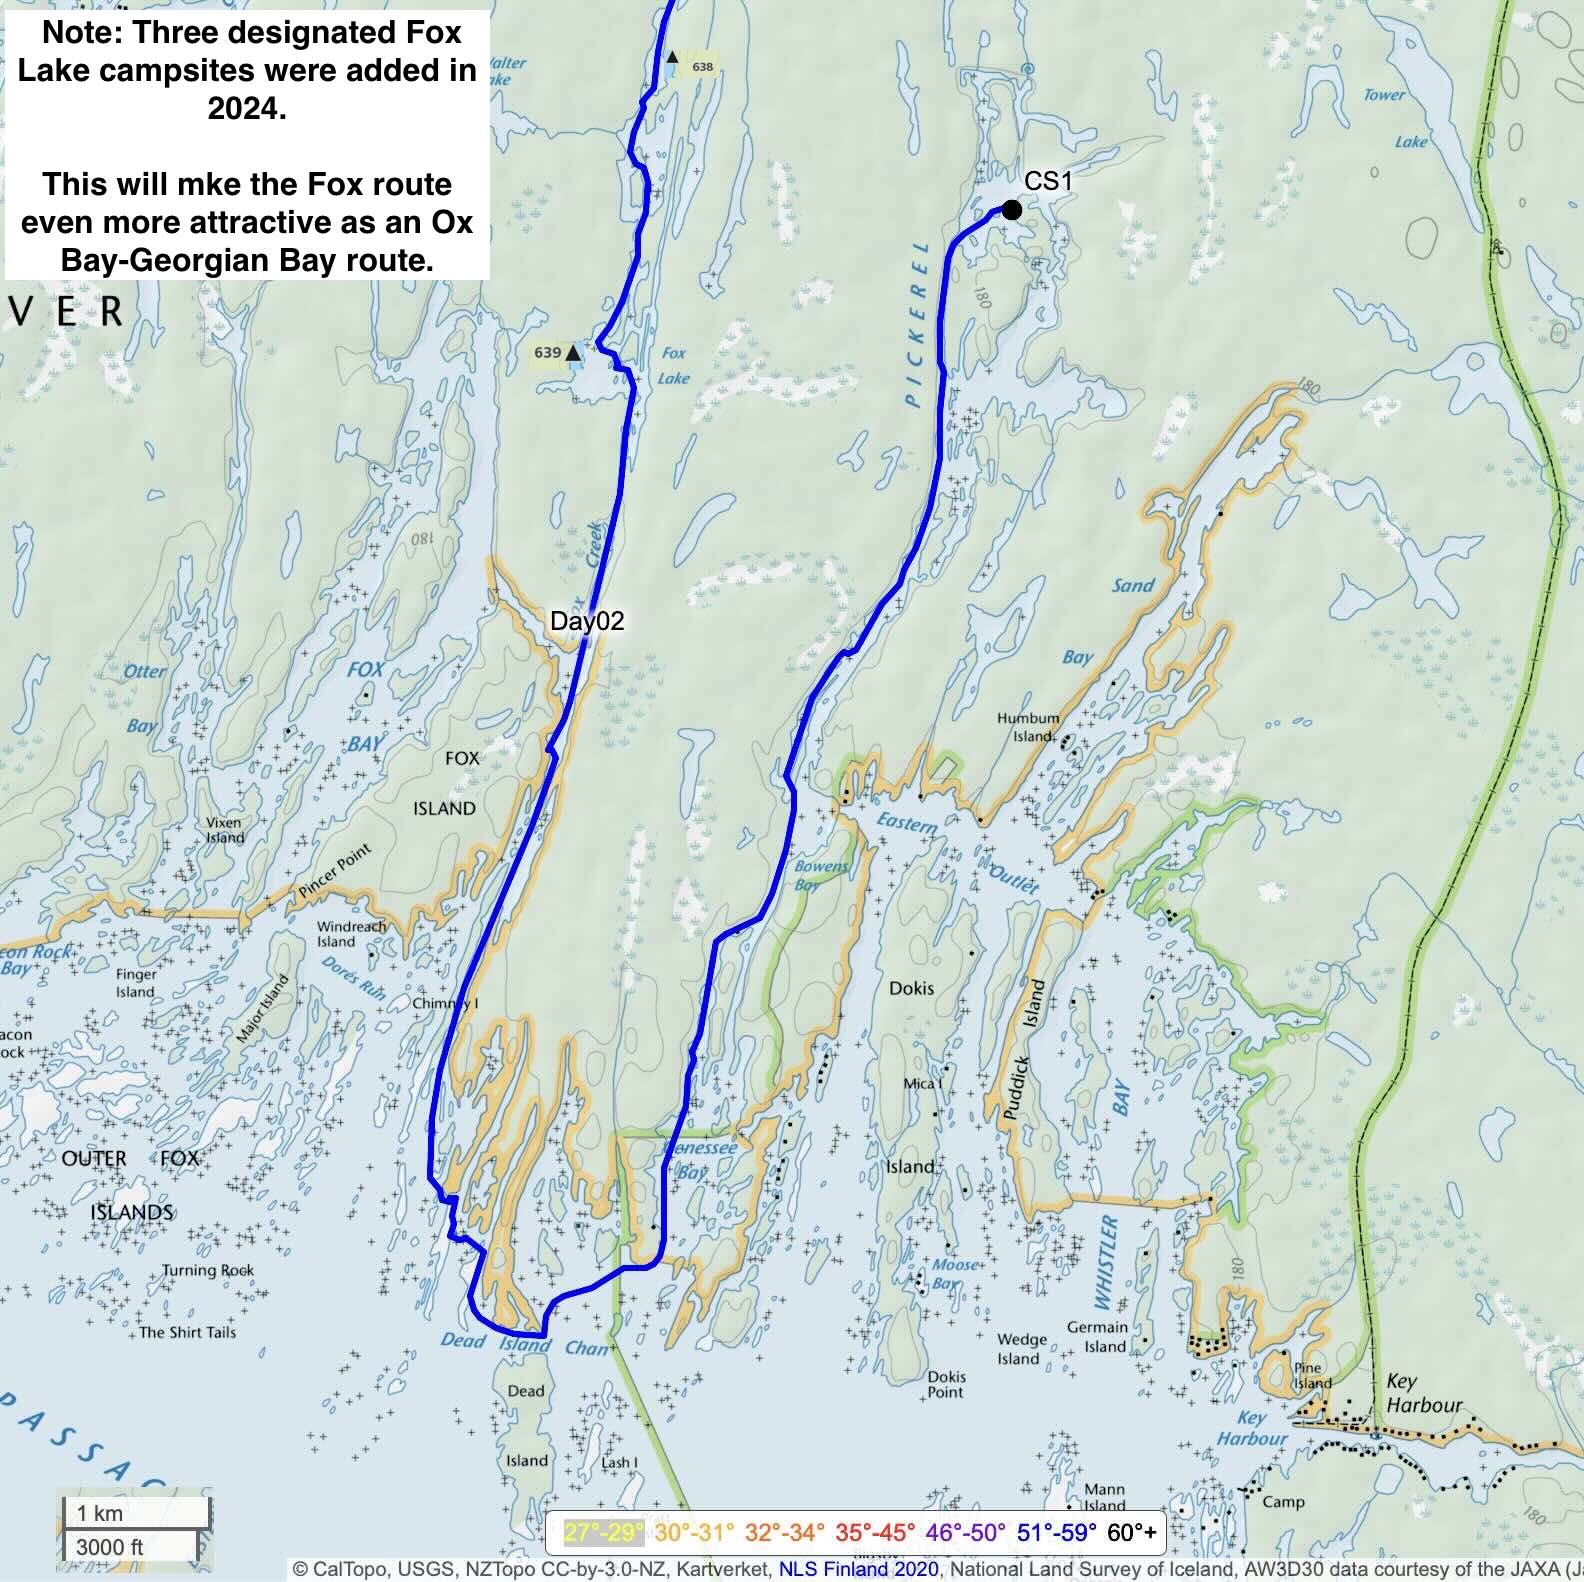


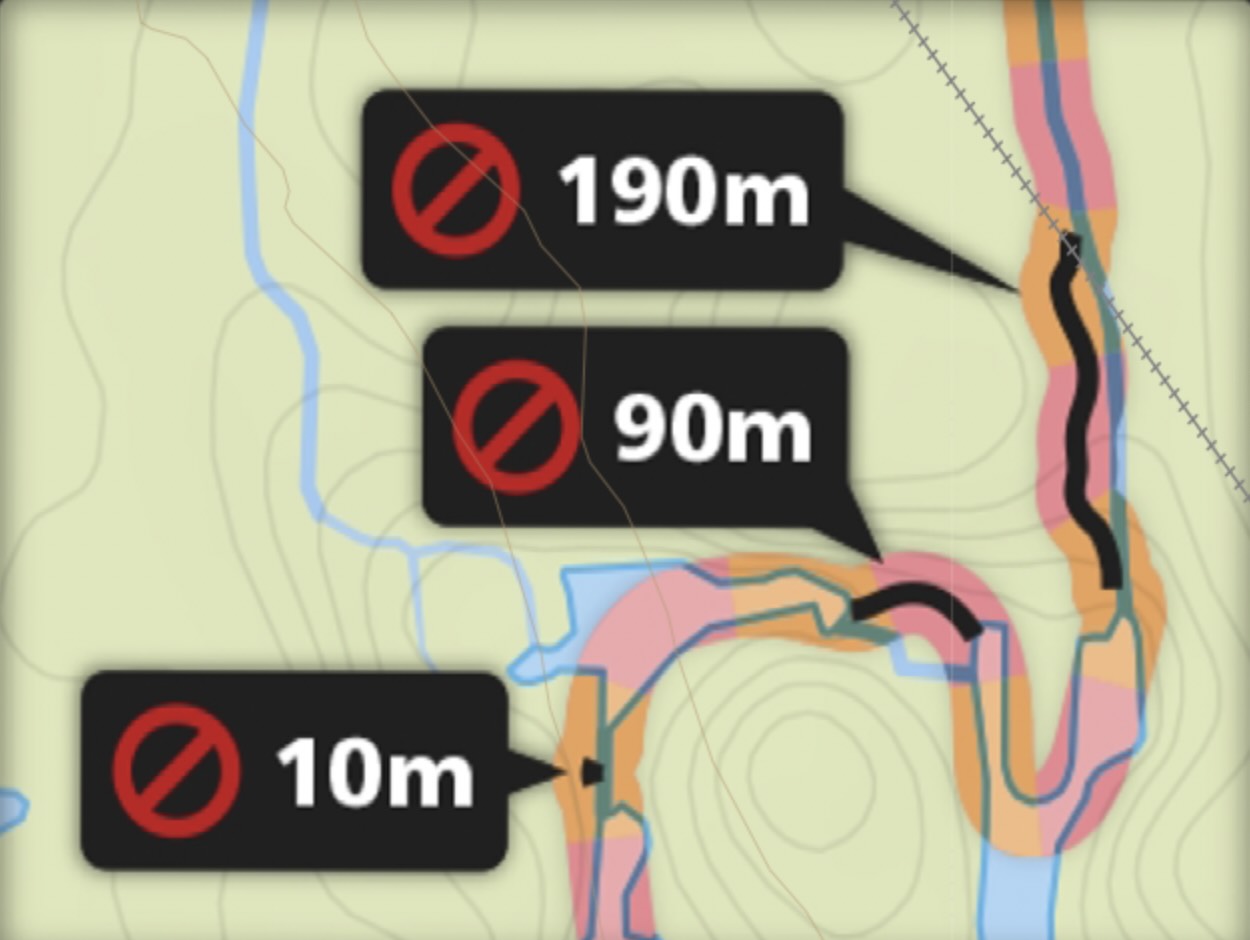
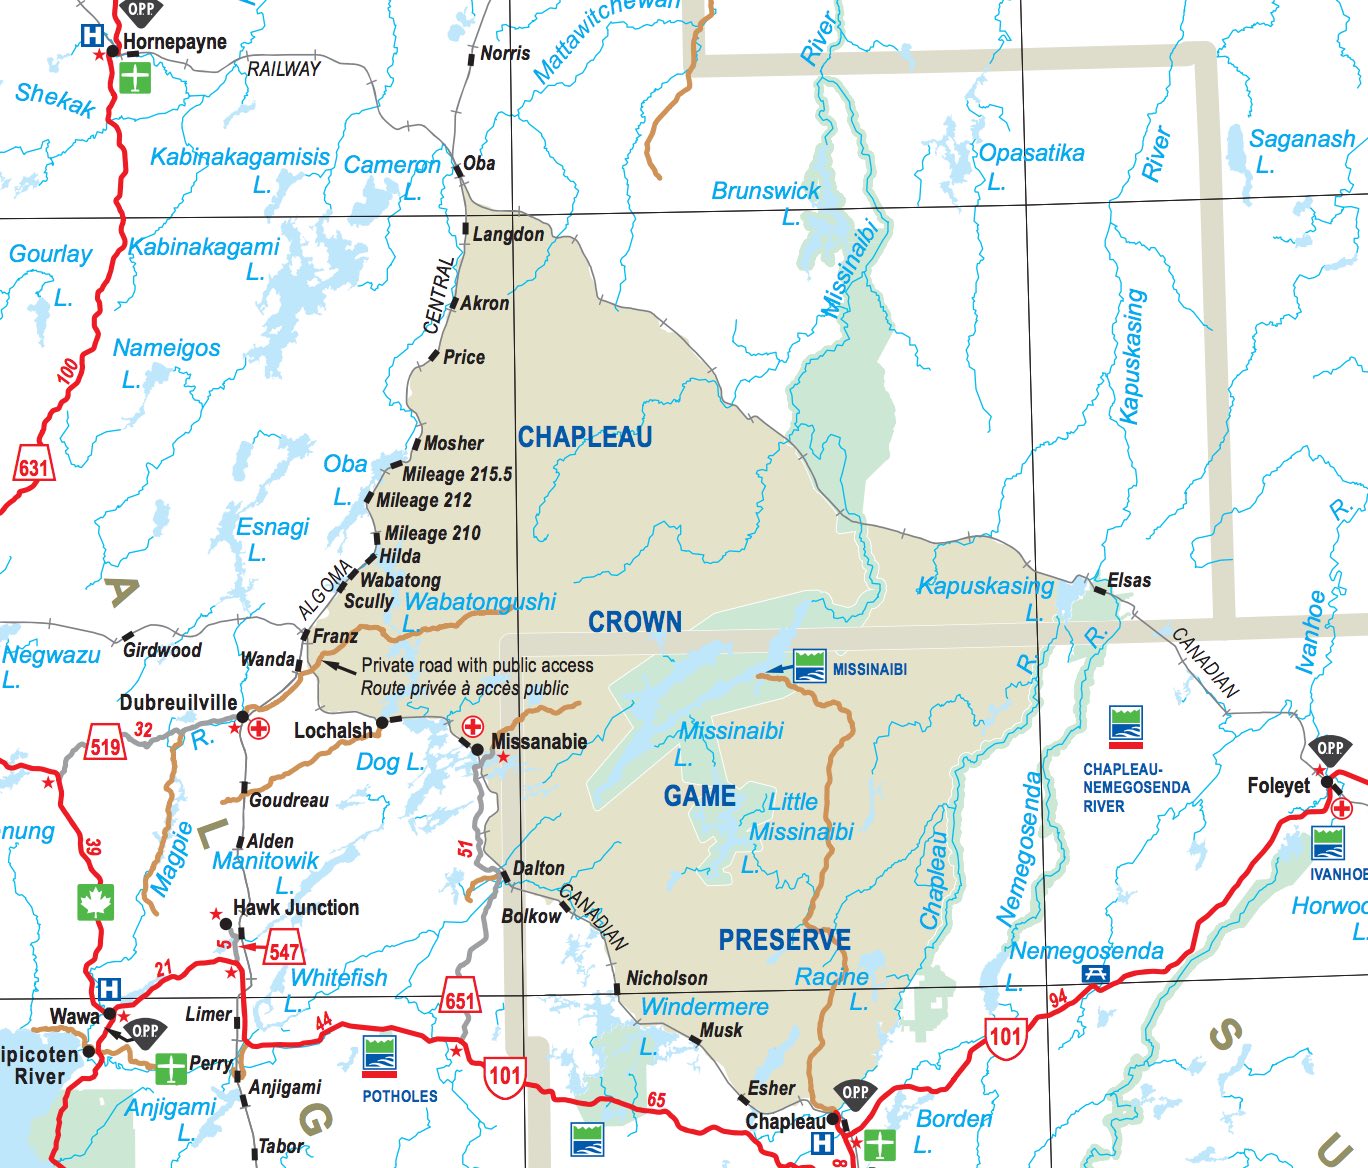