Table of Contents:
————–
See this pre-trip post for an overview of Taiwan and the bike route around the island.
環島 Huándǎo – Planning A Bicycle Route Around Taiwan
—————–
Finally, seven months after the actual trip, I sit down to do something with my JPG images and memories of a fantastic 16-day bike ride down one side of Taiwan and up the other.
The decision to choose Taiwan was the right one, largely based on the numerous positive reviews, trip reports, and YouTube videos I had found through Google. Consider this post just one more 👍 for cycle touring in Taiwan!
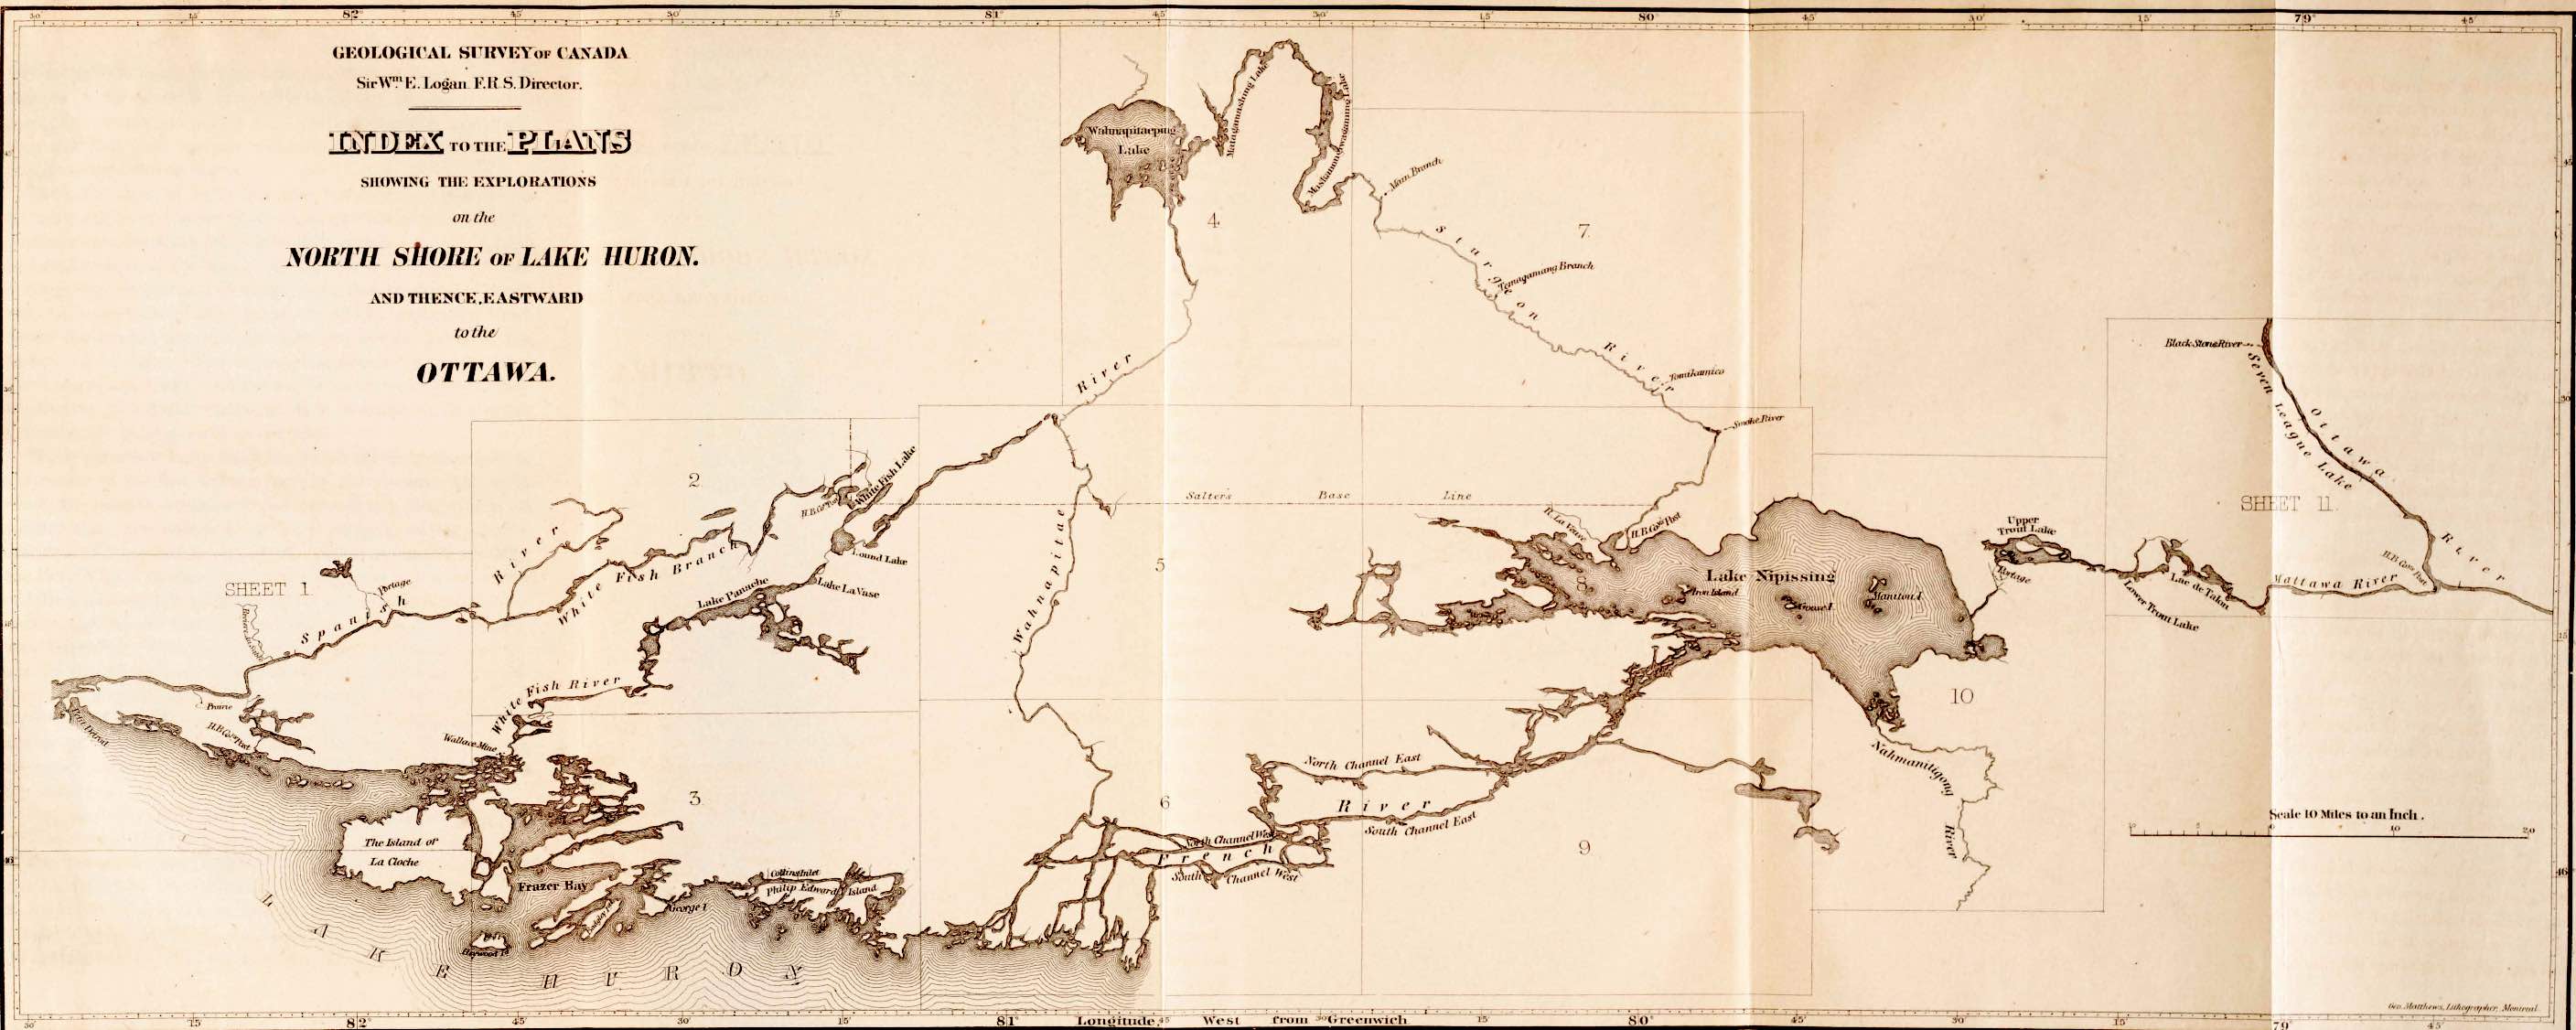
This post looks at the road from Taipei down to Kenting at the south end. It is the flat area to the west of the central mountain range in the map image below. It makes for an easy start to the first few days of pedalling as you pass through most of Taiwan’s major cities. Designated bike routes, bike lanes, and secondary highways made up most of the 500 km I rode. I usually followed the Route 1 shown above.

Note: Coming up are images which focus on the following:
- Maps of the day’s route linked to the Ride With GPS web page via a click.
- Images of road conditions, cycling lanes, and official route paths will give those considering the ride a better idea of what to expect.
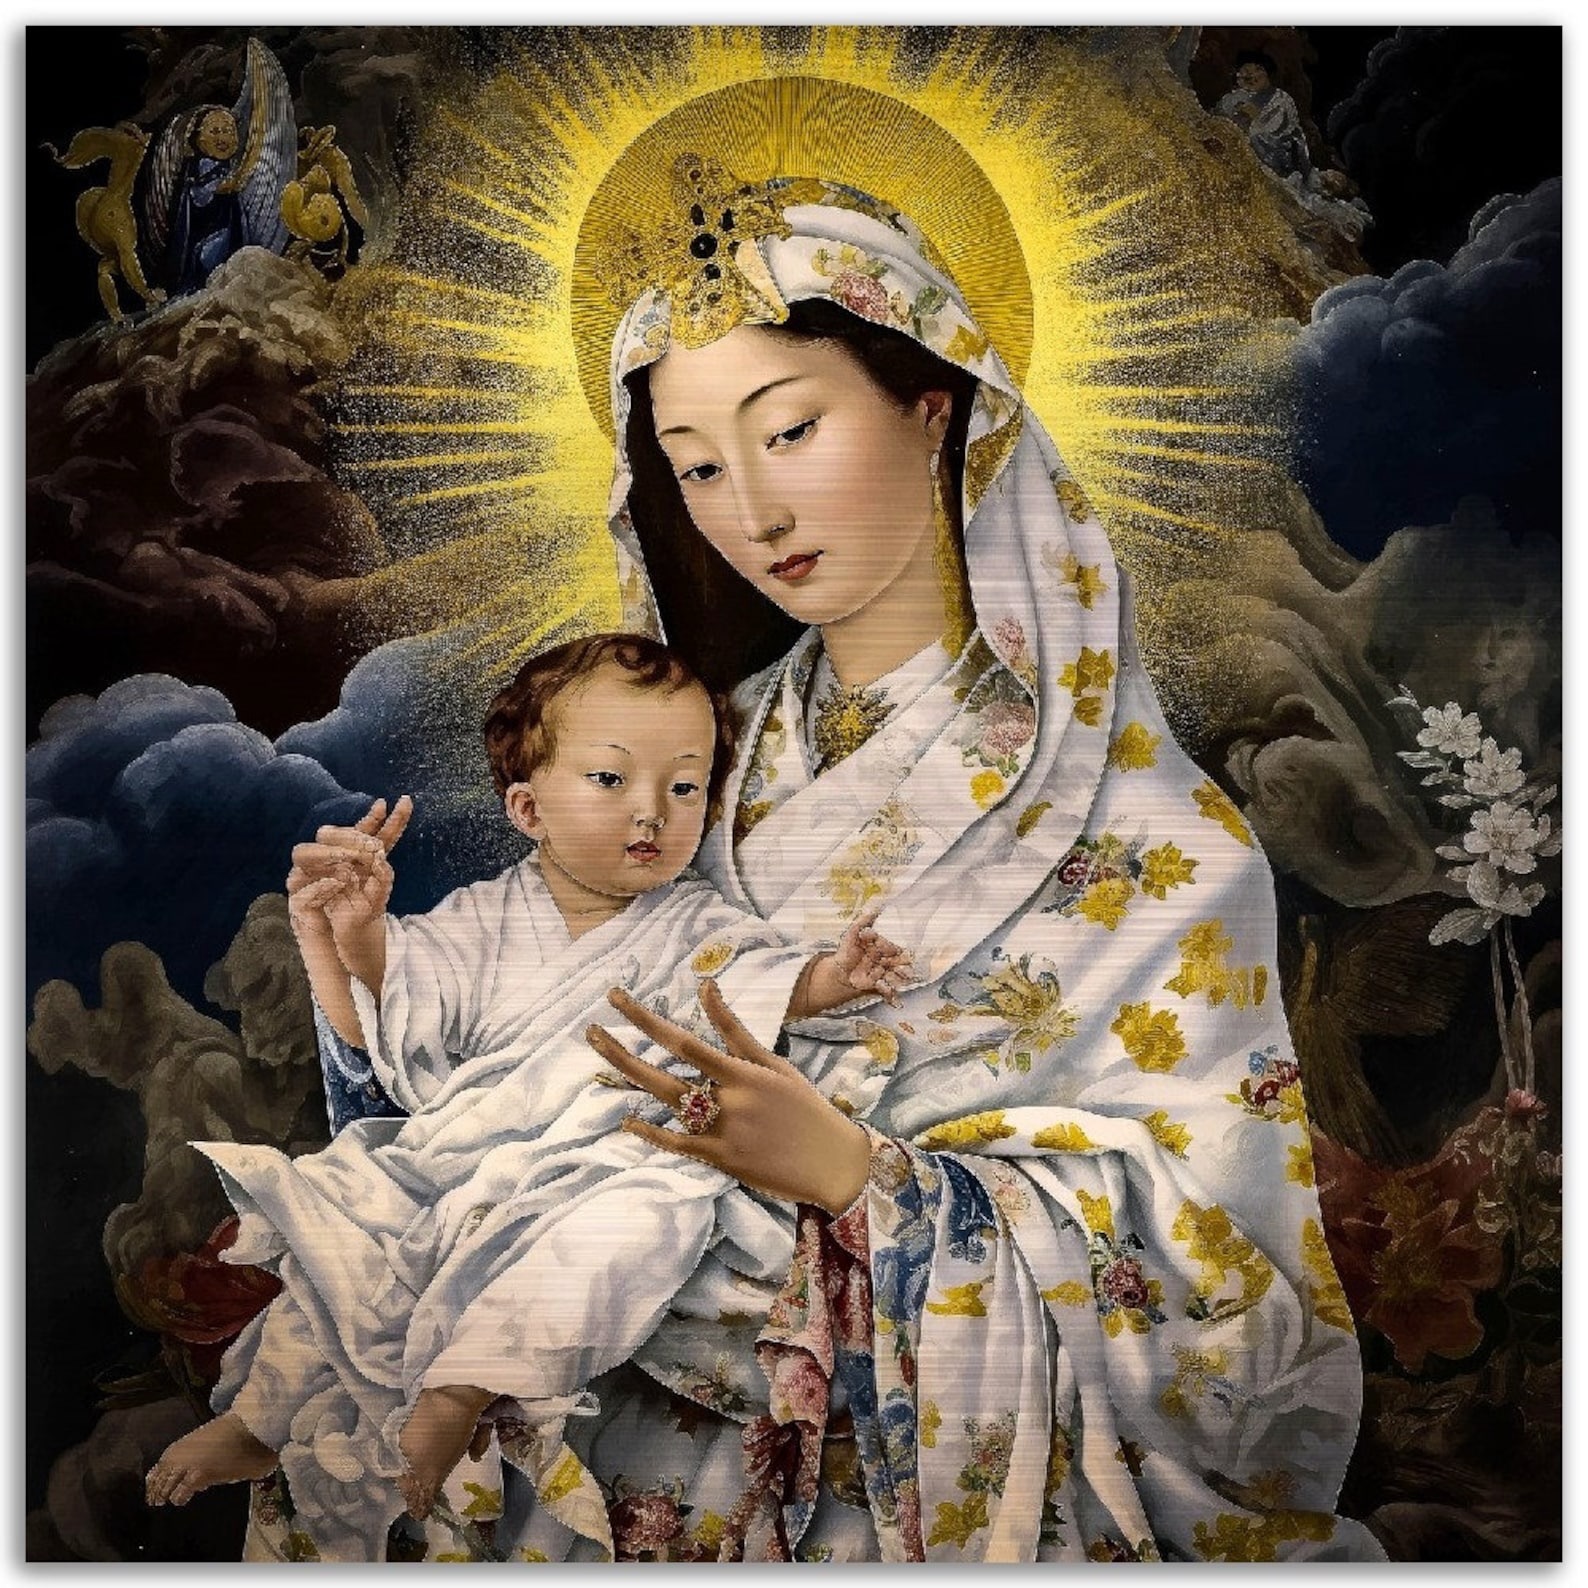
- Images from the various temples I visited along the way, especially on the island’s west side. Scroll past if temple visits are not an obsession you share!
—————–
Day 1 – Taipei (Ximending) to Hsinchu
- date: Saturday, March 29, 2025.
- weather: overcast
- distance: 86 km.
- Ride with GPS File
Shortly after 8:00, I was finally on my way. The goal for the day was Hsinchu, according to my Ride with GPS map, 81 kilometres to the southwest of the Ximending area where I had spent the first three nights of my Taiwan visit.
I had picked up the Surly Disk Trucker from MatthewBike the afternoon before. A couple of adjustments to the seat on Day 1 made it feel just right. It would take a day or two to get used to the straight handlebars and the location of the gear shift/brake levers. My apprehension about the mountain bike-style bars after a lifetime of drop bars proved unwarranted; the more upright seating position suited the tourist mode I was in, rather than the racer mode.
As the altitude profile shows, the first three hours of the ride were over fairly flat terrain. Even the bump two-thirds of the way into the ride proved to be much less than expected.

leaving Taipei – river path – easy start

Route 1 sign – reassuring!
I took very few road pics – three – on this first day. I used my iPhone as my navigation tool; I also had a compact Sony RX100. I may have been so focused on the ride itself that I neglected to get some shots to illustrate the nature of the path I was on!

rice field
A closer look at the Ride With GPS file above shows that on four or five occasions in the first 40 kilometres, I lost my way and had to backtrack due to route closures or changes, or, more often, my own inattentiveness. The 81 km route had grown to 86 by the time I arrived at the H.M. Hotel in Hsinchu!

The hotel is on an upper floor of a building across from the local government building. I wheeled my bike into the elevator and up to the hotel lobby, where I was welcomed by an English-speaking receptionist who had been expecting my arrival. She told me I could leave the bike in the lobby or my room. [I chose the room option.]
The H.M. Hotel proved to be an excellent choice for the night. A clean and modern room with a hot shower, TV and WiFi, and a very helpful staff, it gets an A+ and was perhaps the nicest one I booked in Taiwan. The specially-prepared vegan breakfast the next morning was a surprise.
The hotel is also a short walk from the city’s major temple and nearby vegetarian restaurants. I headed to a neighbourhood Japanese restaurant recommended by my Happy Cow app and was not disappointed!

Sweet potato balls
I headed for Chenghuang Temple, Hsinchu’s most important, but I was initially puzzled when I couldn’t find it. While there were lots of people milling about the busy food stalls and other shops, the temple itself did not seem to be where the map said it was.

In retrospect, the triangle roof in the image below should have been the clue! I eventually followed a few other people through the open doorway below the blank white sign.

There to greet me was the guardian figure you see below, looking appropriately serious.

Guard at the temple entrance
A bit of googling turned up more information about this statue –
Dong Pai Ye (董排爺), an assistant or subordinate deity within the pantheon of the City God Temple, specifically found in places like the Hsinchu City God Temple in Taiwan. He is one of two “Pai Ye” (排爺), the other being Li Pai Ye, who lead the four constables (喜、怒、哀、樂, Joy, Anger, Sorrow, Happiness) under the Six Generals of the City God’s court.
What followed was a half-hour of wandering around, wondering who I was looking at and what their stories were. I was bowled over by the dialled-up-to-11 amount of colour and decorative detail. The continuous stream of devotees and petitioners performing their rituals – lighting incense, leaving offerings, etc. – at the various shrines was an indication of the important place this temple plays in the lives of the locals.

Bizarre figure – Who is he?

Altar with a statue behind

a zoomed-in figure – identity?
The figure in the image is most likely the City God’s Wife (城隍夫人), a highly revered female deity in Chinese folk religion, especially prominent at the Hsinchu City God Temple in Taiwan.

gift table at the temple
Day 1 was an excellent start to my Taiwan bike ride, with easy cycling followed by nighttime sightseeing in downtown Hsinchu. and an A+ hotel in the downtown area close to several restaurant choices.
back to the top
—————–
Day 2 – Hsinchu to Wuqi (via Shalu)
- date: Sunday, March 30, 2025.
- weather: rain in the morning
- distance: Most done by train, with perhaps 10 km of cycling.
Since the H.M. Hotel lobby and my room were windowless, I went down to the street level to check the weather when I got up at 6:45. After a good night’s sleep, I was ready to go. On the menu for the day, about 100 kilometres. Since my arrival in Taiwan four days previously, it had been mostly overcast. Now it was pouring!
I went back up to my room, packed everything, and went to the breakfast room, expecting to pick out the vegan-friendly items from the buffet. What I found was a traditional Taiwanese vegetarian breakfast waiting for me. It was the best breakfast I had during my stay in Taiwan!

The platform at Hsinchu Central Train Station
Given the continued rain, I decided to make use of the Taiwan train system. While the high-speed bullet train is not really bike-friendly, the somewhat slower local trains allow bicycles without the need for bags or boxes. Compared to Canada’s VIA passenger service, even the slowest level in Taiwan is fast and, of course, on time.
I cycled over to the train station in the rain and got my tickets – one for me and one (50% of passenger fare) for my bike.

Before arriving in Taipei, I had already booked my first eight nights’ accommodation. The positives of doing that are:
- knowing you have a room waiting for you at the end of the day
- not having to spend any time looking for a room in the late afternoon
- Having to get to the room as extra motivation to finish the ride.
There is one significant drawback. You lose flexibility because pre-booking rooms boxes you in, and changing plans or destinations means forfeiting the money you’ve spent on the room.
Since I had already booked a room at the Helan Cun Motel in Wuqi District, northwest of downtown Taichung, that is where I was headed.

Hsinchu platform
This is the empty car I stepped into. As we headed south to Shalu, the closest spot to Wuqi District I could find, more people got on board. Note how spotlessly clean the train is.


From the train station in Shalu to the motel was about 3 km, though Google Maps, or my use of it, showed I had put in a couple of extra kilometres before finding my way to the motel. The rain had stopped around noon, and I regretted wimping out on the day’s ride so quickly.
When I planned my route, the motel was the closest accommodation I could find, based on a daily distance of about 100 km. While the motel may have belonged to the “love motel” category, it turned out to be much less garish than expected! At US$50 a night, it was fine. The one negative is that it was located in an industrial area with few shops or restaurants. I had gone against my usual rule of not booking rooms outside the downtown areas of towns I cycle through. I should have stuck to that rule in this case, too!
After paying a 40% supplement for checking in two hours early, I declined the McDonald’s breakfast options and headed to my unit. Like all others, it came complete with a private garage. No issues with bike storage this day!

Love motel in NW Taichung – Wuqi district
A walk down the deserted side street the motel is on led to a busier main road with a 7-Eleven store, where I filled my bag with prepared food, fruits, nuts, and juices.
On the way back, I peeked into a warehouse unit whose roll-up door was open and saw this unexpected display:


Day 2 was one of the two days when I used the train. The other was on the East Coast to get past a tunnelled section of the highway, which route guides encourage cyclists to avoid.
back to the top
—————–
Day 3 – Wuqi to Beigang
- date: Monday, March 31, 2025.
- weather: overcast but no rain
- distance: 100 km
Day 3, and it was back on the classic Brooks B-17 leather saddle I had brought along. Since the early 1990s, it has been broken in with rides from Vancouver Island to Winnipeg, eastern Cuba, Tasmania, and New Zealand’s South Island, and other rides.

More overcast weather and a bit of a breeze, but at least there was no rain. For the first 50 kilometres, I was mainly on Hwy 17.
Here is how a Wikipedia article describes it –
Provincial Highway 17 (PH 17), Chinese: 台17線) is a north–south highway from Qingshui in Taichung City to Fangliao in Pingtung County. The highway is known as Western Coastal Highway (西部濱海公路) since it runs parallel to the western coasts of Taiwan. Since the completion of PH 61 expressway, which parallels PH 17, the latter now mostly handles local traffic.
Traffic was light, and the generous bike lane made for a stress-free morning. As the above elevation graph shows, the terrain is almost flat.
My first stop was at a 7-Eleven for some breakfast. Two rice with bean paste balls and a cup of coffee later, I was back on the road. I was going to buy the two dogs guarding my bike a chicken snack, but decided to leave feeding them to the locals.


When I stopped to take a photo of the road in the image below, a couple of cyclists passed by. Seeing someone take a photo must have prompted them to do the same! They were on their way to Kenting at the bottom of the island and planned to be in Tainan that evening. I complimented them on their ambitious goal, since my plans had me there the following afternoon!

Three days later, as I entered Kenting at the south end of the island, I met one of the cyclists. He was heading back to Taichung, having lost his fellow cyclist after that first day.

In the early afternoon, the route changed from Provincial Hwy 17 to County Road 153. In retrospect, I could have followed it all the way to Beigang. Instead, I ended up on local roads used by the farmers to access their fields and spent an hour and a half cycling down some truly quiet pavement. My RidewithGPS app (well, my use of it!) had led me a bit astray!

farm road through Beigang farm fields


Approaching Beigang, I was initially confused by the structures in the images below. I soon realized that I was cycling past a grave site.

grave site N of Beigang

Five hours on the saddle and I rolled into Beigang, a medium-sized town on the west side of the Beigang River.
Beigang, Hokkō or Peikang is an urban township in Yunlin County, Taiwan. It is primarily known for its Chaotian Temple, one of the most prominent Temples of Mazu in Taiwan.[2] It has a population of 37,763 as of February 2023. Wikiedia entry

I had booked a room at 日日 Meworld, a five-minute walk from the Chaotian Temple. My room was on the seventh floor. I wheeled my bike into the elevator and up we went.

My Beigang hotel – ground floor
When my Happy Cow app did not turn up any vegetarian restaurants, I headed to the nearby 7-Eleven in search of another vegan-friendly supper.

temple altar and gifts at a neighbourhood shrine

Beigang mural – what is the story being told?
The mural above, with the dragon as a central figure surrounded by other deities, had me wondering what story was being told. Since even a local elementary school student could have explained it to me, I was reminded yet again of how much a foreign visitor misses of what is all around him.

a quiet Beigang side street scene
I walked around the downtown neighbourhood and ended the day with a visit to the Chaotian Temple, until a steady downpour had me heading back to the hotel.
Beigang’s Chaotian Temple
The Chaotian Temple in Beigang was one of the most stunning I visited while in Taiwan, certainly on par with Taipei’s major temples.

approaching Beigang’s main temple
 The Rough Guide to Taiwan provides a summary of the history of the Chaotian Temple and its importance to the Taiwanese devotees of Mazu, the sea goddess who figures in Chinese folk religion, as well as Taoism, Confucianism, and Chinese Buddhism.
The otherwise unexceptional town of Beigang (北港; bĕigăng), a short bus ride northwest of Chiayi, is worth a visit for the Chaotian Temple, one of Taiwan’s most significant religious sites. Built in 1694 to enshrine what many consider to be the country’s most powerful image of the goddess Mazu, the temple is one of the island’s greatest mother temples. As such, it’s constantly filled with worshippers, making it the best place in Taiwan to grasp the fundamental importance of Mazu to the Taiwanese, as well as featuring some of the most exuberant temple art on the island.

The main entrance of the Chaotian Temple in Beigang
As I entered the temple, the first statue I came to was the figure below. According to my later Google search, it is probably a representation of
Hu Ye (虎爺), also known as the Tiger God or Tiger General, a significant protective deity in Taiwanese folk religion.
Key characteristics and associations of Hu Ye:
-
Protective Deity: Hu Ye is revered as a guardian spirit believed to protect temple grounds, villages, and individuals, particularly from malicious forces and illnesses.

a temple guardian?

One of the many secondary shrines at the Chaotian Temple in Beigang


On the temple roof are ceramic figures depicting narratives from Confucian, Taoist, or Chinese Buddhist myth and legend.

finally detailed ceramic figures on the roof of the Chaotian Temple in Beigang
To help me decipher what was going on, I turned, yet again, to ChatGPT for its tinsight! Here is the response –
The figures on the Chinese temple roof are most likely
deities or legendary figures from Chinese mythology and folk religion, rendered in the traditional “Jian Nian” (剪黏), or cut and paste ceramic mosaic, style.
Specifically:
- Main Deity Figure: The central, larger figure, depicted with a prominent beard and holding an object that might be a ruyi scepter or a staff, could represent a specific deity like one of the Sanxing (Three Star Gods), particularly Fu (福), representing good fortune, or another revered Taoist immortal.
- Attendant Figures: The two smaller figures flanking the central deity are likely attendants or disciples associated with the main deity, often depicted holding symbolic objects or assisting the central figure.
- Symbolic Significance: These roof decorations, including human-like figures and mythical beasts like dragons and phoenixes, are placed on temples and other significant buildings not just for aesthetic purposes but also for protective and auspicious reasons, believed to ward off evil and bring good fortune.
There is something to be said for a tour of the temple with a qualified guide whose explanations and insights would add another level of appreciation of what is already an incredible cultural treasure.
back to the top
—————–
Day 4 – Beigang to Tainan
- date: Tuesday, April 1, 2025.
- weather: mostly overcast with occasional blue sky
- distance:86 km
Day 4 was another day of secondary roads and generous bike lanes, and moderate traffic zipping by. The bike lanes are shared by bicycles, scooters, and motorcycles, and only tend to be busy close to or when passing through towns.
When arriving first at a red light, stopping and waiting for ninety seconds for the light to turn green, it was not unusual to have forty motorcycles pass by when the light turned green! I often pulled to the side of the lane for 10 or 15 seconds to let the motorized swarm pass before continuing.


The entire lane is for bicycles and motorized two-wheelers

a reassuring bicycle route sign – “I’m going the right way!”


approaching Tainan – a concrete barrier separating the bike lane from the vehicles

Tainan is Taiwan’s oldest city and one of its most populous.

Tainan served as the capital of a Dutch-controlled part of Taiwan in the 1600s. The Dutch had followed the Chinese and Japanese and established a trading post in the area. For a hundred generations, various Indigenous Peoples (including the Siraya tribe in the 1600s) were already there. With the invaders’ arrival, they would retreat inland and up into the Central Mountains.
I had a room booked at the Hotel Brown in the West Central District of the city, yet another nice room at a fairly low cost. For the first time, I would be asked to leave my bicycle in the lobby. It would be one of four spots where this would be the case.
 My Happy Cow app had a few vegan options for Tainan. I ended up at the Living Hut. While not the most exciting food, the double portion I had did provide the fuel I needed to refill my tank! To simplify things for the next morning, I also got a rice noodle, tofu, and veg dish to take out.

I was struck by the number of motorcycles parked under the covered sidewalks of the downtown streets as I stepped out at 6:45 the next morning. I was out before the bike owners had started their day, and the roll-up storefront doors were all still down.


I was on a short walk north on Simmei Street to check out a few temples before cycling on. The temples were as empty as the streets, with only a few locals performing their ritual observances before heading off to their day.


Guan Gong Temple Guan Gong God of War


main altar at the God of War Temple (Kaji Guangong in Tainan

According to Chat GPT…
The figure in the image is Mazu (媽祖), also known as Matsu or Tianhou (Empress of Heaven), a revered sea goddess in Chinese folk religion, Chinese Buddhism, Confucianism, and Taoism. She is particularly significant as the patron goddess of seafarers, including fishermen, sailors, and travelers, and is widely worshipped in coastal regions of southern China, Taiwan, and overseas Chinese communities throughout Southeast Asia..


a statue depicting Guan Yu (關羽), also widely known as Guan Gong (關公), a revered deity in Chinese folk religion, Taoism, and Buddhism
I did not know it at the time, but Tainan would be the last town or city where I would visit any temples until Juifang at the end of the trip.
back to the top
—————–
Day 5 – Tainan to Dongang
- date: Wed. April 2, 2025.
- weather: sunny at first and then mostly overcast
- distance: 86 km
Cycling west to rejoin the bike route on Provincial Road 17 (the West Coastal Highway), there were some fine views of the Strait of Taiwan from a bike path. It was a great start to the day! However, the road soon turned back toward the interior.


a bike path S of Tainan

Tainan coast trail
Stopping for a short break, I checked my WhatsApp and found this image Laila had just sent a few hours previously from Toronto. An early April dusting of snow covered our back yard!

Meanwhile, back in Toronto – our backyard!
While I had seen these long stretches of rectangular patches filled with pumped-in water further north, this day I cycled by dozens more after I headed inland from the coast. It was aquaculture at work, fish and shrimp production in a controlled environment.

aquaculture on Taiwan’s west coast to the south of Tainan
My goal for the day was Dongang, a port town to the south of Kaohsiung. Taiwan’s second-largest city. For three hours, I would cycle through 40 kilometres of urban sprawl with
- elevated highways above,
- stop lights every 200 meters, and
- heavy traffic to the left of the bike lane
- only made worse by having to stop at most of those stop lights
This was my least favourite bit of cycling in Taiwan! On the plus side, there was a bike lane!
When I uploaded my images, I did a double-take when I came to this day. There are no pix! I must have slipped into “just get this over with” mode after I left that idyllic coastal bike trail! There is a reason why most organized bike tours skip the west coast of the island completely!
On the plus side, I met a couple from Montreal who were making the same trip around the island that I was. For the next ten days, we would stay in many of the same towns and occasionally have roadside breaks together. Here is a group shot from a couple of days later at the island’s southern point at Cape Eluanbi:

Cape Eluanbi group photo
back to the top
—————–
Day 6 -Dongang to Kenting
-
- date: Thursday, April 3, 2025.
- weather: overcast
- distance: 77 km
A much nicer day of cycling was coming up. While it was Day 1 of a four-day weekend, I was on the road early enough to avoid some of the later traffic. By then, I was already on some quieter secondary roads
The images below illustrate the varied roadscape of the morning.


As I approached the outskirts of Kenting Town, I met again one of the two cyclists whom I had chatted with three days before. The two-cyclist selfie below is all I have from that encounter. I wish I had his email address so I could send him a copy.

meeting a fellow bike tourist again
I entered Kenting on its busiest weekend of the year! Starting in 1995, the town hosted a rock music festival, Spring Scream, featuring up to 270 bands over the four days. While the festival itself seems to have died, young Taiwanese still head south to Kenting for the weekend. There was a band playing at a venue on the edge of town that evening. It felt like the Taiwanese Woodstock!
The image below is Main Street as I cycled into town mid-afternoon.

I had luckily found out about the long weekend months before and had booked a hotel room on the main strip. There were a half-dozen vegetarian restaurants to choose from, and I got to sample a couple of them – Thai for a late lunch and Indian for supper.
Leaving the downtown core, I headed east and down to the ocean beach. I was reminded again how popular Bob Marley seems to be in Asia.

a Bob Marley sign in Kenting

Kenting Beach behind my lodging

Kenting beach umbrellas
Back on the main street where all the action was –

Chows attracting some attention on Kenting’s Main Street

Trump gracing a meatball sandwich stand in Kenting
While walking through the throng of teens and Facetiming with my wife back in Toronto, I ran into the Montreal couple again, the ones I had met in the traffic hell of Kaohsiung.

Main Street Kenting on its biggest long weekend of the year
back to the top
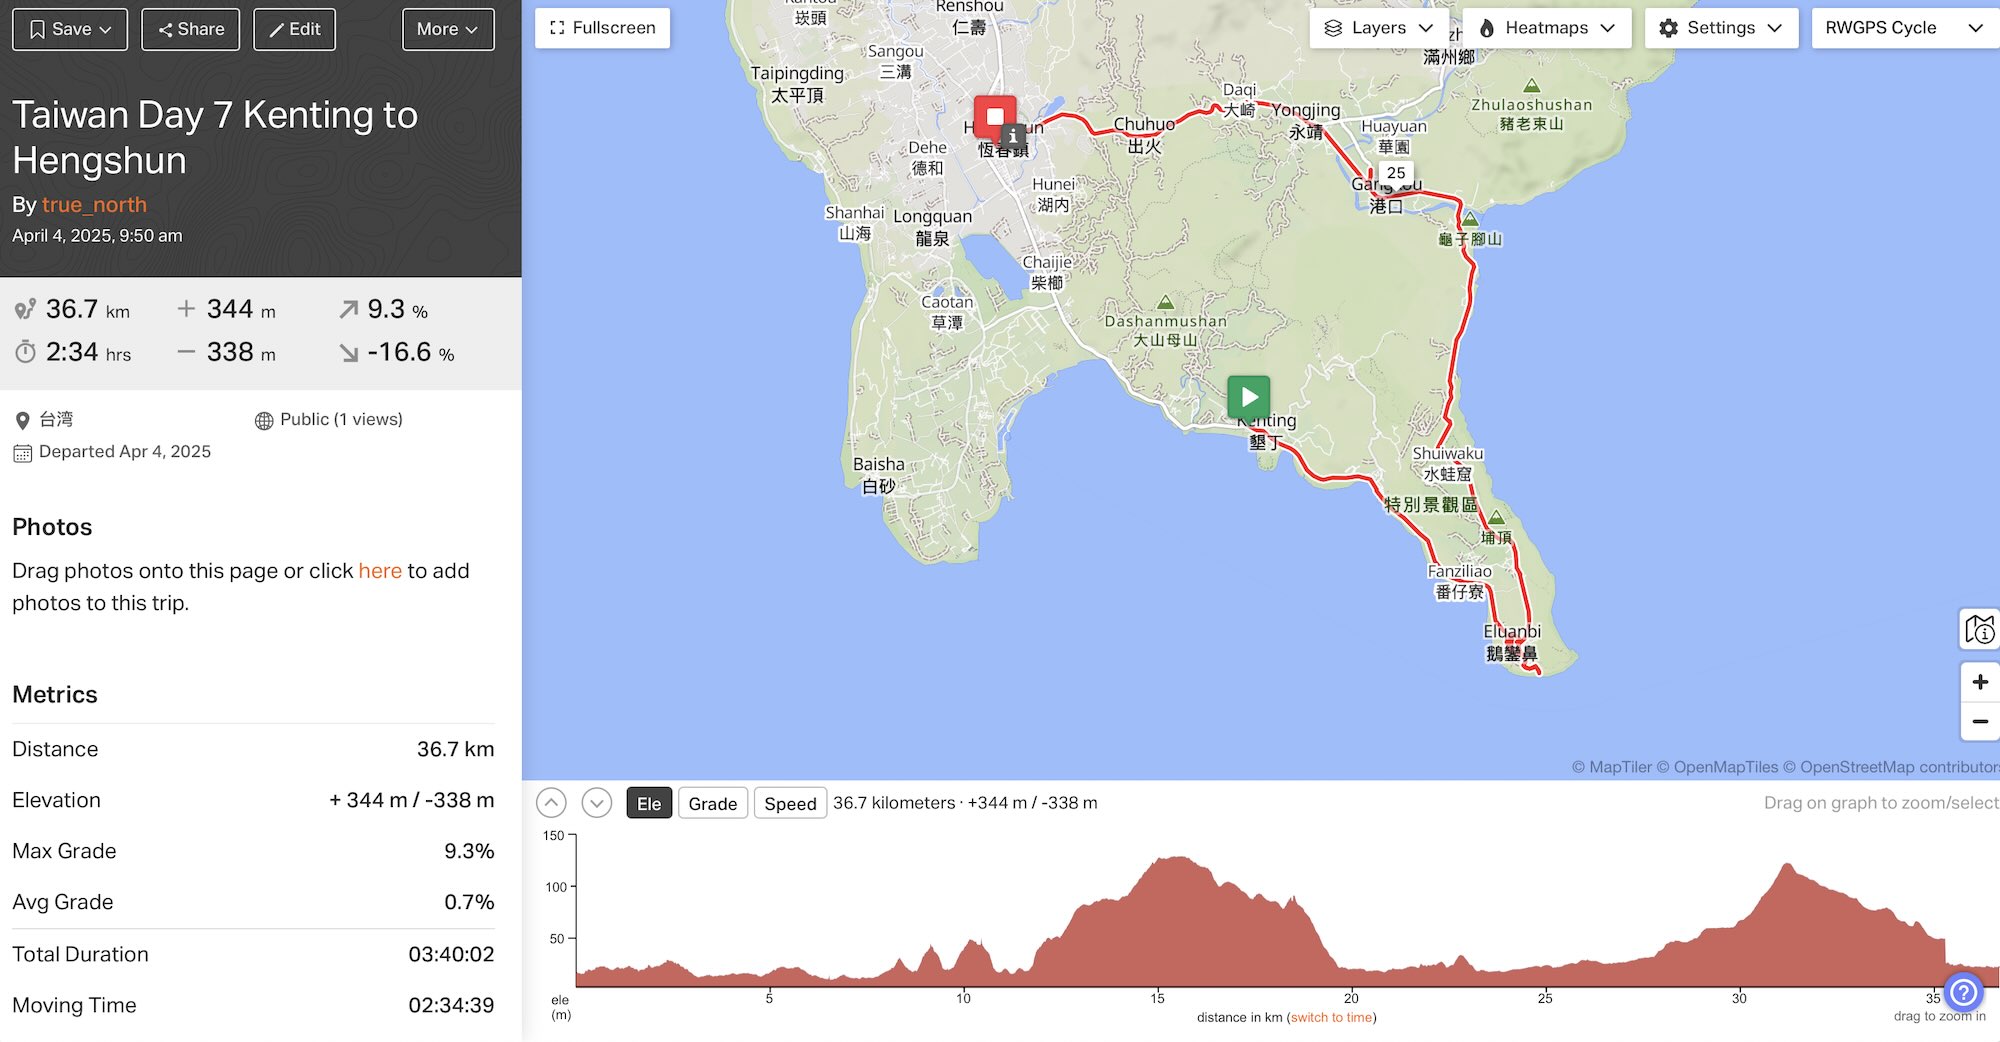
Day 7 – Kenting to Hengchun

Anticipating a tough day crossing the central mountain range the next day, I had planned this one to be an easy one – and it was. Over a leisurely four hours, I spent about 2 1/2 hrs. on the saddle and covered about 37 kilometres.
Before setting off, I walked to the beach on a path around the side of my hotel. It was early enough that nobody was there yet. It was also early enough that the restaurants were not yet open for breakfast. I had anticipated that and picked up some 7/Eleven food the night before.

Kenting beach at 6:45 a.m.


My breakfast in Kenting before setting off – courtesy of 7/Eleven

A view from Lighthouse Park on the way to Cape Eluanbi
I spent some time at Lighthouse Park before continuing to Cape Eluanbi. I had received a WhatsApp message from the Montreal couple that they were at the lookout at the cape, so I headed there. I spotted their loaded bikes resting against the railing of the walkway leading to the lookout.

Touring bicycles parked on the Cape Eluanbi viewing platform

The Cape Eluanbi platform – Taiwan’s southernmost point

mes amis Quebecois à Cap Eluanbi
While they lingered a bit longer after our photo shoot, I pushed on to Hengchun. After a bit more riding along some scenic coast road, it was time to turn inland. There would be a couple of hills to deal with before I got to Hengshun, but they were easy to do.

on the road back to my room in Hengshun

Meanwhile, back at home!

I entered the city through the East Gate [(東門; dōngmén], a section of the city wall that dates back to Qing Dynasty times and a reminder that Hengchun was once an important city.

Entering Hengshun, a view of the East Gate
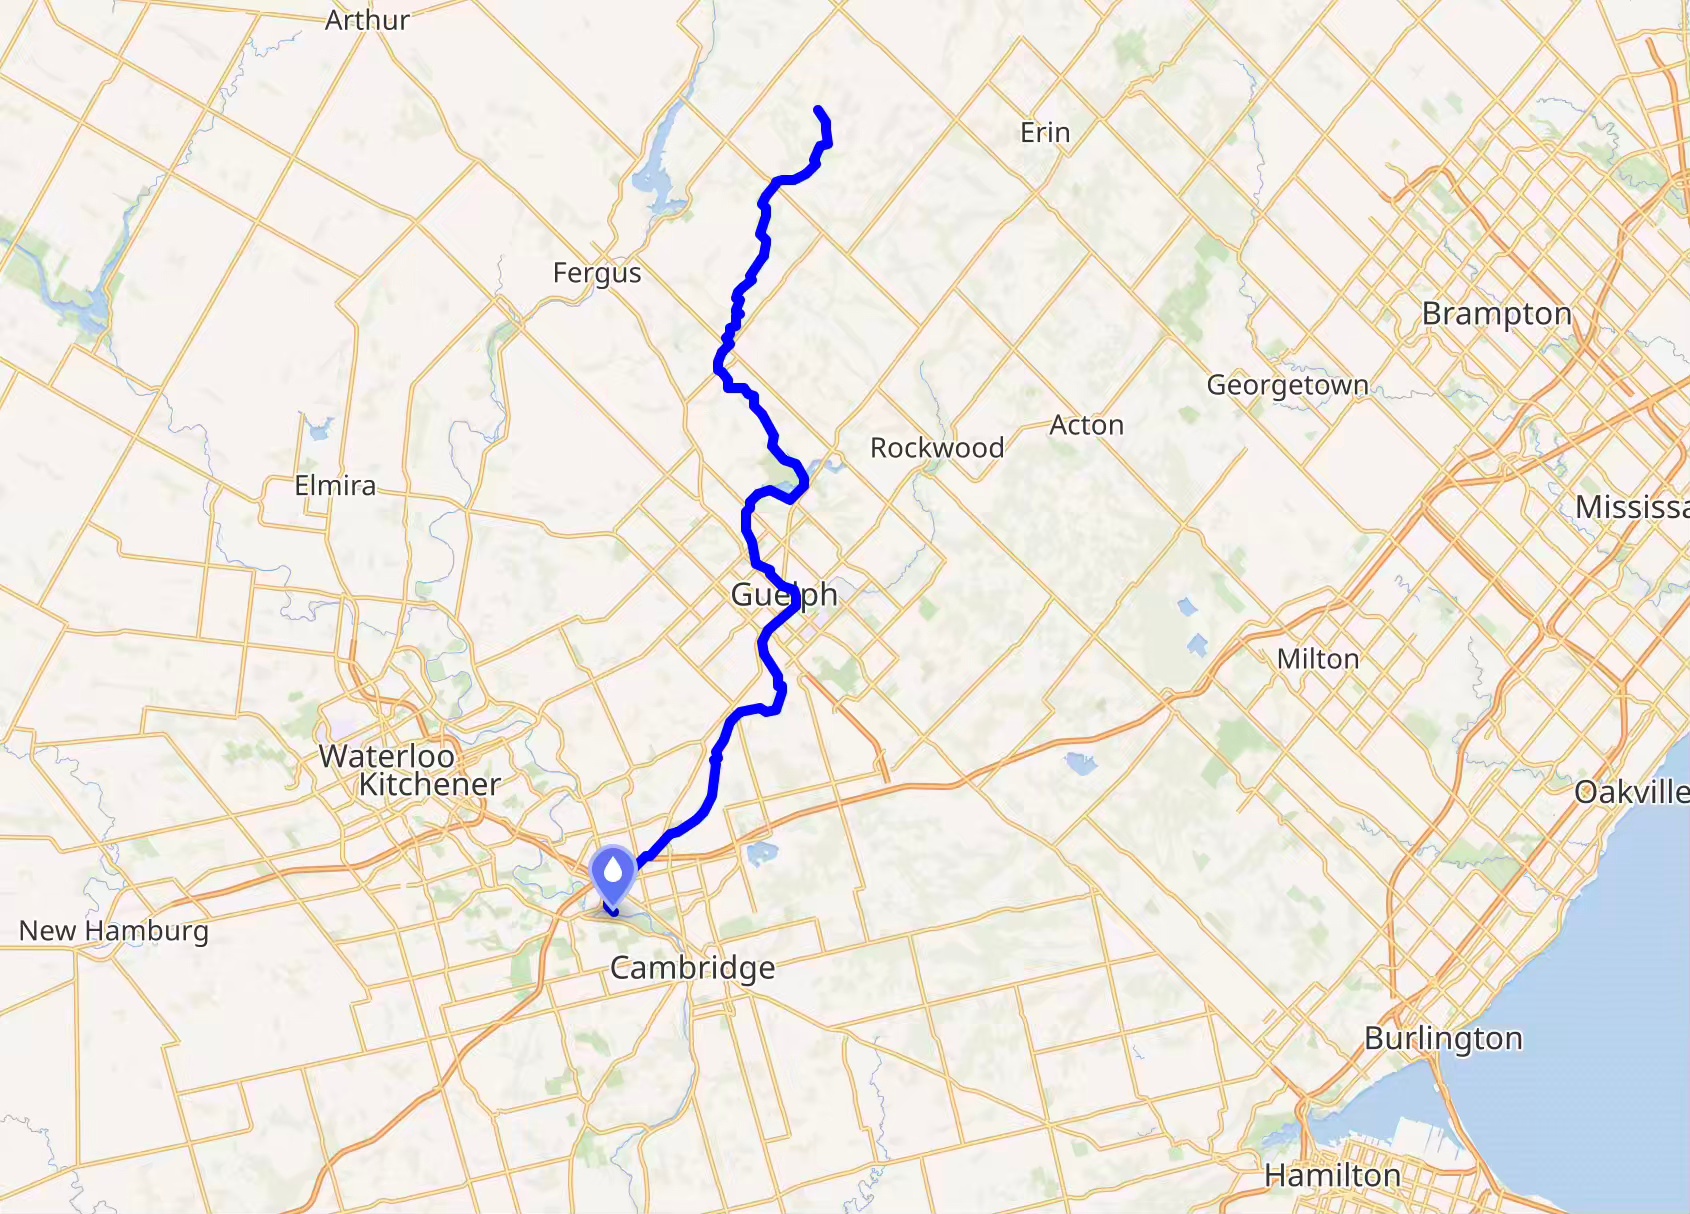
I had reserved a room at the Hengchun Inn ($60 US for the night) on the edge of downtown. While the Google map below makes the 1.4 km route from the East Gate to the Inn look very obvious, this is one of those times I could not figure out what the Google map was telling me.

from the Red Gate to the Hengchun Inn
30 minutes later, I was there! A bit of rest and a shower, and then the daily consultation of my Happy Cow app for suggestions on nearby vegetarian/vegan restaurants. Hengchun has several listings. I went with the traditional Taiwanese vegetarian option, and I was not disappointed with the buffet-style options. Given that I am a fuelie at heart, and not a foodie, Simple but nutritious food is fine with me.
back to the top
—————–
Day 8 – Hengchun to Daren

This was the day I anticipated my first serious climb of the trip. I would find out that it really wasn’t that serious after all. Maybe the three months before the trip spent on my bike trainer in the world of Zwift had paid off? As the elevation/distance chart above shows, the ascent is for the most part very gradual, with only a couple of sections that required out-of-the-saddle grinding.

My before-8:30 start meant that Saturday morning traffic on the first 10 kilometres from Hengchun to Checheng was very light. Soon I was on Hwy 199, a county road that heads east up to Shouka Pass and then down to the Pacific coast. I had reserved a room in Daren, rationalizing the $90. a night charge as my reward for doing the crossing. As it turned out, I could easily have done another 25 kilometres and stayed at Dawu or further up the coast.

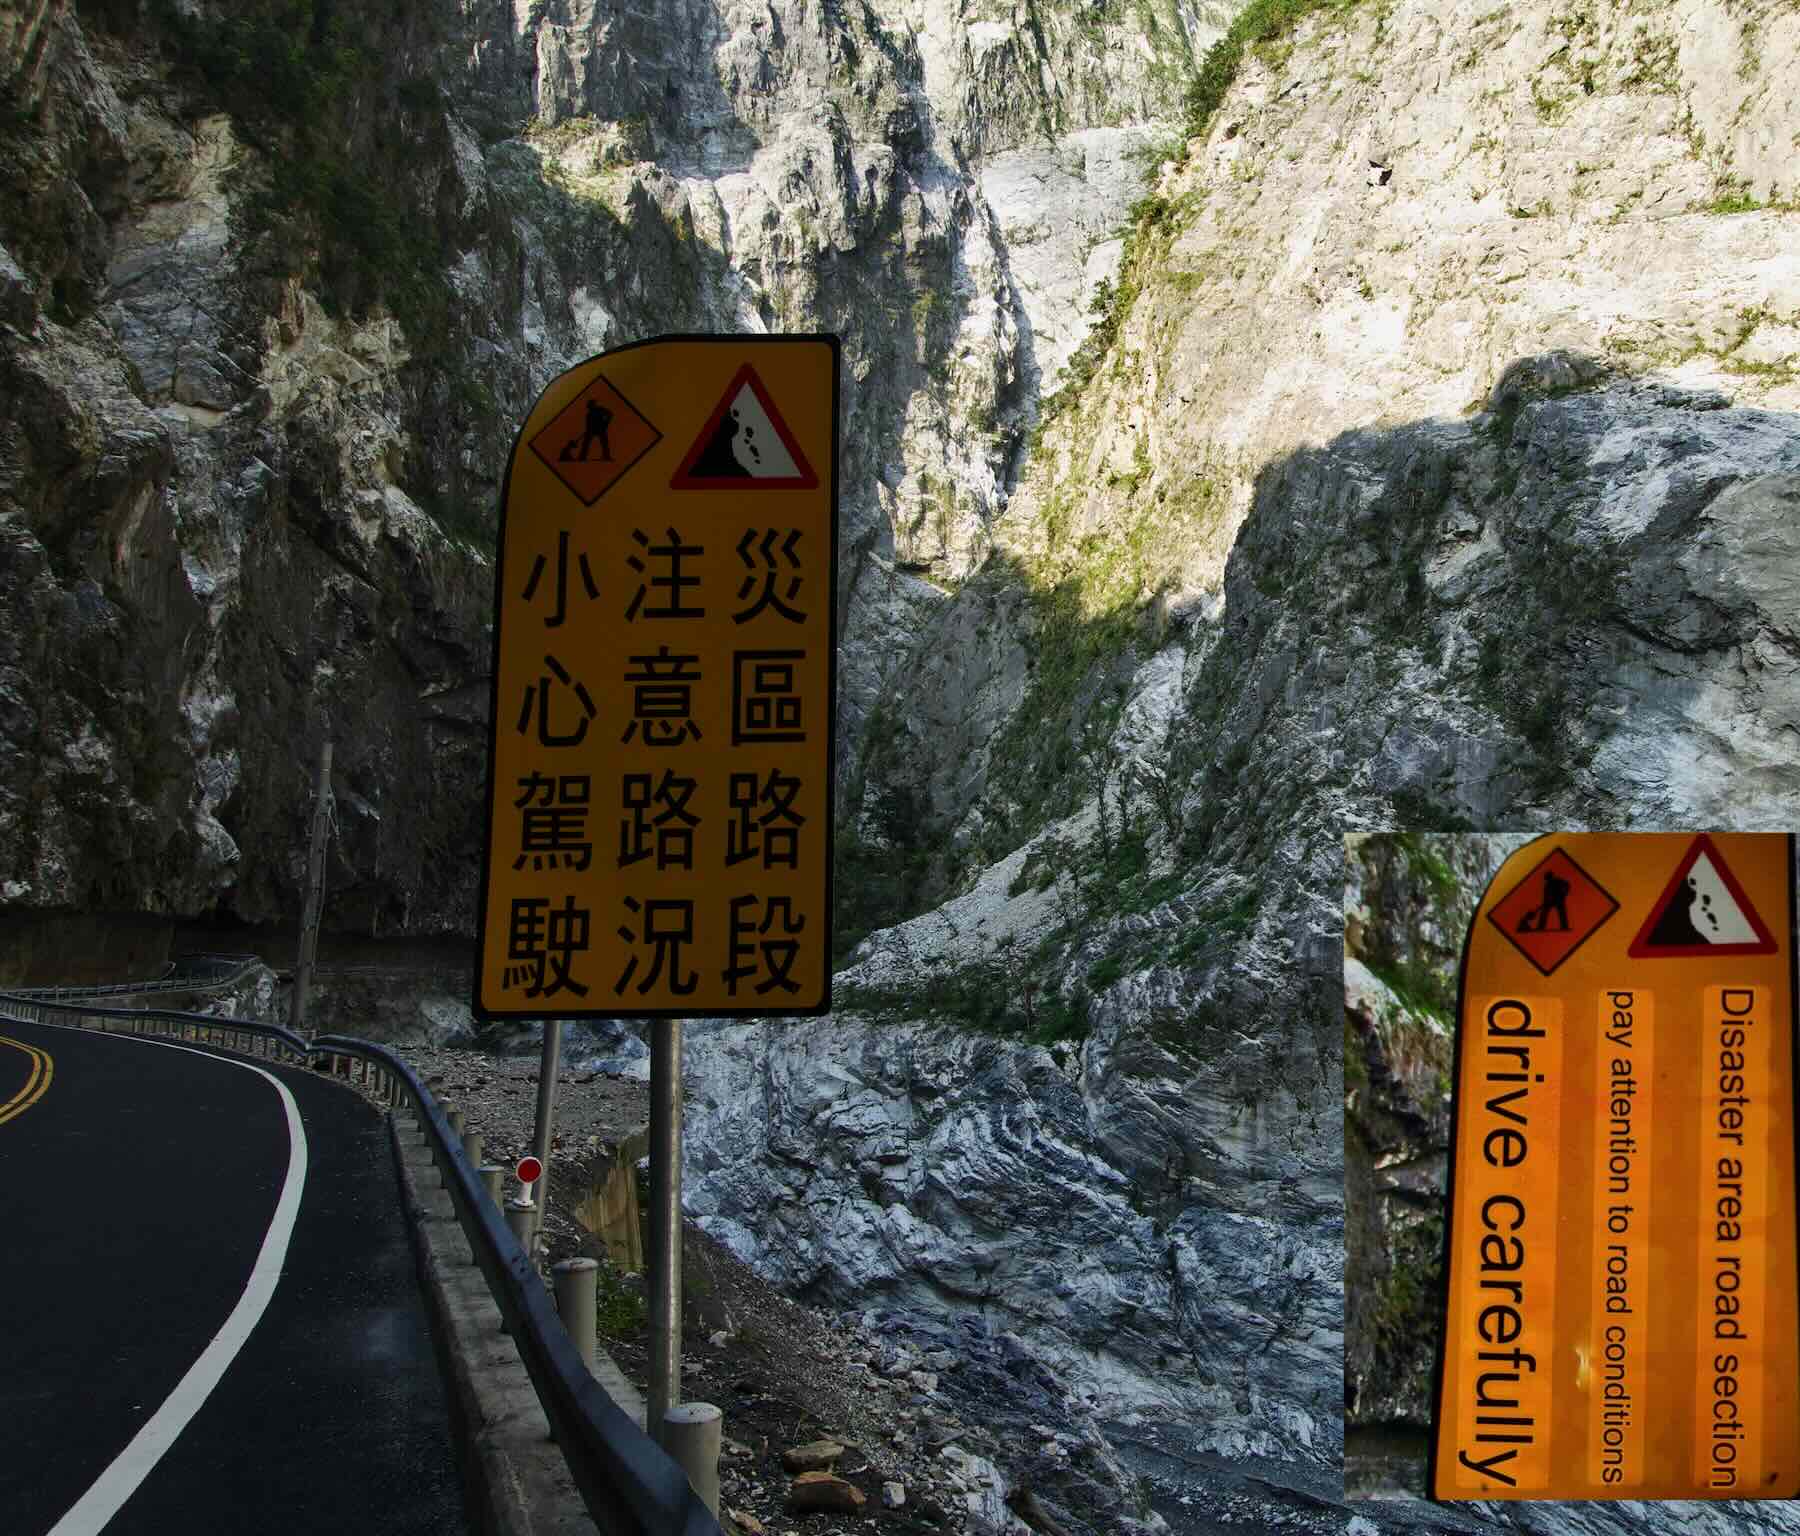
After the first 10 kilometres, the pastoral landscape becomes more hilly and gives way to jungle framing both sides of the road. The interior of the island is where the indigenous people retreated to with the arrival of the Europeans and the Japanese. Sizhongxi was the first of the Paiwan tribal villages I passed by (km 15).

Three kilometres further on, I cycled past the Shimen Historic Battlefield, where the 3500-strong Japanese force had clashed with outnumbered Paiwan warriors. The Japanese were there to avenge the massacre of 45 shipwrecked Japanese sailors in 1871 by the locals. That Mudan site is also off Hwy 199, just a bit east. See here for the Wikipedia entry on the Mudan Incident.

Shimen Battlefield archway – Shimen is Mandarin for Mudan

After cycling through another village around Km 20, I cycled across the Sizhong River and faced my first real uphill of the day, a four-kilometre stretch of winding road with great views of the village on the other side of the river and of the Mudan (Shimen) Reservoir.

At the top of this steep section, I passed this memorial. The narrative I created to explain it involved an indigenous family fleeing Japanese soldiers!

The image below shows the one time I can remember getting off my bike for a few minutes to rehydrate and munch on some snacks.

Another hour and I was at Shouka Pass. I was not the only one to get off the saddle and take in the views. Among the people were two guys from England on motorcycles. They lived in Taipei and worked as English language instructors at the high school level. The four-day weekend provided them with a chance to go for an island ride.

I also saw for the fourth time a father and his son who had cycled up Hwy 199 at about the same pace as me. If I wasn’t passing them by and giving them a thumbs up, it was them doing the same. Well, here we were at Shouka and this time I had to get a photo!

Shouka Pass was at Km 47 of the day’s ride. As the route profile above indicates, it was downhill from there to the Pacific Ocean! I had the road mostly to myself, with minimal traffic. It was an exhilarating and sustained stretch of downhill, right up there with some Rocky Mountain downhills I had done.

I did see a couple of cyclists heading up the road as I was flying down, but they were road cyclists with no touring baggage and clearly up to the challenge of the uphill to Shouka. They would also get their reward, either on the return to the Pacific side or with a long downhill to Checheng.
I got to Daren and my $110 CDN cabin accommodation by 1:30. It is just off Hwy 9 and a short walk to the beach. [Here is its Booking.com page.] My stay here was the most I’ve ever spent on a room outside Taipei.

The red dot shows the hut location.
Since check-in time was 4:00, I headed back to the small commercial district of the village and foraged for some food – a 7-Eleven lunch, some fresh fruit, a bag of mixed nuts, a 2-litre bottle of water, and a can of beer.

Back at the accommodation, I found a path behind the cabins which led down to the ocean. The first half of my around-the-island ride was done, and, as good as it had been, the second half would be even better, thanks to
- lower population density (90% of Taiwanese live on the west side of the mountains),
- far less traffic and quieter roads,
- more stunning coastal and inland scenery,
- the camaraderie of fellow Canadian cyclists doing the same route.

When I returned from the beach, I watched as two bike tourists wheeled into the property. “Hi! You must be Peter,” one said. It was a couple from Calgary; the Montreal cyclists they had met earlier that day told them where I would be staying, so they decided to do the same. For the next eight days, we would exchange route info on WhatsApp and even ride up Taroko Gorge to Tianxiang together early one morning.
Surprisingly, the two Canadian couples were the only bike tourists I saw during my 16-day ride, other than the two guys from Taipei and a Mexican guy who flashed by me at warp speed as I waved at him. [It was the Calgary couple who got to chat with him somewhere down the road and find out where he was from!]
back to the top
—————–


A Bike Ride Around Taiwan: Part 2- The East Coast


 It was a glorious sunny morning as we set off from the dam with the occasional splash of fall colour to raise the bush-lined river banks to Group of Seven quality.


