Getting Real High In Bolivia – La Paz, Lake Titicaca, and the Cordillera Real

Table of Contents

—————-

Altitude and The Need For Acclimatization

Official flag of Bolivia

The official flag of Bolivia

My body is saying “Whoa!’ as it adapts to an unfamiliar situation.  In the past eighteen hours, it’s gone from Toronto at 100 meters above sea level to La Paz at 3500.  The joke on the plane, as we approached El Alto International, was that we had to ascend to land safely.  El Alto is yet another 600 meters higher than La Paz, which sits in a deep gorge cut into the Altiplano, the high plains of western Bolivia.

I will take it very easy for the first few days as I acclimatize.  At least Bolivia is in the same time zone as Toronto so jet lag is not added to the list of adaptations required!

image

For this visit to Bolivia, I’ve gone the organized small group route. A UK trekking company, Mountain Kingdoms, had exactly what I had in mind.  My wife Laila is relieved to know that I won’t be on my own and it is plush to have someone handle all the details.  The major drawback, besides the increased cost, is that you get to walk in an Anglo bubble through a multicultural society where Spanish, Aymara, and Quechua all have official status. The flag to the left, the Wiphala, acknowledges the Indigenous Peoples and was made the second official flag in 2009.

In about a week, we’ll start a 120-kilometer trek down the Cordillera Real mountain range to the east of Bolivia’s capital city. I should be feeling better by then!

—————-

Some Basic Geography

Bolivia overview with red circle for La Paz:Titicaca

The map above locates Bolivia – south of the equator and landlocked with Brazil, Peru and Argentina as some of the countries whose borders it touches. Its one million square kilometre size makes it the world’s 26th largest country and its population of eleven million puts it in the same range as Belgium, Haiti, and Cuba – and a bit less than my home province of Ontario in Canada.

Two-thirds of the country is either a part of Amazonia or the lowlands – but the Bolivia I’ll be visiting is the rather small northern piece of the Altiplano close to the border with Peru at Lake Titicaca.  The red circles on the maps above and below give a rough idea of the limits of my travels.  There is obviously much more to Bolivia than my twenty-four-day visit will allow me to get to. If nothing else, I expect this visit will give me every reason for a return.

Bolivia close up

—————-

Annual Weather Pattern

As far as the weather goes, La Paz’s September corresponds roughly to March in the northern hemisphere. The chart below illustrates La Paz’s temperature range and rain for the various months of the year –

La Paz temperature range and rainfall

The Altiplano has two seasons – one wet and one dry.  Tourist high season and prime trekking time correspond to the middle of their dry season (April-October) thanks to pleasant daytime temperatures, much less rain and clearer skies.  It will be colder though, especially overnight in our tents as we make our way south from Nevado Illampu to Huayna Potosi on the trekking trails of the Cordillera Real, another 600 to 1000 meters above La Paz’s 3500 meter altitude. We may have snow from September 13 onwards  –  the two-week forecast below is for down in La Paz!

image

—————-

Pre-Trek Acclimatization – Places To Visit

Still, I do get to spend four or five days in de facto Bolivia’s capital, officially known as La Ciudad de Nuestra Señora de La Paz.  My hotel, the Rosario, is right around the corner from El Mercado de Hechiceria (the Witches’ Market) and a short walk from the Iglesia de San Francisco and the city’s political heart at Plaza Murillo. Tomorrow I hope to take a ride on the city’s new aerial cable car transit system Mi Teleférico.  It should make for some incredible views and photo ops!

Rough Guide map of Bolivia

Rough Guide Map of Bolivia

More acclimatization time – four days –  will be spent in Copacabana and on the Isla del Sol in Lago Titicaca.  I’m looking forward to the walk along the Incan pilgrim’s trail from one end of the island to the other to see Titikala,  the Sacred Rock, a powerful mythological focal point of the Incan world.  We have also got a day slotted in to see what is left of the pre-Incan ritual centre of Tiwanaku, one of the Americas’ great pre-European-contact centers of civilization.  It was significant enough for the awed Incas to incorporate –  or maybe that should read appropriate? – it into their mythic worldview.

Bolivia Trip - Satelite Map of Route

Bolivia Trip – satellite Map of Route – click on to enlarge

—————-

The Trek Route Down The Cordillera Real

But the main focus of the trip is the two weeks I get to spend on the upper flanks of the Cordillera Real, the Royal Range to the Spanish. The satellite image above captures the terrain from Lago Titicaca and Isla del Sol over to the mountain range on the east side of the Altiplano that has dazzled travellers through the centuries.

our yaks approaching Renjo La

our yaks approaching Renjo La west of Everest

The new mostly west side route we’ll be taking down the Cordillera avoids the worst of the mining activity and the roads which have spoiled a long section of the classic Trans-Cordillera traverse via the east side. In the Khumbu region of Nepal, it was the yaks who carried our gear and supplies. On this trek, just like on my Peruvian Andes mountain trips, donkeys will be doing the hard work while we walk with day packs and camera gear. Pretty plush I’d say!

arierro and donkeys approaching Punta Union pass with the Quebrada Santa Cruz below

Los burros approaching Punta Union Pass with the Quebrada Santa Cruz below

My Spot Connect GPS tracking device will be coming along for the walk. It’s been on canoe trips over the past few years to reassure everyone back home;  I also took it to Cuba a few winters ago for my bike tour of the southern part of the island.

I still remember hiding the device as I approached the military checkpoints at the entrance of some Cuban towns – my fear overriding the fact that they probably would not have known what it was anyway!   This time I won’t have to worry about having a forbidden device.

2015 Cordillera Real Trek Route

the track created by my Spot Connect of our  Cordillera Real Trek Route

When I get back in late September I hope to have my memory cards filled with image files and short mp4 videos that I can shape into a series of posts on what is going to be a most excellent Bolivian adventure.  In the meantime, it is time to get out into the streets and try my limited castellano on the Paceños.  I really should have spent more time in August on my Spanish language practice!

Hasta luego, amigos!

Bolivia Map from Lake Titicaca to the Cordillera Real - Things To See and do

Bolivia Map from Lake Titicaca to the Cordillera Real – Things To See and do

—————-

Next Post: A Travellers’ Guide To La Paz, Bolivia – Things To See And Do

A Traveller’s Guide To La Paz, Bolivia

—————-

See Also:  Trekking Bolivia’s Cordillera Real – Maps, Basic Info, and Planning Advice

Trekking Bolivia’s Cordillera Real – Maps, Basic Info, and Planning Advice

—————-

Day-By-Day Cordillera Real Trek Report

Posted in hiking/trekking | Tagged , , , , , | 8 Comments

Paddling To Temagami’s Maple Mountain

Table of Contents:

Temagami Choices – Why Maple Mountain?

Access Points For Tupper Lake and Maple Mountain

Day One: Sandy Inlet To Diamond Lake Island CS

Dady Two: Diamond Lake To Hobart Lake

Day Three: Up Maple Mountain and Back To Lady Evelyn

Day Four: Back To Sharp Rock Inlet

Day Five: From Sharp Rock Inlet to Ferguson Bay

Useful Info:

  • Hap Wilson’s Temagami Guidebook
  • Natural Resources Canada 1:50000 Topos
  • The Maps By Jeff Temagami Map
  • Friends of Temagami Map

———————–

Temagami Choices – Why Maple Mountain?

sunset over Temagami's Maple Mountain ridge

sunset over Temagami’s Maple Mountain ridge

Having decided to cut out the Little Steel part of our Steel River trip, we were left with a few more days of food in our pack.  We needed an impromptu mini-trip whose paddle strokes would burn it all up.

Canoeing The Steel River – Santoy Lake/Our Thoughts On The Steel As A Canoe Trip

Canoeing The Steel – Day Eight – Santoy Lake/ Our Thoughts On The Steel As A Canoe Trip

We focused on two options, both in the Temagami area:

1 –  a return to Cheeskon Lake and more time walking the hiking trails of the old-growth forest that we had missed on our previous outing.  (Early Autumn Canoeing In the Heart of Temagami).

Early Autumn Canoeing In The Heart Of Temagami

2 – a return to Maple Mountain, a side visit on a previous trip to Ishpatina Ridge.  Ishpatina is Ontario’s highest spot at 692 meters; Maple Mountain reaches 641.

Temagami Canoe Country: Paddling From Ishpatina To Maple Mtn. To Bear Island

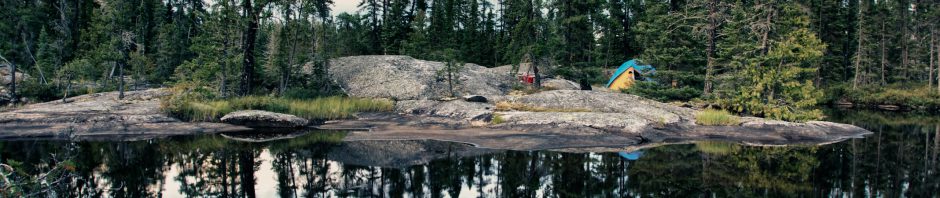
In the end, Maple Mountain won!  Not only would we get to sit on top of Maple again, but we’d also get to set up our tent at one of our favourite campsites, the one you see in the photo below on the east side of Hobart Lake.

Hobarth Lake campsite overview

Hobart Lake campsite overview

The Hobart campsite has all the qualities of a classic Canadian Shield campsite –

  • The sloping rock outcrop goes up to a flat and
  • sheltered area with room for more than one tent and
  • a great elevated open view west towards Maple Mountain Ridge.
  • It also makes an excellent base camp for the paddle over to Tupper Lake and the hike to the top of Maple Mountain.
Hobarth campsite view in the afternoon

Hobart campsite view in the afternoon – the view does not get old!

———————–

Access Points For Tupper Lake and Maple Mountain:

As we drove back east, we considered the various put-in points we could start from.

Three access points to Lady Evelyn Lake from Highway 11

1.  Lake Temagami Access Road

Starting at the end of the Lake Temagami Access Road was crossed off the list right away.  It is the furthest away from Maple Mountain, and having already paddled up Lake Temagami from the Access Road a few times, we were keen on something else.

————–

2.  Mowat Landing

A closer access point to Maple Mountain is Mowat Landing.  Only one portage – the easy one around the Mattawapika Dam, not far from where the Lady Evelyn River and the Montreal River meet.  [See here for a view of the portage.] And only one possible drawback – the long stretch of lake paddle to get to the west end of Lady Evelyn Lake.  Given the prevailing SW or NW winds, crossing can sometimes be challenging.

It is about 40 kilometres from Mowat Landing to Tupper Lake and the start of the 3 km. trail to the top of Maple Mountain.

————-

3.  The Sandy Inlet/Ferguson Bay

An alternative access route is the Red Squirrel Road to Sandy Inlet on Ferguson Bay on the NE corner of Lake Temagami.  We went with this choice.  It took us about an hour from Temagami to get to the parking area at the end of a rough side road that runs from Red Squirrel Road towards the water.  Then it is a 300-meter portage from the car to the shore.  Camp Wanapitei is visible to the south as you walk onto the beach.

[See here for a detailed map of the area.  it is from the Ottertooth website.]

Our choice of entry:

  • added three kilometres to the 40 km of the Mowat landing route,
  • included five portages instead of the single easy portage around the Mattawapika dam across from Mowat Landing.
  • meant we didn’t have to drive another 60 km up to Mowat Landing.

We accepted the three extra kilometres and portages as the price of avoiding the potential drama of a bad day or two of wind on Lady Evelyn Lake.

———————–

Day One: Sandy Inlet To Diamond Lake

  • distance: 14 Km
  • time: 1:30 p.m. start – 6:15 p.m. end
  • weather: overcast; strong N/NW wind (20 kph)
  • portages: two
    – 740 meters, the one we thought was the Napoleon Portage;
    – 220m the short portage from Sharp Rock Inlet into Diamond Lake
  • Natural Resources Canada 1:50000 topos/click on map title to access: Obabika Lake 041 P 01; Lady Evelyn 041 P 08
  • Google Earth 3-D View: see here
  • campsite: island site; multiple 2-person sites; 4-person not so much, water access was ok but a long walk depending on where you set up your kitchen; fuel stove needed unless you paddle to the mainland to look for wood
Temagami. Day One. Sandy Inlet to Diamond Lake

Temagami.  Day One.  Sandy Inlet into Diamond Lake

————-

Portage Trail Confusion!

The Napoleon Portage(s)We were on the water at 1:30 p.m.  We paddled across Ferguson Bay with a strong NW wind blowing.  That, and the fact we were not 100% clear on the Napoleon Portage’s take-out spot, had us end up too far south on the west side of the bay.  As the map to the left shows, we headed up along the shore to the Napoleon Portage take-out.

We figured we were there when we saw the tree with four bright orange bands.  We had only been on the Napoleon once, six years previously, when we came at it from the west side on Whitefish Bay.  The initial steep part was there.  What wasn’t there was a portage trail that has existed for 100 years!  We explained it away with reasons like a string of blowdowns and ice storms since our last visit.

Given the presence of new blazes and marking tape, we somehow got sucked into the “trail.” And once we were in, the only thought was to get to the end.  Somehow it made sense and didn’t make sense at the same time!  We’d hit a stretch or two that seemed like a portage trail – and then we’d bushwhack through another section that had us shaking our heads in disbelief.

N.B. we only found out that it was not the Napoleon Portage four days later coming back.  On that day as we approached the take-out landing for the “mystery trail” we spotted what looked like a portage landing about 100 meters north of where we were heading.  Going up the shoreline to take a look, I hopped out of the canoe, walked a few meters into the bush from the landing area and came back to announce – “This is the Napoleon Portage!”  We are still confused about that “mystery trail’ we followed on Day One – see here for some possible explanations offered by fellow canoe trippers at the Canadian Canoe Routes forum.

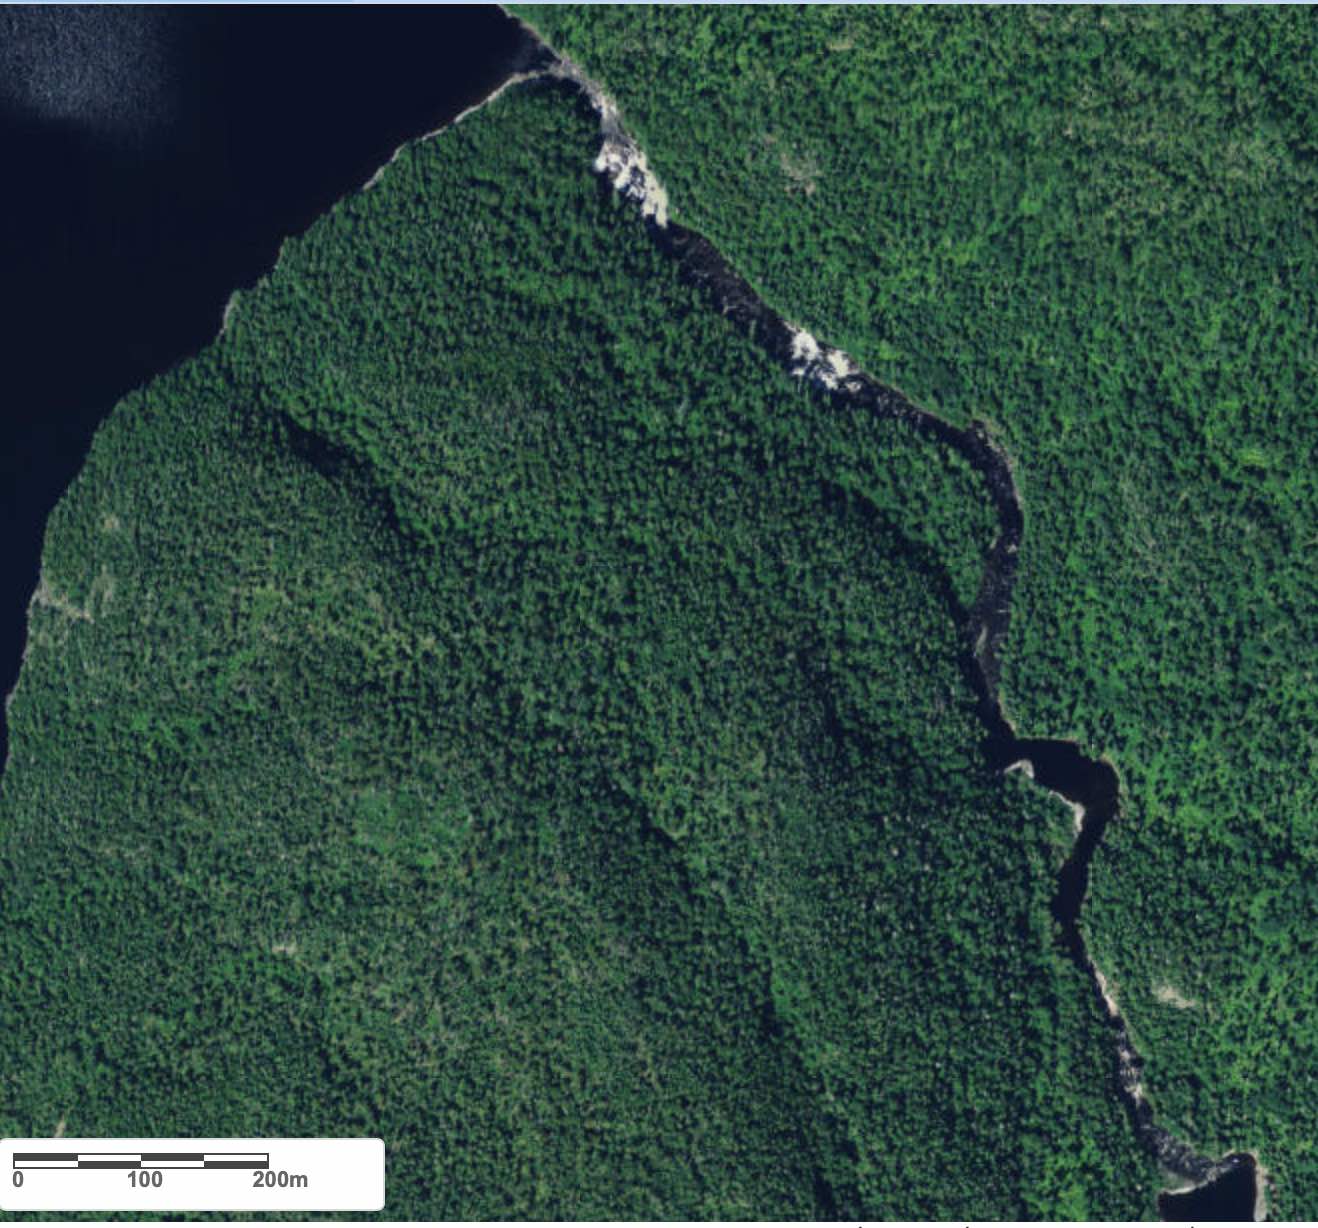
Below is the picture we took four days later when we walked the actual Napoleon Portage to Ferguson Bay from the west.  The Napoleon Portage comes out at the bottom right.  Dangling on the branch is some tape I had just put there.  Other than my fresh tape, there was nothing at the Napoleon portage other than the well-used trail itself!

The “mystery trail’ begins on the left-hand side on the edge of the image.  Enlarge the pic, and you should see the four bands of orange tape.  Five days before, when we approached it from the south and saw the tape, we wrongly figured that we had arrived at the Napoleon Portage take-out.

From the Canadian Canoe Routes poster comment to my thread, we were not the only ones to make that mistake that week!

the-mystery-trail-and-the-napoleon-side-by-each

The Mystery Trail and the Napoleon – side by each on Ferguson Bay!

To make matters worse, we added to the confusion by putting up our marking tape in certain “difficult” sections as we walked “the mystery trail.” Seeing that tape will, unfortunately, reassure some poor canoe tripper who makes the same initial mistake we did.

a rough stretch of the mystery trail

A rough stretch of the mystery trail – the blazes were reassuring!

more of the mystery trail

More of the mystery trail

the mystery trail south of the Napoleon Portage

the mystery trail south of the Napoleon

mystery trail - seemingly normal

seemingly normal and looking like a trail!

the west side of the mystery trail

The Whitefish Bay side of “the mystery trail,” which is pretty crooked for a prospector’s stake line

With the portage done, we got down to paddling, and by 5 p.m., we were at the far end of the Sharp Rock Inlet Portage.  We had already seen twelve canoes in the first three hours of our trip, mostly belonging to the various summer camps on Lake Temagami.  That was twice as many as all the canoes we had seen in five previous summers of Wabakimi and Woodland Caribou tripping!

Day One Island Camp at east end of Diamond Lake

Day One Island Camp at the east end of Diamond Lake

We paddled by the two small islands on the map above just after the portage.  We landed on the west side of the second one and walked up to the top of the sloped granite outcrop.  We found a reasonably flat area for our home for the night.  We had started the morning at the motel in Iron Bridge.  Twelve hours later, we were at the east end of Diamond Lake in Temagami!

Our next target was Hobart Lake and one of our favourite campsites.

———————–

Day Two: Diamond Lake To Hobart Lake

  • distance: 27.2 Km
  • time: 9:15 start – 4:15 p.m. end
  • weather: a mixture of cloudy and overcast, sunny and warm, N/NW wind (15+ kph)
  • portages: three
    – 40m Diamond L to Lady Evelyn Lake – the main portage is on the west side (left as you’re going down); we just ran it and scraped through.  It can also be easily lined on the right.
    – 220m Lady E to a small lake (shorter due to beaver dam activity and higher water)
    – 510m  small Lake to Willow Island Lake (Lady Evelyn River (South Channel)
  • campsite: Hobart Lake – awesome!  Multiple 2- or 4-person tents, “thunderbox”; easy access to water; great swimming opportunity; great view of Maple Mountain all day.

N.B. Follow the following three maps from the bottom map up to the top one.

Sucker Gut To Maple Mountain

lay-evelyn-south-arm-to-sucker-gut-lake

Diamond Lake to Lady Evelyn (South Arm)

————-

Passing By the Diamond Lake Pictograph Site

We set off shortly after nine.  After passing another group of summer camp teen trippers on the way up the north arm of Diamond Lake, we looked over to the pictograph site we had visited the previous October.

A Return Visit To The Diamond Lake Pictograph Site

A Return Visit To Temagami’s Diamond Lake Pictograph Site

It looked surprisingly small and unimpressive from the other side of the arm.  We decided to leave a visit to our return a few days later.

Diamond Lake Picto site in passing

Diamond Lake Pictograph site in passing

————-

The Lady Evelyn Lift-Over –  A Bit of History

Instead, we headed right for the Lady Evelyn Lift-Over.  The name “lift-over” has always puzzled us because while we have portaged it on the left, lined it on the right, and run it down the middle, we have never managed a literal lift-over.  Seeing it in the image below, it is difficult to picture the Lady Evelyn Falls that was once there.

It was the construction of a dam at Mattawapika Falls near the confluence of the Lady Evelyn River and the Montreal River across from Mowat Landing – a smaller one in 1915 and a higher one in 1925 – that raised the water level of Lady Evelyn Lake by some five meters.   It also caused the falls to all but disappear!  It has been reduced to a one-foot drop!

Lady Evelyn Lift-over

Lady Evelyn “Lift-over” – easy to line on the right side

Thanks to a reader of this post for the following detailed explanation of the dam’s history and purpose:

The dam was put in by mining companies operating in the area to supply water for power plants on the Montreal River. A canoe trip on the Montreal River below Latchford will have you pass over and around all of these ancient dams and compressor plants that used to be there to supply air to the mines of the area.

These days the dam holds back water to help operate the string of hydro plants on the Montreal. Many of these plants are peaking plants that operate only intermittently.  The water on Lady Evelyn Lake gets drawn down over the winter to supply hydro operations.

If you go to Lady Evelyn Lake in the early spring, as soon as the ice is gone, the lake level with be about 15 feet lower than in the summer months.  The water level has to be raised by May 15 or so to permit cottagers and others to enjoy the lake.

The Diamond Lake into Lady Evelyn Lake spot – i.e. Lady Evelyn Falls –  was not only massively impacted by the Mattawapika dam 30 kilometres to the northeast.  Another dam – a six-foot timber dam – was built across the stream at the point shown in the above photo.  It was constructed in 1942 by a lumber company to help move its logs from Diamond Lake into Lady Evelyn Lake and down to its mill in Latchford.  The dam remained there until 1973, when it was removed by a Ministry of Natural Resources work crew.  Apparently, the water level on Diamond Lake went down by some 4.5 feet after its removal.

Forgotten in all this was the Ojibwe family whose hunting territory this was and who had lived in the area since 1800, if not longer.  Among other landmarks, a few pictographs at the Diamond Lake pictograph site were partially submerged during the dam’s existence.  Check out Brian Back’s Ottertooth article here for a well-researched summary of the two barriers and their impact.

the little drop - all that is left of Lady Evelyn Falls

The little drop – all that is left of Lady Evelyn Falls

Unclear (to me) is if the dam remained permanently closed for 30 years or if it was opened each spring to flush down the logs that had been cut in the winter into Lady Evelyn Lake.  Send me a comment if you know how this setup worked!  By the 1970s, logging roads had become the preferred way to haul logs, and the dam was no longer necessary.

————-

Meanwhile…Portages to Willow Island Lake

There was some scraping as we slipped down the “rapids” into Lady Evelyn Lake.  Then it was a short paddle up to the first of the two portages, which take you from Lady Evelyn Lake into Willow Island Lake  (a part of the Lady Evelyn River system).

the two portages from Lady evelyn Lake (South Arm) to Willow Island Lake (Lady Evelyn River system)

The portages from Lady Evelyn Lake (South Arm) to Willow Island Lake

An initial fifteen-meter stretch on a creek bed made up of boulders made for some awkward walking.  It soon led to a well-trodden trail that came out to the marshy area at the end of the high-water portage.  We did a double-take since the area had changed somewhat over the past decade.  The spot where we had pitched our tent on a previous trip was now on the edge of a beaver-created wetland.

The start of the first portage from Lady Evelyn Lake over to Willow Island Lake

the end of the first portage to Willow Island Lake

the end of the first portage to Willow Island Lake

With the 220-meter carry done, we loaded the canoe and set off down the pic you see below to get to the small lake and the start of the next portage.  Running along on the north side is a trail that may be used during lower water periods.  We were happy to paddle through.

looking west from the beaver dam

Looking west from the beaver dam

The next portage was easy to find and do.  Near the end, there is a bit of a diversion to deal with the recent blowdown; the orange tape guides you through the slight change to the route.

————–

From Sucker Gut  To Hobart

Down Willow Island Lake, through the narrows into Sucker Gut Lake and then a hard left, we paddled into what you see in the picture below.  The first time we came through here, we didn’t know anything about the Mattawapika Dam near the mouth of the Lady Evelyn River, where it meets the Montreal River.  It raised the water level of the entire lake by four or five meters – all for the convenience of the mining companies.  We had learned since that as a preliminary step, fires would often be set in the area to be flooded.  The charred trunks of the pines and spruces stand as silent witnesses to those times.

view of Maple Mountain ridge from Sucker Gut Lake

the view of Maple Mountain ridge from Sucker Gut Lake

As we paddled westward, we also saw the Maple Mountain ridge and the faint presence of the fire tower again.  We had been here in 2009 and hadn’t forgotten.

closer up view from Sucker Gut Lake

a view of Maple Mountain and the fire tower from Sucker Gut Lake

When we saw a canoe on Hobart Lake, I figured the premier campsite we hoped to get was already occupied.  We were busy formulating a Plan B as we paddled up to the site, one of our favourites,  and found – well, nobody was there!

This post’s second and third images show the site and two happy campers sitting in their plush Helinox chairs, taking in a late afternoon view of Maple Mountain.  We’d spend more time as the hours rolled by, sipping on tea and Crown Royal and snapping pix of the sun setting over Maple Mountain.

A few of them follow –

dusk on Hobarth Lake

Dusk on Hobart Lake

Maple Mtn Ridge at sunset

Maple Mountain Ridge at sunset

Hobarth sunset

Maple Mtn Tower from Hobarth campsite

Maple Mountain Tower from the Hobart campsite

———————–

Day 3: Hobart Lake – Maple Mtn – Lady Evelyn River

  • distances:
    9.5 km (Hobart L campsite to the top of Maple Mount and back to Tupper Lake
    12.6 km Tupper L to Lady Evelyn River (south channel) campsite
  • time: Maple Mtn 09:30 a.m.-1:30 p.m.; Tupper L to campsite 1:30 p.m.-5:15 p.m.
  • weather: sunny and warm; S wind (20 kph) adding to the work,
  • portages: none
  • campsite: poor to fair; easy access to water but a long walk.  room for multiple 2-person tents, nothing really ‘flat’; also hard to find one good 4-person site; thunderbox
Hobarth and Maple Mountain in the morning

Hobart and Maple Mountain in the morning

Unlike the overcast day we had six years previously, this one would be clear and sunny.  After our usual oatmeal breakfast, we savoured the mugs of coffee and the morning view of Maple Mountain.  And then it was off, first paddling the 3.5 kilometres to the start of the Maple Mountain trail.  The map below shows the route – about 1.7 km to the “confluence” of Tupper Creek and Willow Island Creek, and then up to the beaver dam and Tupper Lake.

Hobart Lake To Tupper Lake and Maple Mountain

Hobart Lake To Tupper Lake and Maple Mountain

Maple Mountain Background History

Maple Mountain at 642 meters is not, contrary to what some may think, the highest point in Ontario.  It actually ranks 13th according to this well-researched list of the province’s high spots.  (See here for the Ottertooth article.)  There is only a 51-meter gap between it and Ishpatina Ridge, the #1 point at 693 meters.  Ishpatina is located just twenty-seven kilometres to the west.

Robert Bell of the Geological Survey of Canada gave it the name “Maple Mountain” back in 1888.  However, the ridge with its dramatic rise in elevation has supposedly been on the mythological map of the local Anishinaabe (i.e.Ojibwe) for a while, known to them as Chi- bay-jing, “The Place Where Spirits Go.”

Maple Mountain ranks #1 in Ontario in terms of vertical rise.  It is 351 meters higher than Tupper Lake below, while Ishpatina, for example,  is 317 meters above Scarecrow Lake.  For more reliable information on Maple Mountain, Brian Back’s in-depth look here is your best bet.

the last and steepest stretch up to the top of Maple Mtn

The last and steepest stretch up to the top of Maple Mountain, #1 in vertical rise (in Ontario)

The Trail Up To the Top of Maple Mountain

As we approached the landing and the start of the trail, we spotted a canoe sitting there.  We were obviously not the day’s first.  Given that we had not seen anyone paddle by that morning, chances were good that they had camped on Tupper the previous night.

the take out spot for the Maple Mtn Trail

The take-out spot for the Maple Mtn Trail – a green canoe sits at the landing area

looking out from the Maple Mtn. trail start

looking out at Tupper Lake from the Maple Mtn. trail start

The fire ranger’s cabin ruins are at the beginning of the trail.  Nearby is a spring where we filled up our water bottle.  And then it was on to the trail.

the remains of the ranger's cabin at the start of the Maple Mountain trail

The remains of the ranger’s cabin at the start of the Maple Mountain trail

The first 500 meters are quite flat.  A long stretch of 10-foot boards takes you over some mushy terrain.  I counted 35 pairs of them as we walked along; we came to seven more after a short gap.  It made for easy walking.

the board walk at the start of the Maple Mountain Trail

The boardwalk at the start of the Maple Mountain Trail

However, some altitude needs to be gained, and it comes soon enough, beginning with a gradual ascent and the giving away of all the “up” you just gained as the trail heads downward for a bit!

The trail also gets somewhat less groomed.  We counted at least a couple of dozen places where a chainsaw would help to re-establish the path.  As it is,  deadfall across the trail has hikers walking around the obstructions.  We often spent the first half-hour stopping to clear smaller trees and branches from the path, but we realized that it would take forever to get to the top if we were also going to be doing trail work as we walked up.

Half Way Lake off the Maple Mountain Trail

Halfway Lake  off the Maple Mountain Trail

It was somewhere near the lake that we met the two paddlers and their dog, an older Labrador who was having trouble with the blockages on the path.  They had decided to turn back without getting to the top.  Given what was coming up, the obstructions on the trail were more than the Lab would have been able to handle.

the-last-and-steepest-stretch-up-to-the-top-of-maple-mtn copy

A six-meter steel ladder takes you up an almost vertical section of the trail and leads to more scrambling before the summit.  In true mountaineering fashion, there are a couple of points where you think you are there, only to realize that wishful thinking alone does not make a summit!

2024 UPDATE – A comment on the Canadian Canoe Routes forum thread relayed the following bit of information –

 New route on Maple Mountain, Ladder has been moved some 50 feet away now and they reroute you so you don’t end up climbing that.  Adds a couple 100 meters more to the route but ends up with a gradual incline instead of a steep embankment. 

up the ladder to Maple Mountain top

up the ladder to Maple Mountain’s top

getting close to the top of Maple Mountain

getting close to the top of Maple Mountain – staring up a jet’s vapour trail

a scrambly section near the top

a  section requiring some scrambling near the top

Half Way Lake as seen from the top of the ridge

Half Way Lake, as seen from the top of the ridge, and Sucker Gut Lake at the top of the image

The Fire Tower On Top

Seeing the 30-meter-high Fire Tower means that you are almost there!  On our 2009 visit, it was overcast, and the bugs were so bad I climbed halfway up to the cupola to escape while I snapped some photos.  This morning, we would have no such problems –  no clouds, no bugs.

getting close to the top and the tower

getting close to the top and the tower

Maple Mountain Fire Tower

Maple Mountain Fire Tower – unnecessary since 1970

There was another change since our last visit.  The first seven meters of the ladder have been removed, making access to the rest somewhat awkward.  I am sure some will still be up to the challenge!  There is one complication.  Even if you do get up to the ladder and join the elite crew who have climbed up over the decades, you will end up at the bottom of the cupola with no way to get in.  It has been locked!  The sign at the foot of the tower hopes to discourage you from even bothering to do the climb.

Update: More recent visitors have noted that the lock on the cupola floor door has been removed!  Getting up to the top is obviously (for some people) an essential part of the Maple Mountain experience!

Maple Mtn. Fire Tower Notice

“Fire tower closed to public access.  The lower ladder section was removed, and the cupola access door was locked.  Climbing tower is prohibited.”

As we read the sign, we wondered why the Ontario Parks folks didn’t just take the thing down.  We figured that the expense probably encouraged someone in an office in Toronto to come up with partial ladder removal as a cost-saving alternative.

Well, we were wrong about that.  Check out this Ottertooth news brief, “Adios To Fire Towers” from August 6, 2015.  You’ll read –

With the exception of Caribou Mountain*, a municipally-operated tourist site, above the town of Temagami, the rest of Ontario’s towers are on the chopping block. That includes two in Lady Evelyn-Smoothwater Wilderness Park: Ishpatina and Maple Mountain, both popular backcountry destinations.

See here for the full article.  If seeing that fire tower is a major reason for your visit to Maple Mountain, better get there sooner rather than later!

Maple Mountain fire tower - the cupola

Maple Mountain fire tower – the cupola

looking up the Maple Mountain tower

memorial on paddle at fire tower base

Memorial plaque on a paddle at the Maple Mountain Fire Tower base

As iconic as the fire tower, there is something else much more majestic up on Maple Mountain.  The images below – minus the feel of the wind and the sun as you sit there and take it all in – give you an idea of what you’ll see after spending one and a half hours on your canoe trippers’ pilgrimage.  It is a “wow” moment for sure.

Cliff Lake Thunderbird

The experience of walking up to the top and taking in the view trumps all the statistics and the tower.  We watched two eagles in the skies above the mountaintop as we approached the top.  Eagles were often associated in the traditional Anishinaabe world with the manitou Animiki, the Thunderbird.  Next to Gitchi Manitou, he was the most powerful of spirits.  They were swooping back and forth, riding the winds and surveying their domain, and we were under their watchful gaze!

You just know you’re in the right place when you see eagles.

panorama - looking east from Maple Mountain top

panorama – looking east from the top of Maple Mountain

Looking east from Maple Mountain

Looking east from Maple Mountain

looking SE from Maple Mtn - Sucker Gut, Willow Island, and Chris Willis Lakes

looking SE from Maple Mtn – Sucker Gut, Willow Island, and Chris Willis Lakes

We spent forty-five minutes taking in the views, chillin’ and refuelling for the walk back to the canoe.  If it takes 1 1/2 hours to get to the top, it takes maybe an hour to get back to the canoe.  Instead of an extended bit of aerobic exercise, now your knees and leg muscles get to be stressed.  A pair of trekking poles – not part of a typical paddler’s kit – would help.

on the way back down from Maple Mountain top

on the way back down from Maple Mountain top

Checking Out The Tupper Lake Campsite

Before paddling back to Hobart Lake, we stopped at Tupper’s east-side campsite.  It has a beautiful view of the mountain and the fire tower.  While the site is not in the same class as Hobart’s, it would be a good alternative if the other one was already taken.  We had lunch there and then retraced the route that got us there.

looking from the Tupper Lake campsite to the Mountain

Looking from the Tupper Lake campsite to the Mountain

Tupper Lake campsite

Tupper Lake campsite

That afternoon we paddled as far as the narrows between Sucker Gut Lake and Willow Island Lake.  After having wind from the northwest for the two previous days, now that we had started paddling south, the wind had changed too; it was coming from the southwest.

The campsite we found there was average at best, but it did the job.  The tent was nicely tucked away in the woods, and there was an open area where we set up our cook gear.  The canoe on its side provided a nice windscreen, and we soon had the two butane stoves going.  Since it was past 5 p.m., other paddlers had also probably stopped for the day, since we didn’t see anyone come through the narrows after setting up camp.

______________________________

Day Four: Back To Sharp Rock Inlet

  • distance: 21.4 km
  • time: 07:40 a.m. to 2:40 p.m.
  • weather: sunny, cloudy, and overcast, then rain – SSE wind (15 kph)
  • portages: four – we lined the one from Lady Evelyn to Diamond Lake (same as previous days)
  • campsite: island site in the inlet, nice site for multiple 2-person tents or a couple of 4-person tents; other campsites on the island; thunderbox; easy access to water; some firewood maybe; a nice view down the inlet
the second portage going into Lady Evelyn Lake from the lady Evelyn River (Willow Island Lake)

The second portage into Lady Evelyn Lake from the Lady Evelyn River (Willow Island Lake)

After an early breakfast, we were on the water before 8; we hoped to get some calm water before the south wind kicked in again.  We were past the two portages and into Lady Evelyn Lake by eleven.  That is when it started raining, spitting at first and then getting more serious as we moved into the afternoon.

We would stop for a cup of coffee under the tarp before moving on to the Lift-Over.

lunch spot under the tarp on Lady Evelyn Lake

a coffee break under the tarp on Lady Evelyn Lake

approaching the Lady Evelyn Lift-Over

approaching the Lady Evelyn Lift-Over

When we got to the Lift-Over, we paddled to the south side and decided to track the canoe up the current.  It took a couple of tries to get the nose in just right.  However,  the effort required was much less than the hassle of emptying the canoe,  hauling it and the gear 40 meters, and then putting everything back in again.  We spent some time hopping around and taking photos of this historic spot.  (See Brian Back’s Ottertooth article here for the story.)

the little drop - all that is left of Lady Evelyn Falls

The little drop – all that is left of Lady Evelyn Falls

our canoe after being tracked up the %22rapids%22

our canoe after being tracked up the “rapids”

looking up into Diamond Lake from the top of the drop

Looking up into Diamond Lake from the top of the drop

looking south at the pictograph site from near the Lady Evelyn Liftover

As we entered Diamond Lake, I looked down the shore and spotted the pictograph site on the west shore.  As humble as it had looked from across the water as we paddled by on our way up, now it looked even less imposing.

One last look at the Diamond Lake Pictograph site

We did paddle by just to be sure that it was the site.  You can see it in the image above – the sandy brown bit about two-thirds of the way along the water line running across the middle of the picture.  See A Return Visit To Temagami’s Diamond Lake Pictograph Site for more close-up pix and a detailed analysis of the pictographs.

coffee time at the east end of Diamond

Coffee time at the east end of Diamond

As we approached the Sharp Rock Portage, the rain came down heavier, and we pulled in at a designated campsite and put up the tarp.  We figured we would sit out the worst of it and then get moving again.  Meanwhile, we fired up the stove and got the lunch and coffee fixings out.

under the tarp as the ranin comes down

under the tarp, as the rain comes down

our Swift Dumoine sitting in the rain

our Swift Dumoine sitting in the rain at the east end of Diamond Lake

While we sat there, we noticed five specks on the misty horizon – a Temagami camp group was approaching!  We would lose sight of them after a while, as it seemed that they had paddled up a bay to the north.  However, as we took down the tarp and got ready to move on, there they were again!  They were looking for a campsite and wanted to know if “ours” was available.

The thing that most impressed us was the toughness and resilience shown by these canoe trippers in their mid-teens.  It was still raining, and they were carrying on with their business.  We wished the girls good luck with the weather and pushed off, wondering how far we would get.  It was good that we had started the day as early as we did.

a canoe party approaches

a canoe party approaches

close up of the Temagami summer camp canoe group

a close-up shot of the Temagami summer camp canoe group

the Sharp Rock Inlet side of the portage

the Sharp Rock Inlet side of the portage

We didn’t get too far!   After the Sharp Rock Portage, we paddled for a bit, but the combination of rain and wind and choppy water convinced at least me that we should just call it a day.  Talk about toughness and resilience!  Max wanted to keep paddling to make the next day, the one back to the car, that much shorter.

With the classic argument – “Why stress ourselves now when tomorrow morning it will take half the energy to cover the same distance?” –  I convinced my brother to pull in at the south end of the island seen on the map below.  It was 2:35, and we had covered maybe 3.5 km since our mugs of coffee.  Tent and tarps went up, and the canoe was set up as a windscreen, and we hoped for better weather the following day.

Diamond Lake:Sharp Rock Inlet

Sharp Rock Inlet campsite

Sharp Rock Inlet campsite – a wet and cool evening in Temagami

both tarps up at the Sharp Rock Island campsite

both tarps up at the Sharp Rock Island campsite

looking down the arm to the rest of Sharp Rock Inlet

Looking down the arm to the rest of Sharp Rock Inlet

panorama of Sharp Rock Inlet area

panorama of Sharp Rock Inlet area at dusk – the wind had died down

______________________________

Day Five: From Sharp Rock Inlet To Ferguson Bay (Sandy Inlet)

  • distance: 9 km
  • time: 07:30 to 09:45
  • weather: overcast but no rain
  • portages: two
    – 770m – the real Napoleon Portage
    – 370m or 900m Ferguson Bay landing to car park areas  (depends on where you can park your vehicle)
  • campsite: home sweet home!!, easy access to water; plenty of flat spots; thunder boxes throughout, etc.!
morning view of sharp rock inlet arm

Morning view of Sharp Rock Inlet arm

The previous evening’s major deliberation had centred around which portage to take into Ferguson Bay.

Option A: the Pickerel Bay Portage

About an hour’s paddle down from what we still thought was the Napoleon Portage, another shorter 400-meter one goes into Pickerel Bay.  (See the map below for the location.)  Then we’d have to paddle an hour north to get back to the top of the bay.  Also, we had no idea about this shorter portage’s shape.  For all we knew, it could be in the same shape as the trail we had done on our way in.

portage-choices-to-get-to-ferguson-bay

Option B: What We Thought Was the Napoleon Portage

Of the “Mystery Portage” that we thought was the Napoleon, we knew it was a hell of a trail.  It would take us about an hour to do, and it would save us two hours of paddling down to the other portage and then back up.  And that is how we decided to walk a trail a second time, we swore we would never set foot on it again!

Except – as our Day One trip notes already made clear – we luckily ended up at the start of the actual Napoleon Portage trail and were thus spared both the additional paddling to the Pickerel Bay trail  and bushwhacking of the “mystery trail.”

We unloaded our canoe at 8:15 on the west side of the Napoleon Portage trail, and at 9:00, we were already paddling across Ferguson Bay to the beach on Sandy Inlet just up from Camp Wanapitei.  We had pulled one big rabbit out of that hat!

the Ferguson Bay side and the two Napoleon portage trails

The Ferguson Bay side  of the two Napoleon portage trail

______________________________

Useful Information:

Hap Wilson’s Temagami Guidebook

Wilson Temagami 2011

The best introduction to Temagami remains Hap Wilson’s book of the same name.  It has seen a few editions, and the subtitles have changed with the times.  Still, it guides you through some choice Temagami canoe routes, giving you not only the information you need to deal with the lakes and rivers  – portages, rapids, campsites – but also filling you in on the long and rich history of the area.  There are also tips on gear and camping, and canoeing skills for those in need of a primer.   The first edition, I think, came out in the late 1970s, and these days it is considered a worthwhile investment as a collectible!   The copy of the edition I’ve got is titled Temagami: A Wilderness Paradise – Canoeing – Kayaking – Hiking and was published in 2011, a reprint of the 2004 edition.

Route #14 in the book is “Maple Mountain Loop,” a more ambitious trip than ours.  It starts at Mowat Landing and, after the visit to Maple Mountain, heads north to the Montreal River, which it then follows downstream back to Mowat Landing.  Of this route, Wilson writes –

A long-time favourite, this route tantalizes the adventure spirit with a congenial medley of lakes, creeks and river paddle. This route can be taken in either direction; however, caution should be employed while travelling the open stretches of Lady Evelyn Lake, as the wind can toss up metre-high waves in minutes. (Temagami, 99)

______________________________

Maps:

Natural Resources Canada 1:50,000 Topos:

The topographical maps maintained by the Canadian Federal Government’s map department still provide the most accurate map information for canoe trippers.  They are available online for a free download if you want to print them yourself, or the parts of them that are relevant to your trip.  For this trip, two 1:50,000 topos cover the entire route.  Click on the map titles to access them in JPG format –

The government’s own website, with its no-frills folder-based collection of topographical maps, is the source of the maps.  Both the 1:50000 and the 1:250,000  are available in TIF and pdf format.    Go to the 041 Folder for the maps above and use the appropriate letters and numbers to get the specific maps.  Get started here.

______________________________

Maps By Jeff  


Maps By Jeff, the latest incarnation of Jeff McMurtry’s collection of Ontario canoe tripping maps,  has the digital version of an annotated Temagami map set available. It includes all five of the original 2014 hardcopy maps covering the entire Temagami area.

The map provides the portage and campsite information you need and points of historical interest that you will paddle by.   The 1.0 version of the map does have a few errors that never got corrected. It still provides canoe trippers with an excellent overview for planning a route in the greater Temagami area.

______________________________

Friends of Temagami Map:

FOT Map

When we dropped in at the Temagami Outfitters store to buy a copy at the start of our trip, we were told that copies of Jeff’s maps were available – except for the sold-out Central map!  Luckily, we had downloaded digital copies the night before on our way to Temagami from the end of our Steel River trip.

We bought a copy of the map put out by the Friends of Temagami – a double-sided map with the Obabika Loop on one side and the Maple Mountain area on the other – which did the job nicely.  Portage and campsite locations and additional information are there.

Like most maps these days, it is made of waterproof and tear-resistant material.  It is meant to go along with – and not replace – the 1:50000 topos mentioned above.  See here for the map details at the Friends of Temagami online store.

______________________________

For more Temagami canoe tripping, check out the two following posts for possibilities:

Temagami Canoe Country: Paddling From Ishpatina To Maple Mtn. To Bear Island

Temagami: Paddling From Peak to Peak (Ishpatina Ridge to Maple Mtn.)

Early Autumn Canoeing In The Heart Of Temagami

Temagami’s Lady Evelyn River From Top To Bottom: Route Options, Maps, Shuttles, Permits, And More

Posted in Temagami, wilderness canoe tripping | Tagged , , , , , , , , , , , | 16 Comments

Canoeing The Steel – Day Eight – Santoy Lake/ Our Thoughts On The Steel As A Canoe Trip

Last revised on March 9, 2024.

Table of Contents:

Previous Post: Canoeing The Steel – Day 7 – Meandering Our Way To Santoy 

Canoeing The Steel – Day Seven – Meandering Our Way To Santoy

————–

The Day’s Basic Data and Map

  • distance: 10.8 km
  • time: start – 11:30 a.m. . ; finish – 1:35 p.m.
  • portages: none
    – after takeout from Santoy Lake, drove to Iron Bridge just east of the Soo and overnighted at the Village Inn Motel.
  • weather: overcast, breezy, intermittent rain before leaving and while paddling very misty with visibility at lake level less than 250m most of the way; the brisk wind from SW calmed a bit by hugging the west shoreline
  • campsite:  Village Inn Motel in Iron Bridge was fine.

Steel River Santoy Lake

————–

Stiff  Wind On Santoy – Stay or Go?

We woke up at 6 a.m. to the sound of heavy rain, which would go on for a couple of hours and then peter out a bit. It looked for a while like we wouldn’t be going anywhere as the wind from the southwest was doing its thing, and there we were at the north end of the ten-kilometer-long and narrow lake.

Already I was thinking about a possible wind day on Santoy when we got up around 9:30 – very late for us – and put up the tarp over the tent for extra protection. We also had breakfast and – importantly – our jolt of caffeine! Amazingly, the rain stopped, and the wind seemed to have died as we did all this.

We were expecting it to pick up again – but when it hadn’t by 10:30, we decided to take advantage of the interlude. We packed up, and by 11:30, we were on our way.

————–

Down The West Side of Santoy

The choppiest water we would face would be that in the first three kilometers or so – and it was nothing compared to the Temagami waves and wind we had dealt with on our previous October trip.

west shore of Santoy Lake in the mist

west shore of Santoy Lake in the mist

As our GPS track on the map above shows, we stuck pretty close to the west shoreline most of the way down. We would get to look at the start of the Diablo Portage one more time. The picture below shows the portage marker indicating the Devil’s Hole entrance! – to our three hours of “pain and suffering” on Day One. We accepted it as the entry fee to a week’s work of memorable paddling.

paddling by our old friend, the Diablo!

Paddling by our old friend, the Diablo!

a last misty look at the Devil's Hole

a last misty look at the Devil’s Hole and the start of the Diablo Portage from Santoy Lake

It would take us two hours to paddle to the dock and the parking area at the south end of Santoy Lake. We had made the right call in packing up since the rain held off, and the wind was not an issue once down the initial open stretch. The images below capture a little of what it was like to paddle through the mist.

approaching the south end of Santoy Lake

approaching the south end of Santoy Lake

Santoy shoreline in the mist

Santoy shoreline in the mist

————–

Santoy South End-The Empty Parking Lot

As we approached the dock,  the rain, which had held off for the past two hours, started coming down – at first just a little and then a bit harder while we were getting the canoe tied down on the car. Still – no cause for complaint from us. At least we were not at the north end of Santoy dealing with a “wind and rain” day!

Santoy Lake parking area and dock

Santoy Lake parking area and dock

Santoy Lake boat at the dock

Santoy Lake boat at the dock

another view of the boat and dilapidated dock at Santoy Lake

another view of the boat and dilapidated dock at Santoy Lake

Instead, we would be able to get back on the road and head east. How far we were not sure – but by ten that night, we were approaching Iron Bridge and the Village Inn Motel just east of the Soo. We had stayed there last summer after our Bloodvein trip, so we knew it would be a decent place to stop. We were busy until 1 a.m. cleaning up and repacking the bags for our next mini-canoe trip!

strapping down the canoe

It’s not what it looks like! Max strapping down the canoe…

heading back east on a rainy day

heading back east on a rainy day

We had initially planned to spend more time on the Steel River system – time to paddle up Eaglecrest and Evonymus and the northern stretch of the Park. However, the allure of more lake paddle faded after we were finished with Steel Lake, and we turned south at the Steel/Little Steel confluence instead.

————–

The Steel River From Santoy to Superior

Santoy Lake is not the end of the Steel River. From Santoy, it continues down to Lake Superior. There is a campsite at the top of a couple of twenty-meter drops unofficially known as Staircase Falls, which are found right where the river exits the lake.


Norm Stewart, whose online trip report from 1980 is downloadable as a pdf file (here), makes the last stretch sound like a great ride. It also leaves you figuring out how to return to that vehicle at Santoy Lake!

Steel River From Santoy To Lake Superior

the Steel River From Santoy Lake To Lake Superior

While we had initially considered camping at the top of Staircase Falls and spending some time in tourist mode walking down the portage trail to the river with our camera gear, the weather told us to do otherwise.

Update: In August 2020, Jonathan Kelly paddled the final stretch from Santoy Lake to Santoy Bay and then over to a takeout spot on Jackfish Lake to the NW. Click on his Dropbox link below for his detailed 1.2 Mb pdf file of the map:

https://www.dropbox.com/sh/1kjojdv07be3 … paSJa?dl=0

Here is a 280 Kb jpg of the same file –

See also this Canoe Canoe Routes forum thread he started for more comments:

Steel River – DOWNSTREAM from Santoy to Hwy 17 / Superior

————–

The Steel As a Canoe Trip Choice +s and -s

If you want to experience a compact one-week route with many of the pleasures and challenges of wilderness canoeing,  then the Steel River Loop may be the trip for you. Here are the main points that came to mind as we drove east from Santoy to Wawa in the rain – 

Pluses –

  • It is a loop! You get to do an entire river system and somehow end up back at the starting point! Of course, there is a catch. See the Minus section!
  • The length of the trip (six to eight days) fits in with the number of days trippers seem to have these days. You can leave home on a Friday night, put in on a Saturday or a Sunday morning and be back home nine days later on a Sunday night.  
  • You won’t see a lot of other canoe trippers – especially on the upper stretch of the loop. We met one party of two canoes.
  • You are treated to a solid day (or two if you stretch it out a bit)  of fast water, swifts, and runnable rapids that will see you doing 10 kilometers an hour at times with little effort. It was the “fun” section of the trip. It would make a great intro to canoeing.
  • Paddling down stretches of the river with that intimate feel, thanks to how narrow it becomes, is always a treat. 
  • To stand at the top of Rainbow Falls on a sunny afternoon and watch the water tumble down is a pleasure relatively few will experience.
  • While our paths did not cross, we saw evidence of moose and bear on the portage trails and the shore. The eagles that flew overhead daily reminded us that we were at least close to wilderness.
  • You get to see how the Cairngorm/ upper Steel Lake area has rebounded from the large fire of the early 2000s. 
  • If you are into fishing,  the Steel is apparently excellent! The Northern Scavenger blog has a very readable trip report – Steel River Loop – from the following year – 2016 –  that has numerous mentions of catching brook trout and pickerel (walleye), including their personal bests in all categories! A comment (2022-12-20) by Bret Graves notes that I make “not one mention of the fabulous fishing that awaits you. Trophy speckled trout. We did this trip many times in the 80s and early 90s. We are loggers from Manitouwadge.”

Minuses –

  • The portage trails are poorly maintained and sometimes challenging to find the starts of. Unsurprisingly, the ones in the upper part of the loop are in the worst shape. The very first portage has the reputation of being one of the more punishing portages in Ontario.
  • [Update: Major trail work done in 2018 between Santoy and Steel Lake’s south end will improve things for a few years! See below for more details.]
  • The route is not rich in classic Canadian Shield campsites, and the absence of sites on the meandering stretch south of Deadhorse Bridge makes for a long day to Santoy Lake. 

To be fair, the Park is officially unmaintained, so my whining about the trails not being “maintained” is a bit off the mark!    Major thanks to Rob Haslam for his work over the years to keep the portage trails open. He has done the river a dozen times, which must be a record,  with 2007 being the last time he did major maintenance on the upper stretch.

Any clearing and marking by other trippers will make the Steel portages much easier for the next crew passing through. Even the bit of tape we put up seemed to make a difference to the two groups of trippers that followed up later that week. And we thought we were the only ones on the river!

______________________

Click on the title below for another perspective on the Steel River Loop.   –

RHaslam’s “Solo On The Steel” Post

Rob recounts a trip he did in 2012, which begins from the north end at Eaglecrest Lake. I had never even heard of the Steel River before I clicked my way into this post back in 2012. This post by Rob was the seed of our trip!

______________________

Update:

It is six months later – late January – and I just got this email from my brother. He wrote –

Just in the process of rereading the Steel report – I’m game for another go!!

And you know what? So am I! The more I think back, the more I see a great little canoe trip!

______________________

Update: August 2018   

Fantastic news! A four-man Anishinaabe (i.e.Ojibwe) work team just did some work – with chainsaws and all – on the portages that take you from Santoy to just below the south end of Steel Lake. I found the info in a Canadian Canoe Routes forum thread. The poster Speckling wrote this –

As we were about 300 m from the end at Diablo Lake I was stunned to hear a chainsaw working ahead. Turned out it was 4 fellows from Pic River (father, son and 2 others) that had been hired by the band to clear portages. They started at the bridge between Cairngorm and Steel Lake and were making their way out via Santoy Lake. The large log suspended across a rock pinch in the portage trail, that required threading your canoe through the space needle, is no more, and we subsequently sailed through without a hitch.

Further related to portage clearing, the 1st leg (800 m) of the portage from Diablo to Cairngorm was absolutely spotless and not once across the entire length did I hear so much as a squeak from the canoe touching anything! The guys did a real nice job on it… See here for the thread and scroll down to August 12, 2018.

______________________

And now, to finish off this canoe trip report!

We still had five days’ worth of food and were keen to paddle a bit more, so we decided to pass through Temagami on our way back to southern Ontario. We had paddled up to Maple Mountain in 2009 near the end of a longer canoe trip.

Temagami: Paddling From Peak to Peak (Ishpatina Ridge to Maple Mtn.)

This time we figured we’d just paddle in from the Red Squirrel Road put-in and make a return visit to one of our favourite campsites – the one on Hobart Lake with all the qualities of a classic Canadian Shield site! Then we’d walk up to the Maple Mountain ridge with its memorable view of Temagami’s lakes below. The next day we’d get to Temagami around noon.

Next Post: Paddling To Temagami’s Maple Mountain

______________________

Posted in wilderness canoe tripping | 4 Comments

Canoeing The Steel – Day Seven – Meandering Our Way To Santoy

Table of Contents:

Previous Post: Canoeing The Steel – Day Six –  Rainbow Falls

Canoeing The Steel River – Day Six – Rainbow Falls

————–

The Day’s Basic Data and Maps (1:30,000)

  • distance: 44 km
  • time: start – 07:40 a.m. . ; finish – 6:30 p.m.
  • portages: four log jams
  • SP14 190m river left (steep bank take out and a steep bank put in) (40 min);
    SP15 400m river right  (steep bank take out and a steep bank put in (45 min);
    SP16 120m river left (steep bank take-out and a steep bank put in)  and
    SP17 360m river right (steep bank take out relatively easy put in; flat and roomy) (30 min)
  • weather: Sunny and very warm
  • campsite: SC07 Santoy Lake beach frontage with various possible 2-person sites plus some 4-person sites set back in trees/brush providing some wind/rain shelter.

map scale: approx. 1:30,000

————–

From Rainbow Falls  To Deadhorse Bridge

We had spent a relaxing afternoon at the Rainbow Falls Spa & Resort but it was time to move on.  Ahead of us was a meandering stretch of the river defined not by Canadian Shield rock outcrop but by the massive glacial sand deposits that the river has carved its way through.

The change in terrain explains the source of all that deadwood that has accumulated at four major logjam points on this stretch of the Steel.  Due to the erosion of the sand banks, which in parts can rise 40 meters or more from the river,  the trees rooted in the shallow earth topple into the river over time and join the deadwood already there.

steep sandy banks The Steel River below Rainbow Falls

some of the steep sandy banks of the Steel River below Rainbow Falls

Steel River banks between Rainbow Falls and Deadhorse Bridge

Steel River banks between Rainbow Falls and Dead Horse Bridge

We got on the water early this day – 7:40.  We were expecting it to be a long one.  Given the scarcity of campsites between Rainbow Falls – the Haslam maps only mention a couple of emergency sandbar sites – we decided to make the beach on the north end of Santoy Lake our goal.  It would mean paddling and portaging about 45 kilometers.

Deadhorse Bridge below Rainbow Falls on the Steel River

Dead Horse Creek Road bridge below Rainbow Falls on the Steel River

By nine we were approaching the bridge which crosses the Steel River about 11 kilometres down from Rainbow Falls. (The road is named after Dead Horse Creek, which it follows up from Highway 17.)   We paddled another five minutes before stopping at a spot on the riverbank for breakfast.  Some stretches of the river after the Falls still have swifts and we enjoyed the feeling of being moved along with little effort on our part.

————–

The 4 Logjams Below Deadhorse Bridge

The easiest stretch of the day done – and breakfast over – it was time to deal with the first couple of the day’s challenges, the two logjam portages which are about 2.7 kilometers as the crow flies from the bridge.  As a hint of what paddling on the meandering Steel for the rest of the day would be like, in actual paddling distance it came out to 5.5 kilometers!

the top of the first of the Steel River logjams

the top of the first of the Steel River logjams

Our picture file for this very hot day is rather thin!  No doubt we were living our mantra of “gittin’ ‘er dun” and intent on efficiently knocking off the portages as they came up.  During the day, we would deal with the four logjams which Haslam mentions in his map set.

————–

The Kevin Callan Account From 2002

We had also reread the Callan description of this section of the Steel the previous evening but were to find out that it did not reflect what was on the river on our 2014 trip. On top of the four major logjams, his map has another four indicated. Since his report dated back to 2001, these additional four he mentions may have broken up over the past decade. We would not see them. A more recent look at the satellite images of the stretch of the Steel from the Dead Horse Road bridge to Santoy revealed a new logjam forming between our #2 and #3!  If you’re going down this section, do not be surprised if things don’t correspond exactly with the info on your map!

our gear at the end of the third Steel logjam portage

our gear at the end of the third Steel logjam portage

The portage entry and exit points were easy to find and a couple even had portage markers. We left marking tape on the other two.  Thanks to the steep sand banks they were also, to no surprise, usually awkward.  One of us would haul the bags out of the canoe and the other person would grab them from the top of the bank and dump them in a nearby staging area.  Then it just came down to moving everything along what were mostly good portage trails. Perhaps our trail grading standards had slipped a bit after our Diablo/Cairngorm experience on the upper Steel!

————–

Logjam #1:

Lower Steel River Logjam #1 and start of #2

The first two portages are located close to each other and then there is an hour and a half of heading in every cardinal point on the compass as you make your way down the river.

————–

Logjam #2:

Logjam #2 on the Lower Steel River – P400m RR

The third logjam portage was the shortest (120 meters) and the easiest. The trail was in excellent condition. Do note that we paddled about fifty meters further down from the portage marker. This fits in with what Haslam wrote about the entire logjam moving downriver a bit.  It was shortly after 2 when we got to the end of this portage. We set up our camp chairs in the shade and had a one-hour lunch break. It was one hot day out in the sun.

————–

Our Logjam #3 (+ a new one forming above it)


collapsing sand banks and the Steel River logjams

collapsing sand banks and the Steel River logjams

Logjam #3 … satellite image

close-up of Logjam #3

After our break we were back on the river, cheered by the fact that it was only 8.5 kilometers (as the crow flies!) to Santoy Lake but knowing that we were looking at about three hours of paddling.

————–

Logjam #4

Some two and half hours later we were at SP17, the fourth and last logjam portage. We found a boat shell at the take-out spot and a trail that is in pretty good shape with just a bit of deadfall to deal with.  We got it done in a relatively quick and easy half-hour.

the top of the Steel River's final logjam

the top of the Steel River’s final logjam

the final logjam on the lower Steel river – Santoy Lake coming up!

SP17 - final logjam before Santoy Lake -360 meter portage

A 1.5-kilometer paddle from the put-in after the last logjam, past a private cottage that sits on the west side of the river as it enters Santoy,  and we were finished for the day.

————–

Santoy’s North Shore Beach

With a strong wind from the SW to deal with, we turned east towards the beach area and found a decent campsite SC07 tucked inside the bush.  It came complete with a grass floor!  In either direction from our camp spot were several others, some with fire pits and some not. The area has definitely seen some campers over the years.

start of Santoy Lake beach on north shore

start of Santoy Lake beach on the north shore

Santoy Lake north shore beach and camping area

Santoy Lake north shore beach and camping area

With the tent up, we sank into our camp chairs and looked south to the other end of Santoy Lake.  On tap the following morning –  a final paddle down the ten-kilometre lake,  passing the take-out for the Diablo Portage on the way to our vehicle sitting near the public dock.

The wind from the southwest was worrisome but there was a half-day for it to blow itself out.  We hoped for calm waters and a clear sky the next morning!

looking down Santoy Lake from the north beach

looking down Santoy Lake from the north beach

Santoy in the evening

___________________________

Next Post: Canoeing The Steel – Day 8 – Down Santoy Lake

Canoeing The Steel – Day Eight – Santoy Lake/ Our Thoughts On The Steel As A Canoe Trip

Posted in wilderness canoe tripping | Leave a comment

Canoeing The Steel River – Day Six – Rainbow Falls

The Day’s Basic Data And Map

  • Distance: 17.0 km
  • time: start – 09:10 a.m. . ; finish – 12:30
  • portages/rapids –
    SP12 – 140m (river right per Haslam’s waypoints – C1/C1 tech) we lined the top and ran the rest.
    SP13 – 500m river right to the Rainbow Falls campsite. Then veer left for 100m down to the river put-in)
  • Weather: sunny and hot
  • Campsite: SC06 – Rainbow Falls; ¾ down the portage trail on a bluff above a creek; poor water access; room for multiple 2 or 4-person tents; fairly open and away from main falls area; great scenery; very good rest day site.

Previous Post: Day Five – Heading South On the Steel 

Canoeing The Steel – Day Five – Heading South On The Steel River

Day6

SC05 camp on the Steel - a new day begins

SC05 camp on the Steel – a new day begins

overturned canoes at the campsite

overturned canoes at the campsite

We left the campsite at about 9 and revisited the other campsite on our way down for another look at that creek from the previous evening. We were curious about what the morning sun from the east would do to the creekbed.

a return visit to the enchanted creek

a return visit to the enchanted creek

We floated through the swifts at the bottom of McKernan Lake which Callan describes as Lost Towel Rapids. The topo map does show a contour line crossing the river at this point. Perhaps their higher early-season water levels explain the different experiences we had.

At the bottom of Beath Lake, about 3 km. downriver from the previous night’s campsite, we came to the set of rapids that Haslam’s notes describe this way –

The rapid at the bottom of the map can be problematic. (They are incorrectly labeled C2) It is difficult to run, unless the water is very high, and there is no port. Best approach is to line down RR until you can hop in and shoot the haystacks at the end.

We took a quick look and lined the initial drop on river right and then, as Haslam suggests, hopped back in for the ride down.  When we turned around to take a look at the rapids from down below, we saw John Mark and Adam up near the top making their way down.


Steel Rapids below our Day 5 campsite

Steel Rapids (C1/C1Tech) below our Day 5 campsite – the view from below

the-days-first-set-of-rapids

fellow paddlers riding the rapids

fellow paddlers riding the rapids at the bottom of Beath Lake running into Milotte Lake

Steel River rapids - cutting through the turbulence

Steel River rapids – cutting through the turbulence

Steel River morning adreneline rush

Steel River morning adrenaline rush

Big grins all around! Not too shabby for a couple of rock wall climbers from Detroit on their first wilderness canoe trip!

Steel River shore - open clam shells in water

Steel River shore – open clam shells in water

For us, this would not be a long day on the water!  We continued on down, enjoying one set of swifts after another and a set of CI  rapids or two.  And sometimes we’d hit quiet stretches of the river like the ones illustrated in the pix above and below.

a quiet stretch of the Steel River above Rainbow Falls

a quiet stretch of the Steel River above Rainbow Falls

While our goal for the day was the campsite at Rainbow Falls, we did check out the site about 4.5 kilometers above the falls on river right. You can see the red campsite sign on the tree in the middle of the pic below. A quick visit revealed a large and pretty flat area with room for a few tents.  It would serve canoe trippers well in a pinch although given how close you are to Rainbow Falls, an extra 30 minutes would get you to the Falls campsite and access to some stunning views.

established campsite 4.5 km. above Rainbow Falls on the Steel River

established campsite 4.5 km. above Rainbow Falls on the Steel River

large campsite above Rainbow Falls on the Steel River

large campsite less than  five kilometers above Rainbow Falls on the Steel River

About 500 meters above Rainbow Falls we saw the warning sign on river right. We wondered if it was put there as a result of someone having gone over the Falls. As we got to the take-out spot on river right, the American guys caught up to us.  We got our canoe and gear out of the way so they could land. Then we proceeded to haul our gear to the large (100′ x 30′) rectangular clearing about two-thirds of the way down the portage trail and actually some distance from the falls themselves. In short order, the tent was up.

Meanwhile, they had lunch up by the falls and took in the spray and energy.  Eventually, they would come trucking by the campsite area.  The portage trail actually takes a hard turn to the left just as you come onto the campsite area and then goes down somewhat steeply to the river alongside a creek.  They were going to paddle down the river a bit more before calling it a day.

Steel River -campsite and Rainbow Falls

Steel River -campsite and Rainbow Falls

satellite shot of the Rainbow Falls stretch of the Steel River

Our plan was much less ambitious!

Not even one and we were done for the day. After lunch, we walked back on the portage trail to the top of the falls where we spent a good chunk of the afternoon. Rainbow Falls became part spa and part photo opportunity as we set up our camp chairs just below the top of the falls and to the side of the first two drops.

Rainbow Falls Spa and Resort

Our first real wash-up in three days, catching a few rays as we lounged in our chairs and felt the mist of the tumbling water…taking in the scene in front of us. For us perhaps the highlight of our Steel loop was the time we spent at this twenty-meter drop in the river.   Eventually, we got out the camera gear and framed some shots – you can see some of the results below.  We would return to the falls closer to dusk to catch the scene in a different light.

The Steel River's Rainbow Falls - looking down from the top

The Steel River’s Rainbow Falls – looking down from the top

view of river right at Steel River's Rainbow Falls

View of river right at Steel River’s Rainbow Falls

Max standing at the top of Rainbow Falls

Max standing at the top of Rainbow Falls

a shot of me framing the previous shot at Rainbow Falls!

a shot of me framing the previous shot at Rainbow Falls!

The first two drops of the Steel River's Rainbow Falls

The first two drops of the Steel River’s Rainbow Falls

Steel River's Rainbow Falls - the island and the end run

Steel River’s Rainbow Falls – the island and the end run

Max at Rainbow Falls

Max at Rainbow Falls

checking out the drop at Rainbow Falls

checking out the drop at Rainbow Falls

Rainbow Falls on the Steel – a satellite image

logging roads and clearcutting in the Rainbow Falls area

Meanwhile, as I would learn later, our fellow paddlers continued on their way down the river.  They eventually stopped paddling at 11 that night!  By then they were deep into the meandering stretch of the Steel and may well have gotten to a sandbar campsite close to the end!  They found out just how difficult it is to find even a barely adequate place to pitch a couple of tents in the final stretch from Rainbow Falls to Santoy Lake.

We would get our own taste of the Steel below Rainbow Falls the next day.  As if to make up for the meagre distance we had covered on this day (17 km), we’d paddle and portage almost triple that the next day.  Check the next post for the details!

Next post: Day Seven – From Rainbow Falls To Santoy Lake

Canoeing The Steel – Day Seven – Meandering Our Way To Santoy

Posted in wilderness canoe tripping | 4 Comments

Canoeing The Steel – Day Five – Heading South On The Steel River

Previous Post: Canoeing The Steel – Day Four – Steel Lake

  • Distance: 15.3 km
  • Time: start – 9:30 a.m.; finish – 3:15 p.m.
  • portages: 4  – note:Steel; Portage … run and line options also considered
    SP08 – 250m (15 min) river right from campsite to the first small lake;
    SP09 – 460m (1h 10m) river right; over hill and dale to the second small lake;
    SP10 – 160m (1 min) Class 1 with a bumpy ride and haystack finish in high water or portage, which is on river right. Nice campsite area at the bottom.
  • SP11 – just above Savoie Lake 150m (river left per Haslam’s waypoints – C1)- it was a bumpy ride down in low water
  • Weather: sunny and very warm
  • Campsite: SC05 river right; cedar grove; room for multiple 2-person tents; small beach area; easy access to water; picturesque east view of rock face bathed in setting sun.  An alternate site about 700m down on river left is west-facing  with a small beach beside a creek with room for several  2 or 4-person tents

Steel River Day 5

so long to the campsite at the north end of Steel Lake

A last look at our campsite SC04 at the north end of Steel Lake

It was morning five and since turning off from the highway to the Santoy Lake put-in we had yet to see anyone. No fishermen, no paddlers…not even any four-legged wildlife – no moose, no bear.  Well, chipmunks had visited a couple of our campsites but that had been about it. We figured things might change as we got down to the turn-around point and headed back south.

But first – more portages to get there, three carries interrupted by two little puddles of water. We had walked SP08 the evening before, doing a bit of trail maintenance in some of the more grown-over spots. Now we did it one more time with the gear and then paddled down to the take-out spot for the second portage. Day5_Ports_details_revised

the put-in for the first of the portages from Steel Lake to the Junction (the turn south point)

the put-in at the end of  SP08, the first of the portages from Steel Lake to the Junction (the turn south point)

We found SP09 in pretty rough shape with some ridge-edge sections having collapsed thanks to mini-landslides. It definitely felt longer than the measured 460-meter distance.  The steep take-out did have a welcoming portage marker!

the take-out spot for SP08 on the Steel River

the take-out spot for SP09 on the Steel River

This was one of those portages where even manoeuvring the canoe became an issue in a couple of messy spots.  Blueberry bushes have covered parts of the trail. There are definitely some ups and downs to guarantee an aerobic workout and it all ends with a sustained downhill to the put-in.  You notice this when you go back for the second load.   As always, it gets done and you sit there at the put-in and get ready for the next challenge.

relaxin' at the other end of a somewhat messy SP08

relaxin’ at the other end of a somewhat messy SP09

break time at the end of SCP09

break time at the end of SP09 – chewing on some water

We had just loaded the canoe and were about to push off to the third portage when someone came down to the put-in!  It was John Mark, one of four American guys (two had driven up from Wisconsin and the other two from Detroit).  Soon the others joined him and we had a brief chat about the sketchy trail and the Steel in general. They had put in at Santoy the day after us – and here they were!  Three had never been on a canoe trip before and they were still totally psyched about the experience.  As we pushed off, I thanked the Detroit guys for their hockey coach;  they were quick to reply that he was hoping to get a job where he’d be done in April!  Wishing them all the best, we pushed off for SP10.

As we approached we saw a Class 1 set of rapids with enough water (almost!) to run. Within a minute we were down and through and approaching a nice campsite (SC02 on Haslam’s maps, SCS04 here in this GPS data file) at the confluence of the Steel and Little Steel Rivers.

That’s it in the pic below, looking like very few tents have been put up there so far this year.

the campsite at the confluence of the Steel and Little Steel Rivers - the Junction!

the campsite at the confluence of the Steel and Little Steel Rivers – the Junction!

A Side Note:

Callan and many others mistakenly identify the Steel River here as Aster Lake.  However, Aster Lake is actually found about five kilometres due east of the Steel River.  The Garmin Topo Canada map above has Aster Lake correctly located, as does the Fed Govt topo 042E/07 map below –

From Steel Lake To Aster Lake

See here for another map source which shows Aster Lake 5 km east of the confluence

None of the government topos have a lake name for the confluence of the Steel and Little Steel Rivers, though the stretch from the confluence down to our campsite for the night has, in order,

  • Burrow,
  • Stewart,
  • Savoie, and
  • Mckernan Lakes.

Presumably, a set of rapids or swifts would indicate the bottom of one “lake” and the top of another. Given the negligible drop from one lake to the other, the Garmin Topo Canada map set has the same above sea level figures in meters for the first three lakes as you paddle down from the confluence.

Steel River Junction field of flowers

Steel/Little Steel Junction field of flowers

framing the shot in the LCD screen

framing the shot in the LCD screen

I am making a real effort to get a great shot in the pic above. The funny thing is that all my DSLR flower shots turned out to be crap while Max’s Canon SX280 p&s captured the scene perfectly. After our moment with the flowers, we would paddle the 5.5 kilometres down to the bottom of Stewart Lake before we stopped for lunch.

Confluence of the Steel and Little Steel Rivers At first, as we started down the river, I recorded the location of the swifts we were zipping through but after three or four of them it struck me that the swifts were something to enjoy and did not need GPS exactness to deal with.  I felt better when I put the GPS device away and just went with the flow of water. Looking at the GPS track just now, I see that we hit speeds of up to 11 kilometers an hour – if only for a few seconds at a time! Nevertheless – totally enjoyable!  In the end, Haslam’s maps have all the swift and rapid info if you want a bit of a warning about upcoming “challenges”. There is a zip file of the gpx waypoints of our trip – and of the swifts and rapids in particular – which you can download here. (Ignore the sales pitch if you want; just click on No thanks, continue to view at the bottom of the page.)

We figured that a canoe trip starting at one of the lakes north of the confluence down through here would make a great introduction to canoe tripping!  The lakes would give newbies a chance to practise their paddling skills and then the moving water would give them their first shots of rapids-induced adrenaline.

It would be somewhat like the Spanish River starting at Ninth Lake and working your way down the lakes to the rapids.  However, there are no rapids on the Steel that come close to what the Spanish has further down. It was thirty years ago but I still remember tanking at Graveyard Rapids!

vertical rock face on the east side of the Steel River

vertical rock face on the east side of the Steel River

We love paddling down narrow rivers – and we were loving the Steel since the turnaround.  Around 12:30 we stopped for lunch on a shady stretch of the river and watched the river flow by for an hour as we cooled down and had a bite to eat.

shady Lunch spot on the Steel

shady lunch spot on the Steel – getting some water for the soup of the day

a tiger lily cathces Max's eye while we are having lunch on the Steel south of the Junction

a tiger lily catches Max’s eye while we are having lunch on the Steel south of the turnaround point

After another very easy ten kilometers after lunch,  we stopped for the day at the campsite (SC05) mentioned in the Callan trip report. It is a sheltered and shady spot on the west side of the river with a nice stretch of vertical rock across the water. Callan describes their afternoon as they paddled down to it from the Steel/Little Steel confluence –

Eventually we reached Aster Lake [sic], turned south, and almost immediately began running rapids. The whitewater was a welcomed diversion. Only once did we have to portage, 180 yards to the left of a technical Class II rapid. The rest of the day was spent negotiating a combination of fast chutes, manageable Class Is’, and easy swifts. In fact, the strong current remained consistent most of the way, squeezing itself through walls of granite or high gravel banks. Even when the river eventually broadened out, becoming more lake-like, the scenery still remained breathtaking. Jagged cliffs provided a backdrop to thick forested banks, left untouched by the past fire, and tiny islands of sand and gravel split the current in all directions. It was a place of awesome beauty, an absolute dream scape. We camped directly across a spectacular cliff face, and celebrated the day with an extra glass of wine. It continued to pour down rain while we set up camp, but at this point in the day nothing seemed to dampen our spirits.

While we had a similar experience with the water – totally buzzed by the swifts and Class I rapids which sucked us down the river while we watched the shoreline zip by – we didn’t see anything that warranted being called CII or CII technical.  Then again, if they had lower water that would certainly change the character of the two or three – we didn’t really notice – rapids we had run with no problem.

As for Callan’s effusive praise of the scenery, it seems to us a bit over the top. The reality, while still a very nice slice of the Canadian Shield, is hardly that dramatic.

a set of rapids we ran after lunch

a set of rapids (SP11) we ran after lunch – about as wild as it got on the Steel

And now for our own bit of hyperbole!

We thought of the exhilarating river running as the flip side of the Diablo Portage, the yin to the yang of the 1.1 km carry.  As much work as the portage had been, the swifts and rapids were simple fun. It really brought home the Dr. Jekyll/Mr. Hyde nature of the Steel River Loop. Consider – over three kilometers of gruesome and often messy portages in the first two days topped off by forty-five kilometers of lake paddle.  And now this – the sweet gurgling sound of swifts and easy rapids all afternoon as we finally headed south.

For most paddlers, the highlight of their Steel River loop will be the two days they spend on the stretch of the Steel River from the turnaround point at the confluence to just below the Dead Horse Road bridge some ten kilometres south of Rainbow Falls.

Steel River campsite

Steel River campsite SC05

end-of-day coffee on the Steel

end-of-day coffee on the Steel – and souvenir scratches of the rapids we had scraped through

the rock face across from our Steel River camp site

the rock face across from our Steel River camp site

paddlers drop in for afternoon tea

paddlers drop in for afternoon visit – and stay the night!

Day 5 campsite SC05 and alternative We had just set up the tent and put some water on to boil when the four canoe trippers from the morning paddled towards the campsite.  We told them that if they were looking for a place to camp, they were welcome to join us; if not, I mentioned the site on the other side of the river some 700 meters downriver.  (See map above for location.)

Ben had a copy of Callan’s trip report and had probably planned on camping at the same spot. Whatever the case,  they accepted the offer and soon had their two tents up in spaces on either side of ours (fortunately 2-person tents!). An evening’s worth of great conversation followed – as is often the case when kindred spirits meet on the river.

An After-Supper Paddle:

After our usual supper, we did take advantage of the evening stillness to paddle the 700 meters down to the other campsite noted on Haslam’s maps. Our canoe is definitely meant to be paddled loaded and it handled a bit strange empty.  Down at the other campsite, we found a flat and fairly open site (compared to our sheltered site upriver). It also seemed warmer thanks to its exposure to the setting sun. The pic below captures some of that sun streaming down on the east side of the river.

looking north towartds our campsite from the one on the east side of the Steel River

looking north towards our campsite from the one on the east side of the Steel River

This river left campsite is located beside a creek and offers plenty of room for multiple 2-person tents and even a few 4-person tents with no one complaining about not getting a flat spot. This is when you ask yourself if you should have kept paddling for a ‘nicer’ spot.

campsite east side of the river 500 meters down from ours on the Steel

campsite on the east side of the Steel river 700 meters down from ours

On the edge of the site, we found the sunlight streaming down through the cedars onto the creek bed that seemed like the portal of a magical world.  We got there just as the sun was starting to dip below the western hills and was casting those nice, long. soft sunset light rays right up the creek making for an enchanting picture-taking opportunity.

We spent a good ten or fifteen minutes there framing different shots that captured the light and the creek bed that it lit up.  It is Zen moments like these that make the act of photography special – and sometimes we are even rewarded by an image that captures most of what it is that beguiled us in the first place.

the creek running into the Steel by the next campsite from ours

the creek running into the Steel by the next campsite from ours

The Steel River - The Enchanted Creek at dusk

The Steel River – The Enchanted Creek at dusk

The Enchanted Creek - another look

The Enchanted Creek – another look

We would also drop in the next day to see what the early morning light might show.

Steel River rock across from SC05

Steel River rock across from SC05

On our way back we also paddled up close to the rock face across from our campsite. And then it was back to the euchre tournament as we marvelled about the bug-free evening on the Steel River.

It had been a fun day. The next day – but only a half day of paddling – would serve up more of the same as we got to scamper around Rainbow Falls!

Next Post: Canoeing Down the Steel – Day Six – Rainbow Falls

Posted in wilderness canoe tripping | Leave a comment

Canoeing The Steel – Day Four – Steel Lake

Previous Post: Canoeing The Steel – Day 3 – From Cairngorm Lake To Steel Lake

  • distance: 27.5 km
  • time: start – 8:00 a.m. ; finish – 2:20 p.m.
  • portages: none – just one long lake
  • weather: sunny and hot; no wind in the morning and a gentle SW wind in the aft
  • campsite: SC04  at the start of portage trail at end of the lake; room for a couple of two-person tents; site maintenance required before pitching the tent (deadfall removal); good access to water; evening work on the portage trail

Day4

Steel lake -early morning start for the big paddle

looking south on Steel lake – early morning start for the big paddle

The previous evening the wind had blown strong from the SW and we were hoping for a repeat of that as we got up a bit earlier than usual for our day of Steel Lake paddling. The pic above shows what we found – i.e. an almost ripple free lake.  Shortly after 8:00, we were off, having postponed breakfast until we put in a few hundred paddle strokes in the early morning coolness.    By 9:15 we were down the lake about seven kilometers sitting in the shade, coffee mugs in hand, enjoying the stillness.

Steel River - paddle to bkft

sunny breakfast spot on Steel Lake

sunny breakfast spot on Steel Lake

There is a bit of a treadmill effect that kicks in when you get to stare at the same horizon for an hour or more.  The island in the pic below was just one of many upcoming points we paddled towards in the course of our twenty-seven kilometers down the river to the campsite. Paddling on the east side of the lake across from the island was a nice stretch of vertical rock face that is always a pleasure to glide past.

paddling down Steel Lake

paddling down Steel Lake

a typical Steel Lake vista

a typical Steel Lake vista

While we are not talking Mazinaw Rock here, these stretches of the Steel Lake shoreline are still impressive.  Ever on the look for pictographs (as my brother rolls his eyes), I scanned the rock face for signs of applied ochre and sometimes my will to see something helped create pictographs out of lichen and natural rock stain.
On the other side of the lake, the shoreline look is more rounded with an occasional rock outcrop.  Much less evident were signs of the big burn of the early 2000’s. (See here for a map which shows the area most affected.)
rock face on the east side of Steel Lake

rock face on the east side of Steel Lake

a shady spot on the east side of Steel Lake for a morning break

a shady spot on the east side of Steel Lake for a morning break

driftwood on rock on Steel Lake

driftwood on rock on Steel Lake

picto fever strikes again!

pictograph fever strikes again!

Shortly after 2:00 p.m., we approached our campsite at the bottom (i.e.north end) of Steel Lake. We found there a campsite just meters from the take-out spot and after a bit of site rehab put up the tent. We also put up the silnylon tarp as a precaution as it clouded over in the early evening.  Not only does the tarp take the brunt of any rain and keep the tent itself much drier, but it also makes taking down the tent in the rain the next morning that much easier.

campsite at the north end of Steel Lake

campsite at the north end of Steel Lake

campsite slope down to the water - rapids start on bottom right

campsite slope down to the water – rapids start on the bottom right

One of the things we discussed that evening was our original plan to paddle up Eaglecrest Lake and even further north (up Evonymus, Kawabatongog, and Grehan)  the next day. The Steel River Provincial Park includes this twenty-kilometre stretch of lakes which make up the Little Steel River system.
In the end, we decided that after the forty-seven kilometers of Cairngorm and Steel, we’d had enough lake paddle!  The thought of another forty had lost its appeal.  We would instead turn south at the confluence of the Steel and Little Steel Rivers (mistakenly named Aster Lake in a number of trip reports) and enjoy a day or two of swifts and CI rapids.
the start of the 22-meter drop from Steel Lake to the confluence of the Steel and Little Steel down below

the start of the 22-meter drop from Steel Lake to the confluence of the Steel and Little Steel down below

a stretch of SP08 portage on the Steel River

a stretch of SP08 portage on the Steel River

Given our early finish, we had time this day to trim back some of the new alder growth on the portage trail.  Something we can’t comment on – but which is clearly a real attraction for some canoe trippers – is the chance to drop a hook into some A+ fishing spots.  It was a point made by more than one of the trip reports I read through.

the bottom of the rapids that SP08 takes you around

the bottom of the rapids that SP08 takes you around

The upper Steel loop portion almost done, we were looking forward to heading south and feeling the pull of the river as we paddled down to Rainbow Falls.

Next Post: Canoeing The Steel River – Day 5 – Heading South On The Steel River

Posted in wilderness canoe tripping | Leave a comment

Canoeing The Steel River – Day Three – From Cairngorm Lake To Steel Lake

Last revised on May 23, 2023.

Table of Contents:

Previous Post: Day 2 – Portaging Into Cairngorm Lake

Canoeing The Steel River – Day Two – Portaging Into Cairngorm Lake

——————

Essential Data – Portages, CS locations, etc.

  • distance: 20.7 km
  • time: start – 9 a.m.; finish – 5 p.m.

portages: three (did the first two lined/ran/scraped the 3rd)

  1. SP05 – 510m (1h 45min) from Cairngorm Lake to Steel Creek/River leading to Esker Lake
  2. SP06 – 300m (45 min) river left and over fire access road well-groomed for first half less so second half but appeared well used
  3. SP07 – 60m river right but with higher water may be possible to run or scrape/line (we did the latter)
  • weather: sunny with cloudy periods and very warm
  • campsite: SC03 – beach landing and sheltered camping area in a cedar grove 15 meters from the beach; multiple tent spots, could easily accommodate several two-person tents and at least a couple of four-person tents.

Day3

————-

Early 2000s Fire in the Cairngorm Area

Max waiting while I give the Cairngorm campsite a last looking over

Max waiting while I give the Cairngorm campsite a last looking over

Sitting in the bay waiting for me to do a last quick campsite check for stray items, Max focussed on the reflections in the water – a definite favourite theme of his. The image below is what caught his eye. Before I uploaded it, I flipped the image so that up became down and made it look like a fuzzy Group of Seven impression of reality.

 Max in a reflective mood while I do a last check of the campsite

Max in a reflective mood while I do a last check of the campsite

We had just over ten kilometres of paddling to do to get to the north end of Cairngorm – and the wind, such as it was, was playing nice and blowing our way!  We were curious to see how the neighbourhood had responded to the large forest fire that had burned through in the early 2000s. The yellow area in the map below illustrates the extent of the fire zone that we entered as we left our west side campsite.

new growth on Cairngorm Lake after the fire of the early 2000's

new growth on Cairngorm Lake after the fire of the early 2000s

Cairngorn Lake - Steel Lake Forest Loss History Since 2000

Cairngorm Lake – Steel Lake Forest Loss History Since 2000 – see here for source

The desolate look reported by canoe trippers who passed through soon after the fire has been replaced by a fairly uniform (in terms of height) carpet of tree growth that signals the start of a new cycle in this patch of the boreal forest.

Recently I listened to a podcast of an older episode of CBC Radio’s  Quirks and Quarks in which the speaker dealt with the notion that by the year 2075 50% of Canada’s existing boreal forest will have burned. (Click here to access.) He explained that this is largely due to natural causes and a part of the boreal life cycle. However, with the increase in human cause climate change and insect infestation, the boreal forest is under additional stress and this makes predictions that much more difficult.

another post-fire stretch of the west side of Cairngorm Lake

another post-fire stretch of the west side of Cairngorm Lake

the heart of the burn on Cairngorm Lake

the heart of the burn area on Cairngorm Lake – both sides

————-

Portage Into Esker Lake From Cairngorm

After a couple of hours of paddling it was portage time.  As the map below illustrates, the portage towards Esker Lake is actually in a side bay 300 meters east of  Cairngorm Lake’s actual outlet, the very start of the Steel River. We spent an hour and 45 minutes on the portage. It is in rough shape and began with a muddy stretch that reminded us of the start of last summer’s portage into Knox Lake on the Bloodvein in WCPP.

From Cairngorm to Esker (Moose) Lake

The post-fire terrain is covered with lots of new growth – alders and young firs. You look ahead into a clump of bush and think to yourself -“Naw, that can’t be it!”  But of course that is where the trail is! With our handsaws out, we spent some time defining the trail and tape-marking some of the more vague sections.

From Ciarngorm Into Esker Lake

From Cairngorm into Esker Lake (also referred to as Moose Lake in a number of reports)

the start of SP05 at the north end of Cairngorm

the start of SP05 at the north end of Cairngorm Lake

The portage comes out across from a waterfall (called First Falls in the Toni Harting account).  There was room there for a two-man tent if it was necessary to stop for the day. The entire area is quite scenic and just begs to be photographed.

We paddled up close to the falls and dipped our Nalgene bottle into the flow.  Soon we were sipping what we labelled  Steel River Nouveau and toasting the fact that after 2 1/2 days we were finally sitting on the Steel River!

waterfalls from Cairngorm Lake - the start of the Steel River

waterfalls from Cairngorm Lake – the start of the Steel River

the waterfalls at the end of SP05 - the start of the Steel River

the waterfalls at the end of SP05

a bottle of Steel River Nouveau to celebrate - we are finally on a river!

a bottle of Steel River Nouveau to celebrate – we are finally on our river!

————-

Deadfall And Beaver Dams On the Way To Esker Lake

Then it was down the mighty Steel – well, at this point perhaps Steel Creek. Some deadfall across the river below the falls required a bit of manoeuvering and once or twice we had to saw our way through. The pix below show some of what we paddled under and around and through.

looking back at the end of SP05, the first portage from Cairngorm into Steel Lake

looking back at the end of SP05 and its portage sign

Steel River deadfall before Esker Lake

Steel River deadfall before Esker Lake

No pix taken but we also dealt with a couple of beaver dams – standing on top of the dams and then hauling the canoe over the top and hopping back in. The first one was perhaps two feet high and the one closer to Esker Lake was half that.

more sweepers on the Steel on the way to Esker Lake

more deadfall on the Steel on the way to Esker Lake

It is less than one kilometer from the SP05 put-in to Esker Lake. Within a half-hour, we were sitting on Esker Lake ( referred to as Moose Lake in Toni Harting’s report in Paddle Quest and in some older trip reports) and looking for a lunch spot with some shade. It was blazing hot and we were wilting.

approaching Esker Lake on the Steel River from Cairngorm Lake

approaching Esker Lake on the Steel River from Cairngorm Lake

We finally found a spot – easy to land, reasonably flat, but shade was scarce. We would eventually huddle under the branches of the tree pictured on the edge of the outcrop below.  Off came the boots and the socks; they would get a good drying while we sat in the shade and went on with our one-hour lunch ritual.

looking north from our lunch spot on Esker Lake

looking north from our lunch spot on Esker Lake

————–

Portage Out of Esker Lake on RL Across Fire Road

With lunch done,  it was back to work. First up was a quick paddle down Esker Lake and the start of a narrow two-kilometre stretch of the river which would take us into Steel Lake. SP06 comes up about 700 meters from the north end of Esker.

Day3_Port2and3

the Garmin Topo Canada 4.0 map – without the fire road from ten years before indicated!

As we paddled up to the portage take-out we could see the bridge crossing the river. The portage trail itself is on river left (as indicated in Haslam’s map set) and looks used and maintained – at least up to the road that goes over the bridge. On the other side of the gravel road (called the Esker Lake Road on some maps), we noticed some long marking tape streamers on a tree branch.  Walking over, we found yet another portage marker in the grass – the third in the past two days! The trail from here on down to the put-in was visible but in rougher shape than the first half.

Steel River portages between Esker Lake and Steel Lake

Google satellite image of the fire road between Esker Lake & Steel Lake

——————

Confusing Out-Of-Date Maps and Reports

Garmin’s Out-of-Date Data

As much as I find the Garmin Topo Canada map set useful, it sometimes disappoints with its lack of up-to-date information.  If that logging or fire road was constructed in the early 2000’s you’d figure that the Garmin map set 4.0 would include it over a decade later.

To be fair, the Fed. Govt. topo 042E02 Killala Lake is also missing the fire road. Checking other sources, I found that the Ontario Govt map site does have it. (Link  here.)  The Google satellite view above shows the road as it crosses the river.

And here is a newer 2022 sat  image from the Ontario Government map site

2022 sat image of the first P on RL from Esker Lake to Steel Lake

———

Callan’s Out-of-Date Route Descriptions

And, as much as I find Kevin Callan’s trip reports useful, they sometimes disappoint with a confusing description of what canoe trippers will face.  The passage below is a good example. Having read it a few times, I am still not sure what he is talking about. It doesn’t seem to fit with the maps you see above – i.e. the stretch from Esker Lake to Steel Lake. As confused as he says he was by the government pamphlet, he leaves the reader in the same state.

Callan Esker lake to Steel Lake Callan map Esker Lake to Steel Lake

It would seem that a big reason for Callan’s confusion in the Esker-to-Steel section was due to his portaging the first set of rapids on river right. A snippet of his trip map is on the left and shows their 170-meter portage. We looked at the terrain and were impressed that he and his wife bushwhacked their canoe and gear 170 meters to their RR put-in.  He calls it “yet another rough carry-over”. It looked to us like a mini-version of the Diablo Portage!

It may be that the road was not there when they passed through; the huge boulders we saw on either side of the road may also have been added as a part of the road construction. And the beaver dam you see in the second image down below may be a more recent addition too. In any case, do not portage this on river right! As for his comment about paddling downriver for fifteen or twenty minutes before hitting the portage, this doesn’t seem to fit with the map either.  It is about 800 meters to the bridge and the rapids; the take-out would be even closer.


Update: Some additional information in the form of a response to my posting by Rob Haslam, clarifies some things – and makes sense of Callan’s portage choice. Haslam writes this –

…that portage indicated on Kevin’s report as RR after Moose Lake (locals call it that sometimes) was indeed river right. When the big fire went through in 2000 or sometime around then, they pushed that new road in to combat the fire and built the bridge. When I went through, I had no choice but to re-establish the port on RL, around the bridge.

So, while the portage trail SP06 is now on river left it used to be on river right. The Callans were working with a 20-year-old trip report map from 1981 when they went through after the fire but before the road and bridge were put in.  The fire had probably obliterated whatever trail they were looking for and they were left with a “rough carry-over”.

Amazon.ca  info here

Released in March 2023 was Callan’s Top 70 Canoe Routes of Ontario, an expanded version of the Top 60 (2017) and Top 50 (2011) editions that have appeared in years past.  Included again in this new release is Callan’s Steel River write-up. It is the same as the one from the early 2000s quoted above.

A note at the beginning of some of his older trip reports from the 1990s and early 2000s – like this Steel River report –  indicating when they were written and if they have been updated with subsequent trip info would certainly be helpful to paddlers using them to plan their own Ontario canoeing adventures.

———-

 The late 70s/early 80s Ontario MNR Steel Trip Map

Esker To Steel Portages

I also found what looks to be the Ontario Ministry of Natural Resources info sheets on the Steel River canoe trip that used to be given out to interested paddlers. It may be included in the 1981 booklet Canoe Routes of Ontario – I haven’t been able to get a copy to see if my guess is correct.

You can access a PDF copy of this “historical” document here.

It helps explain why the Callans were looking for a portage at the bottom (i.e.north end) of Esker Lake. It no longer exists.

The portage further down the river and on river left (marked in red on the map) is the one that Rob Haslam mentions putting in after the fire.

Note also the next portage (#7) just before you come into Steel Lake – it is presumably still there. In early July there was enough water for us to run/line the short CI rapids. We did not look for evidence of the portage trail.

the view looking NW from the Esker Lake logging Road bridge

the view looking NW from the Esker Lake logging Road bridge

The Steel River as it leaves Esker Lake

looking back from the bridge at The Steel River as it leaves Esker Lake

portaging SP06 - the portage on river left from Esker to Steel

portaging SP06 – the portage trail on river left from Esker to Steel

———-

Norm Stewart’s 1980 Steel River Circle Trip Notes

As a comparison with Callan’s description of their difficulties on the Cairngorm-to-Steel section, consider this description of a 1980 trip (see here for the report) which Norm Stewart and his son did.  His description does not even mention the first set of rapids and portage!

Norm Stewart. 1980 trip report extract

Like Harting twenty years later, Stewart gives Esker Lake the name Moose. The name does seem to be fitting, given his experience!  The “small drop” that he mentions is the second set of rapids on the Esker  Lake- Steel Lake stretch. SP07 is a 60-meter portage on river right around them. You can see them in the middle of the satellite image below.

SP07 – 2022 satellite view of the C1 rapids just before Steel Lake

Given the higher water level, we did a combination of lining and running (and occasionally scraping) our way down.

the top of SC07, the last rapids before Steel Lake

the top of the set of rapids at SP07, the last rapids before Steel Lake

looking back up the rapids at SP07 - we scratched our way down!

looking back up the rapids at SP07 – we scratched our way down!

And that would be the end of river travel for a while.  Ahead of us was Steel Lake, all thirty kilometres of it!

——————

Campsites on the South End of Steel Lake

two Steel Lake south end CS locations

The Haslam maps have two marked campsites, both on the east shore of the lake and both described as beaches. We checked out the first one and – thanks to the high water – there was little actual beach to camp on. A closer look at the ground a few meters in from the beach area did not turn up a fairly level spot for our tent.

one beached Swift Dumoine - the tent site was in about 20 meters

one beached Swift Dumoine – the tent site was in about 20 meters

Off to the next one – a couple of kilometers further north on the lake. The pix above and below show what we found when we got there – a fairly long and wide beach area. Even better, when we walked into the clump of mature cedars we found an excellent tent site, nicely sheltered.  We had our home for the night!

our upper Steel Lake beach property - for one night

our upper Steel Lake beach property – for one night

east side campsite off the beach at the start of Steel Lake

east side campsite off the beach at the start of Steel Lake

campsite at the top (i.e. south) end of Steel Lake

campsite at the top (i.e. south) end of Steel Lake

A stove pipe, a window frame, bits of blue tarp – from the debris of a shelter nearby, the spot had probably been used by hunters in the past. Moving away some of the logs seen in the pic below would create space for even more tents.

the remains of a hunters' camp at our campsite on Steel Lake

the remains of a hunters’ camp at our campsite on Steel Lake

Our nine-to-five day had been our biggest one so far –  twenty-one kilometers and three portages knocked off.  On tap for the next day was even more distance with one big plus – no portages.  We planned to paddle the length of the Steel Lake and went to sleep dreaming of a moderate breeze from the SW blowing us the twenty-seven kilometres down to the next campsite. Who needs sheep when you can count the kilometres of Steel Lake!

——————

Next Post: Canoeing the Steel River – Day Four – Steel Lake

Canoeing The Steel – Day Four – Steel Lake

Posted in wilderness canoe tripping | Leave a comment

Canoeing The Steel River – Day Two – Portaging Into Cairngorm Lake

Last revised on January 21, 2023.

Contents:

Previous Post: Day One – The Diablo Portage

Canoeing The Steel River – Day One – The Diablo Portage

—————

The Day’s Basic Data and Maps

  • distance: 12 km (from Diablo Portage
  • time: start – 10:00 a.m.; finish – 4:15 p.m.
  • portages: three –
    SP02 – 750m from Diablo Lake to 1st small lake/pond (1h 30m);
    SP03 – 300m from 1st lake to second lake/pond (20 min);
    SP04 – 150m from 2nd pond/lake to Cairngorm Lake (30 min)
  • The S stands for Steel, P for portage and C for campsite. SP01 was the Diablo Portage.
  • weather: mostly sunny and warm
  • campsite: SC02. Sheltered hilltop site; possible beach at the bottom in lower water; no easy access to water; room for multiple 2-person tents; okay spot for 4-person tent.

Steel River Day2

——————–

Cairngorm Lake – The Day’s Goal

Cairngorm Lake – Steel River headwaters

Cairngorm Lake (356m a.s.l.)  is the headwaters of the Steel River system and sits another five meters a.s.l. higher than Diablo Lake. The agenda for the day – not overly ambitious – was to do the three portages up into the lake and then paddle down to a campsite on its west side, which Haslam had recommended in his trip report. The report also provides locations for a site at the south end of the lake (3 km from the last put-in) and another potential island campsite a 10-kilometer paddle to the bottom (.i.e, the north end) of the lake. [See Haslam’s Maps 12, 13, and 14 for campsite locations.]

The A+ he gave to the middle one we were heading to sounded good!

Max's zen moment with the iris on the shore of Diablo Lake

Max’s zen moment with the iris on the shore of Diablo Lake

——————

Back To The Diablo For Another  Look

Diablo Lake – and the portages from Santoy to Cairngorm

Before we headed to the first and worst of the portages, we turned back to our old friend, the Diablo! Thanks to the rain and our desire to get the thing done, we had not taken any pix of the difficult boulder stretch of the portage trail. It was a sunny morning as we paddled back.  Returning as tourists made for a different experience!  Max momentarily set aside the purpose of our mission to focus on a flower drying in the sun.

iris at the end of the Diablo Portage

iris at the end of the Diablo Portage

And then, it was along the final easy section of the trail, which led us right back to the previous day’s piece de resistance, the boulder path up the gorge section of the Diablo Portage.

Max looking down the boulder stretch of the Diablo Portage the next morning

Max looking down the boulder stretch of the Diablo Portage

another view of the boulder path we had portaged in the rain

another view of the boulder path we had portaged in the rain the previous afternoon

——————

The First Portage (750m) Into Cairngorn L.

Note: We did this trip in 2015. In July 2018, a four-man Anishinaabe (i.e. Ojibwe) crew from nearby Pic River First Nation worked on the portages from Santoy Lake to the south end of Steel Lake.  This should make things much easier for the next few years! 

Our return visit over, we headed out into Diablo Lake for the half-hour paddle to the other end and the start of SP02, a 750-meter carry that would take us into a small lake.

Day2_Cairngorm_Ports

looking east at Diablo Lake from the first take-out

looking back east at Diablo Lake from the first take-out

A few minutes were spent looking for the start of the portage, and then it was on to a rolling trail with a bit of mush and mud, sometimes helped by logs laid down to deal with the worst of it.

the start of the first portage into Cairngorm Lake

the start of the first portage into Cairngorm Lake

About an hour and a half later, we put in on the edge of a small puddle which we could walk up to without much difficulty.  The pic below shows the terrain – with the canoe ready to be slipped into the water after our little Gatorade/Clifbar break is done.

the put-in after the first portage towards Cairngorm

the put-in after the first portage towards Cairngorm

—————–

The Second Portage Into Cairngorn Lake 

The start of the second portage (SP03) is in the distance.  We knew we were at the trailhead when we found the portage sign lying in the grass.  We really should have done a better job of putting the sign back up; that prospector’s tape will not hold it very long.

looking across the pond to the start of the next portage into Cairngorm

looking across the pond to the start of the next portage into Cairngorm

start of another portage trail to Cairngorm

start of the second  portage trail to Cairngorm

As for the trail itself, it felt like a portage trail!  Like the first one, it was a mix of mostly nice stretches and a bit of mush.  We were off to the third and last portage of the day into Cairngorm Lake in less than a half-hour.

leaving a Ciarngorm portage put-in spot

leaving the second Cairngorm portage put-in spot

———————

The Third and Last Portage Into Cairngorn

A short 400-meter paddle to the other end of another puddle lake, and we faced our third and last carry of the day (SP04).  Again, the portage sign was not initially visible when we looked for the start of the trail.  We found it lying in the grass and put it back up. We also used our hot pink prospectors’ tape on some of the trail’s more vague or confusing sections.

Cairngorm portage sign in the grass

Cairngorm portage sign in the grass

Within a half-hour, we arrived at the end of portage into Cairngorm and found a beaver dam to deal with.

beaver dam before entering Cairngorm Lake

Beaver Dam before entering Cairngorm Lake

We paddled across and hauled the canoe over the dam itself.  Finally – Cairngorm, the literal high point of our Steel River Loop!

looking back at the beaver dam from the start of Cairngorm Lake

looking back at the Beaver Dam from the start of Cairngorm Lake

At about 2 p.m., we stopped for our usual one-hour lunch further down Cairngorm Lake. Out came the Wasa bread, peanut butter, and a couple of Thai soup packages that we hydrate in our mugs.  Sometimes extra water is boiled for coffee or tea, but given the heat of this day, we were quite content to fill the one-liter Nalgene bottle with water, shake the Steripen around in it for a minute, and then pour in the Gatorade crystals.

Cairngorm Lake view - a bit of vertical rock

Cairngorm Lake view – a bit of vertical rock.

———————

Cairngorm Lake Campsites

Campsites on Cairngorm are few and far between, other than the three which Haslam locates on his map set. The pix below show our campsite, nicely sheltered on a hilltop on a point and with a trail down to the landing and what would be a beach with lower water conditions. We found a mostly flat spot for the 8′ x 10′ footprint of our MEC Wanderer 4 tent.  We did miss having a view of the lake and having a “patio” outcrop where we could let the wind take care of the mosquitos.

Cairngorm Campsite on west side of Lake

Cairngorm Campsite on the west side of Lake

the Cairngorm campsite

the Cairngorm campsite

Now that we had slipped into trip mode with two shorter – if not totally easy – days, we had a bigger day coming up.  We hoped to paddle down to the bottom of Cairngorm and, after more portaging, find our way to a campsite at the south end of Steel Lake.  It would prove to be a scenic day!

Next Post: Canoeing The Steel River – Day Three – From Cairngorm Lake To Steel Lake

Posted in wilderness canoe tripping | Tagged , , | 2 Comments

Canoeing The Steel River – Day One – The Diablo Portage

Last revised on March 31, 2023.

Table of Contents:

Previous Post: Canoeing Ontario’s Steel River System: Introduction, Maps & Approaches

Canoeing Ontario’s Steel River System: Introduction, Maps, & Approaches

————

Map and Basic Data

  • distance: about 8.3 km. (plus at least 2.5 km. on the portage trail and another 400m paddling around the island we camped on)
  • time: start – 10:10 a.m.; finish – 3:45 p.m.
  • portages: one
  • SP01  – 1100 meters (3 h) the Diablo Portage!  [S for Steel; P for Portage]
  • N.B. Our portage and campsite #s  differ from the ones on the Haslam maps.  Ours begins with the Diablo Portage (SP01) and the Diablo Lake campsite (SC01); Haslam’s are numbered from Eaglecrest Lake on down.
  • weather: overcast morning; rain in the afternoon; sunny early evening and then more rain overnight
  • campsite: SC01 northeast end of the west (larger) island on Diablo Lake about 400 meters from the put-in  [S for Steel; C for Campsite]
  • Federal Gov 1:50000 Topo MapColdwell       042 D 15

Steel River Day1 - portage and camp

————

Accessing The Santoy Lake Put-in From Hwy 17

weather forecast - July 6-July 13


After the 1200 km. drive up from Toronto on a Sunday,  we spent the night at Marathon’s Airport Inn on Highway 17.  The next morning we listened to the forecast on the Weather Network while we consumed a continental breakfast which was, in retrospect, way too meagre for the work we’d be doing later on.

The forecast for the next week looked great – except for this very day! 30 to 50 millimetres of rain and a thunderstorm were predicted.

What to do? The thought of a second night in a motel on Highway 17 didn’t appeal, so we figured we would get on the water and at least paddle up to the north end of Santoy and camp off the beach there for the day before heading back to Diablo the next morning.

the side road to Santoy from Hwy 17 (the Trans-Canada)

As the pix below show, the water was glass-like, and it wasn’t raining when we arrived at about 9:30.  By 10 a.m., we were on the water and paddling up the west side of the lake.

Santoy Lake - the put-in

the south end of Santoy Lake – the put-in

Santoy Lake put-in and parking area

Santoy Lake put-in and parking area – our car is the only one in the parking area.

————

Paddling Up Santoy Lake’s West Side

We were looking for potential campsites, but with the possible exception of the camp property three kilometres from the put-in, we would see no places to camp. [A week later, we camped at the north end of Santoy Lake at one of the many campsites in the bush off the long strip of beach.]

Santoy Lake shoreline - not for camping

Santoy Lake west side shoreline – not for camping

Thanks to a gentle SW wind in an hour and a bit, we approached the portage take-out.  The white stop sign and the black and white portage marker were quite visible.  The weather was holding up, and it looked like it would be okay for a while.  Rather than camp at the north end of the lake for the day, we decided to go for it – to “git ‘er dun,” so to speak.

The Diablo Portage - .the take-out spot

The Diablo Portage – .the take-out spot

————

The Diablo Portage –  What To Expect

Cliff Jacobson:

The previous post had this assessment of the Diablo Portage found in the August 2014 issue of Backpacker magazine.  The article “Go Big: Ten Tough Trails We Guarantee You’ll Love” quotes Cliff Jacobson, the U.S. version of Kevin Callan (sorta) –

After canoeing waterways all over the world, guidebook author Cliff Jacobson says the portage between Santoy and Diabolo [sic] Lakes is tougher than any other he’s found, even in the remote reaches of Nunavut—yet this pristine paddling escape sits right off the Trans-Canada Highway. “At just under a mile—1,673 meters, to be exact—it would be doable in 20 minutes if it were relatively flat,” he says, but hauling a canoe and gear through piles of Mini Cooper-size boulders takes all day. The elevation gain is about 300 feet (with 100 feet stacked into the first 100 yards), so “progress is measured in meters, not miles, per hour.”

[Note:  If the Diablo (not the Diabolo) Portage was 1,673 meters, it would not be “just under a mile.”  At 1.04 miles, it would be just over a mile!  However, the actual length of the portage is “only” about .7 miles or 1100 meters. Jacobson got the incorrect figure from the 1981 Canoe Routes of Ontario booklet put out by Ontario’s Ministry of Natural Resources.]

Rob Haslam:

Rob Haslam’s advice, delivered, I am sure, with a wink and as the result of having done the Diablo Portage “trail” a dozen times, is this –

“Don’t even bother trying to look at Diablo on a map. Nothing will prepare you for the pain and suffering. Best to go in with very little information or expectations.”

(I lifted his words from his reply to my Canadian Canoe Routes forum thread here.)  Having done the portage, I can better appreciate his point, even if it isn’t the approach I apply to almost everything I do. As my various posts surely indicate, I obsess over all the details beforehand – and feel compelled to share them afterward!

Satellite Image With Contour Lines:

So even before we left home, we were primed for something special in the portage department!  We examined all the topos and satellite maps, trying to get a handle on “the pain and suffering” we were taking on.  The sat image below with the 15-meter contour lines superimposed on top was the most illustrative image I found.

According to my Garmin Topo Canada map, Santoy is at 248 m asl, and  Diablo is at 351 m – a bit over 100 meter gain in altitude over a distance of 1100 meters of “trail.”

We agreed on one thing very early: we would not attempt to do our usual carry-and-a-half system.   It has Max take a pack and a duffel to the far end while I carry the other pack and duffel halfway and then, dropping them off, return for the canoe.  While I carry the canoe to the far end, Max returns for the stuff I left halfway. We know we’ve made a good estimate if we meet at the halfway point. Well, not for the Diablo!

————

The Diablo’s First Section – A Steep Uphill

We decided to break it into sections, the first being the carry from the water up to the top of the steepest part of the trail, where things levelled out somewhat.  Complicating matters was that we often had to find the trail first. It has not been groomed in years, and the ferns and alders have filled in the blank spaces very nicely.  Carrying half-loads took 45 minutes to deal with the steep first 200 meters.

the intial steep section of the Diablo Portage

near the top of the initial steep section of the Diablo Portage

We used our handsaws and prospectors’ tape to make the trail easier to see on second and third carries.  It didn’t hurt that Max is a veritable trail hound with a knack for finding the mere rumour of a trail in a mess of green.

Note: In the summer of 2018 the Diablo Portage, as well as all others right to the south end of Steel Lake,  were cleaned up by a four-man crew. See the end of the post for more details!

Another thing that definitely did not hurt was the weight of our Swift Dumoine Kevlar/carbon canoe. It weighs 42 lbs., much less than the weights on the leg press machines and loaded barbells we had spent the winter and spring pushing up and down at the gym. There are Steel trip reports out there with 80+ lb. canoes being carried up to Diablo Lake.  My hat goes off to those who take on the added workload!

Really, though, the swifts and the CI rapids of the Steel do not need anything more than a lightweight canoe. I’d say your canoe is a great place to cut thirty pounds of unnecessary haulage.

Max sniffing out an easier stretch of the Diablo Portage trail

Max sniffing out an easier stretch of the Diablo Portage trail.

————

The Second Section – Alongside  The Creek

With the first section done, it was time to deal with the second section. It did not involve much altitude gain but did require careful footing over and beside a moss-covered creek bed which led up to the gorge. It had also started raining just as we finished the first section, making things more interesting. All we had was a litre of Gatorade, a couple of Clif Bars, and some Gorp to replenish the fuel we were rapidly burning.

a bit of the middle strech of the Diablo Portage

a bit of the middle stretch of the Diablo Portage

our marking tape provides a clue in the middle stretch of the Diablo Portage

our marking tape provides a clue in the middle stretch of the Diablo Portage

another shot of the middle stretch of the Diablo

another shot of the middle stretch of the Diablo

typical section of the middle stretch of the Diablo

typical section of the middle stretch of the Diablo

————

The Third Section – the Boulder-Lined  Gorge

The middle section of the Diablo Portage led to the last hurdle – the boulder-lined gorge. I had wondered what folks were getting at when they wrote things like – “Just when you  think it can’t get any worse, it does.”

Take a look at the image below.  That is indeed the trail – a more gentle stretch of the final section.  All that is missing is Max or I carrying a pack or canoe as we negotiate our footing in the rain. Actually, our gear is not in the rest of the pics of the trail because the pics were taken the next morning – sunny and clear – when we returned to have another look at what we had come up!

the upper stretch of the Diablo Portage

the upper stretch of the Diablo Portage

Mind the Gap! Some dark holes are included in the middle and gorge section of the trail – I noticed a half-dozen.  We didn’t step into any of them, but the result of doing so is pretty obvious. Callan notes that he and his wife gave the portage the pet name “Face Plant” after his wife had one leg go into a hole while hauling gear.

one of the many dark holes we noticed on the side of the the Diablo Portage trail

One of the many dark holes we noticed on the side of the Diablo Portage trail

The last particular obstacle I remember is the deadfall crossing the trail in the two pix below.  I was carrying the canoe and first attempted to carry it sideways between the two boulders and under the log. When that didn’t work, I made a full retreat and pushed the canoe bit by bit over the top of the log and then went to the front end to pull it over.

It took the last bit of energy I had to deal with the canoe yoke getting caught on the branch stubs and not moving forward. Meanwhile, Max had single-hauled the packs and duffles over this stretch – in all, seven trips back and forth, each an opportunity to add more face to the ‘Plant.’ Luckily, we were spared ankle twists and disappearing legs! The only problem we had to deal with was fatigue.

a bit of the upper section of the Diablo Portage Trail

A bit of the upper section of the Diablo Portage Trail

the log over the Diablo Portage

the log over the Diablo Portage”Trail” is gone as of August 2018! See below…

————

The Final Section: The 100-Meter Trail to Diablo Lake

Believe it or not, the trail – I always want to put quotation marks around the word when I use it in this post! – becomes civilized at this point and, for the last one hundred meters or so, leads you gently to the shores of Diablo Lake.  The image below shows a part of this section – it looks a lot like a portage trail!

the gentle end to the Diablo Portage

The gentle end to the Diablo Portage

We had started from the other end at about 11:20.  At about 2:30, we had all of our stuff – an estimated 200 lbs. including canoe and paddles – at the put-in point on Diablo Lake.  It was pouring at this time, so we put up the tarp and made some lunch. We pulled out our new Helinox camp chairs and leaned back with our mugs of filtered coffee, and celebrated the fact that rain and all, the trip’s single worst portage was done!

————

Northern Scavenger’s YouTube Video – Raw Footage of The Diablo Portage

Two years after our Steel trip, the Northern Scavenger duo did their own tussle with the Diablo in 2017!  Their 32-minute YouTube video will give you a good idea of what it is like. The video begins with this thought –

We don’t want to say it wasn’t too bad….but I think we had our expectations that it was going to be a much more difficult portage and it ended up not meeting…not quite as bad,,, it’s still .a very challenging portage.

The occasional strands of that pink prospectors’ tape we put up a couple of years before were still dangling there. Nice to see them popping up in the video every few minutes!

Breaking down the video into sections of each of the four  I mentioned above –

  • Section 1 – up to 8:30;
  • Section 2 – 8:30 – 24:00;
  • Section 3 – 24:00 – 29:00;
  • section 4 – 30 to the end.

————

Update August 2018 –  Diablo Portage Clearing & Signing

Fantastic news! A four-man Anishinaabe (i.e.Ojibwe) work team just did some work – with chainsaws and all – on the portages that take you from Santoy to just below the south end of Steel Lake.  I found the info in a Canadian Canoe Routes forum thread. The poster Speckling wrote this –

As we were about 300 m from the end at Diablo Lake I was stunned to hear a chainsaw working ahead. Turned out it was 4 fellows from Pic River (father, son and 2 others) that had been hired by the band to clear portages. They started at the bridge between Cairngorm and Steel Lake and were making their way out via Santoy Lake. The large log suspended across a rock pinch in the portage trail, that required threading your canoe through the space needle, is no more, and we subsequently sailed through without a hitch.

Further related to portage clearing, the 1st leg (800 m) of the portage from Diablo to Cairngorm was absolutely spotless and not once across the entire length did I hear so much as a squeak from the canoe touching anything! The guys did a real nice job on it… See here for the thread and scroll down to August 12, 2018.

————

An Alternative Access Route to Diablo L.:

The  Canadian Canoe Routes forum thread Steel River Loop Maps Repost has inspired several other canoe trippers, including us, to head to the  Steel River.   In August 2020, in a reply by PaddlingGal, who had just returned from her river descent, she included maps detailing an alternative route to Diablo Lake. The map below shows the three portages that make it happen.

See the forum thread discussion (here) for her full description of the portages. I’ve made a point-form summary of her notes on the three portages below.  They add up to about 2000 meters of portaging instead of the 1100 meters of the Diablo.

SP9(a): 16U 508260 5417236   

  • take out spot located just to the left of the dock in the NW corner of the lake
  • well-maintained approx. 1200-meter port to Pike Lake (local name)
  • marked with yellow signs installed by the trail clearing crew from Biigtigong First Nation
  • lots of ups and downs, wet terrain, and a fair amount of elevation gain. 

SP9(a)E: 16U 507120 5417694    

SP9(b): 16U 506473 5417963   

  • an easier 350-meter carry 
  • with slight elevation gain
  • ends in a part of the creek instead of the lake proper. 
  • some new deadfall on the trail, but compared to the first port out of Santoy, still a breeze.

SP9(b)E: 16U 506117 5417902  

SP9(c): 16U 505976 5417473   

  • 500-600 meters long with moderate incline, and a few tricky sections. 
  • exits into the northeast part of Diablo L., right where the “Poor Campsite” marker is on Rob’s map. 
  • paddle south to the middle of Diablo, then turn back north to get to SP10 on the Haslam map

SP9(c)E: 16U 506102 5417099   

—————–

The Diablo Portage – is it really that bad?

My description of the Diablo Portage has perhaps over-dramatized its difficulty. It has perhaps led some paddlers to embrace a two-kilometre/three-portage alternative that may be just as demanding and time-consuming. Brian, in the comments section below dubbed the three portages Papa, Mama, and Baby Bear! 

From what we heard from the two crews that did the Diablo later that week, they had an easier time doing the Diablo – 

  • it wasn’t raining when they did it, and
  • our dangling pink prospectors’ tape gave them something to follow!
  • they hadn’t read a trip report which emphasized what a difficult portage it was!

See the Comments section at the end of the post.  Brian has done both the Diablo and the alternative entry route and makes some points of comparison.

—————–

The Biigtigong First Nation trail crew from Pic River – not exactly next door to Santoy Lake!  Their clearing, trimming, and signing have improved the Diablo Portage for the next few years.  

Miigwech!

_____________________________

Now back to our trip report!

We looked toward the island shown on the map below. When the rain stopped, we did the 400-meter paddle over to the campsite on the north end, first doing a spin around the island to see if there was another – i.e. better – site.  Not seeing one, we set up camp at the perfectly acceptable spot indicated on Haslam’s map.  Without a doubt, we were done for the day!

Steel River Day1_Diablo

campsite on Diablo Lake island

Rainbow over the Diablo Portage

Rainbow over the Diablo Portage

In the early evening, the rain stopped for a while, and the sun came out – and over the Diablo Portage appeared a rainbow.  Noah had been given his rainbow as a sign that the world would never again be flooded. We considered the possible meanings for us as we stood on our island on Diablo Lake and looked back to the portage. As for the predicted thunderstorm, it never did pass through, and for the next six days, we would get a string of warm and sunny days as we paddled down the Steel River system.

looking west to the next day's portages to Cairngorm Lake

looking west to the next day’s portages to Cairngorm Lake

Next Post: Canoeing The Steel River – Day Two – Into Cairngorm Lake

Posted in wilderness canoe tripping | Tagged , , , , | 9 Comments