Table of Contents:
Introduction – Off To The Chiniguchi
Day-By-Day Reports – Maps, Images, portage and campsite info, etc.
—————
The Temagami area has provided my brother and me with some terrific canoe trip routes over the past few years. 2022 was going to have us experience yet another sample of this easily accessed yet rugged part of the Canadian Shield – we planned a mid-June trip down the Lady Evelyn’s North Branch from a Beauty Lake put-in to Macpherson Lake, followed by a paddle up the Greys River to Makobe Lake and then down the Makobe River to Elk Lake and our vehicle. It didn’t happen and, worried about late-season water levels, we looked for a nearby mid-September alternative.
Southwest of our usual north-end Temagami destinations is the Chiniguchi River system, sandwiched between the Sturgeon River, which is considered Temagami’s west-side boundary, and Wanapitei Lake.
The Geological Survey of Canada map from the 1850s transcribed the lake’s name as Wahnapitaeping.
The name Wanapitei comes from the Ojibwe waanabidebiing, meaning “concave-tooth [shaped] water” to describe the lake’s shape. (source)

Chiniguchi River system top to bottom – it empties into the Sturgeon
The Chiniguchi River headwaters (White Rock, Redpine, and Sawhorse Lakes) are just north and west of the lake with big bays, which is what Chinicoochichi means in the Ojibwe language. As for Matagamasi, in Robert Bell’s 1875 report, it is recorded as Mattawagamishing, with the key Ojibwe word being Mattawa meaning “narrow”.
We had heard about Wolf Lake and the Matagamasi and Chiniguchi pictograph sites. And while we had done the Sturgeon from Stull Creek down to the mouth of the Obabika River, we were keen on paddling some of the middle section of the river. The overview map below is what we came up with for a short eight-day September canoe trip. We drove up on a Monday morning and headed home the following Tuesday.

Note the contrast in logging road presence between the interior of our loop and the east side of the Sturgeon River!
—————
Some Historical Background:

Geological Survey of Canada Map of the north shore of Lake Huron.1856.
Before the Robinson Treaties of 1850, the waters we paddled were the “home and native land” of an Indigenous people belonging to the Anishinaabe cultural family and known to the French and British newcomers as Ojibwe. While the Wanapitei/Chiniguchi/Temagami area does not seem to have supported a large number of people – four to five dozen families (200-300 people) seems like a reasonable estimate – there was an Ojibwe band summer gathering spot on the west side of Lake Wanapitei. To access the less-used hunting grounds in this hinterland or perhaps for non-economic reasons, the families had probably moved there from established Ojibwe communities like those at Bawating (Sault Ste. Marie), Manitoulin Island, or Lake Nipissing.
How long the Ojibwe have been in the Bawating/Lake Huron area is unclear. Answers range from “since time immemorial” to 2000 years to 500 years or less.
- Their culture may have developed into what we know as Anishinaabe over two or three or five millennia while successive generations continued to live in the same general area. This is the in situ or since time immemorial theory.
- They may have moved into the area more recently from the south or the east because it was empty or by displacing people already there. This is labelled the migration theory.

If there is some historical fact underlying the Ojibwe Migration myth, then the Ojibwe arrived in the upper Great Lakes area about 500 to 1000 years ago. [See William Warren’s History of the Ojibway People, ch. 4, for the best account of the Migration story.]
In the Wanapitei/Chiniguchi/Temagami area, the various families belonging to the band (now the Wahnapiae First Nations community with a current population of about 100) would gather from May to September at a community site on the west side of Wanapitei Lake. From late September to May, the individual families would move to their hunting grounds for the fall and winter. These hunting grounds stretched north to the height of land and as far east as Lake Temagami, where some families connected with the Wanapitei band had gone.

Voorhis map segment – see here for his full 1930 report. Note that he mixes up the numbers of the Temagami and Sturgeon posts.
In Post-Contact times, the development of a fur trade economy would impact Ojibwe and Cree settlement patterns. Trading post communities developed as families camped near a Hudson Bay Co. post during the May-to-September months. Interestingly, only one such community developed in the entire region from Lake Wanapitei to Lake Temagami. It was the one on Temagami Island after the establishment of an H.B.C. sub-post there in 1820.
That post was moved to Bear Island in 1875. A reserve on Bear Island in Lake Temagami was only established in 1971, almost 30 years after the federal government had purchased the island from the province. We know it now as Temagami First Nation; about 200 people live there. [See here for more on the Indigenous community on Lake Temagami.]

In 1850 the Robinson Treaties were signed. One dealt with the Lake Superior region. The other, the Robinson-Huron Treaty, impacted the area shown in the map below.

Robinson-Huron Treaty area and today’s First Nations
The establishment of a treaty had been prompted by Ojibwe concern about what they considered illegal mining activity in the Sault Ste. Marie area. Violence had already flared, and the government had sent troops to deal with the volatile situation.
Shingwaukonse, the Ojibwe leader, pressed for recognition in a treaty of Indigenous land claims and rights by the Province of Canada and its representatives. After a one-sided set of negotiations, The Robinson-Huron Treaty was signed in September 1850. See here for a good introduction to the Treaty and the historical context which led to it.

Shingwaukonse -from Ojibwe shingwauk (pine) and onse (little)
The text of the Robinson Treaty established the following points:
The Province of Canada got this –
they the said Chiefs and Principal men, on behalf of their respective Tribes or Bands, do hereby fully, freely, and voluntarily surrender, cede, grant, and convey unto Her Majesty, her heirs and successors for ever, all their right, title, and interest to, and in the whole of, the territory above described,
The Anishinaabe living In the Treaty area got this:
Reserves
the reservations set forth in the schedule hereunto annexed; which reservations shall be held and occupied by the said Chiefs and their Tribes in common, for their own use and benefit.
A Perpetual Annuity (annual payment)
the sum of two thousand pounds of good and lawful money of Upper Canada, to them in hand paid, and for the further perpetual annuity of six hundred pounds of like money, the same to be paid and delivered to the said Chiefs and their Tribes at a convenient season of each year,
Hunting And Fishing Rights
the full and free privilege to hunt over the Territory now ceded by them, and to fish in the waters thereof, as they have heretofore been in the habit of doing; saving and excepting such portions of the said Territory as may from time to time be sold or leased to individuals or companies of individuals, and occupied by them with the consent of the Provincial Government.
See here for the full text of the Robinson-Huron Treaty.
Signing the Treaty for the Ojibwe people living in the Wanapitei to Temagami area was Tagawinini, the fifth of the Ojibwe chiefs to be named in the Treaty. In the list of reserves established by the government, we read –
ELEVENTH –Tagawinini and his Band, two miles square at Wanabitibing, a place about forty miles inland, near Lake Nipissing.

The Robinson Treaties (Superior and Huron) of 1850 are almost 175 years old; they are also current history. The issue of the annuity agreed to by the Province of Canada in 1850, and now the responsibility of the Ontario Government, is in dispute. A recent CBC article provides this summary:
The annuity hasn’t increased since 1874, when it was capped at $4 per person. In the previous stages of the trial, the Anishinaabe successfully argued this breaks the treaty, a ruling the Ontario government appealed to the Supreme Court of Canada.
There is a wide gap between what the Ontario government thinks would settle the matter (minus $10 Billion) and what the negotiating team for the Anishinaabe people living in the Treaty lands is asking for. The Nobel Prize-winning economist Joseph Stiglitz testified that the true figure is plus $100 Billion+!
Note: Like many paddlers, I know little about the various treaties that impacted the lives of those Indigenous Peoples who live(d) in the Canadian Shield. While I was born and grew up in Quebec’s Abitibi region to the northeast of Chiniguchi, since moving to southern Ontario fifty years ago, I have experienced Up North mostly as the canoe country I access from Toronto. I have come to realize that Crown Land camping is not free and that when preparing for a canoe trip, my map is not the only thing I should be looking at!
————–
Some Trip Highlights:
- The Matagamasi pictograph site
- Paradise Lagoon
- Wolf Lake rock face and island campsite
- Chiniguchi Lake pictograph site
- the 2.6 kilometers of logging road portages from Button to the Sturgeon via Parsons Lake
- the easy C1 rapids and shifts below the Pilgrim Triangle
- Upper Goose Falls
- Lower Goose Falls
- the glacial sand deposits of the lower Sturgeon
- Carafel Creek/Lake
The weather was not the best but the worst of the rain seemed to fall overnight, with the daytime mostly overcast. We stayed dry and used both 3×4.3 m (10’x14′) tarps at every campsite!

Chiniguchi-Sturgeon route overview
Our route was just one of a few Chiniguchi possibilities. Among other choices, there is
- a shorter one looping back from the north end of Chiniguchi Lake;
- a longer one which enters the Sturgeon from Stouffer Lake
- an even longer one that enters the Sturgeon at Kettle Falls
- a route that takes you down the Sturgeon to the mouth of Murray Creek and then up the creek and the Chiniguchi River all the way back to Matagamasi put-in
————–
Logistics:
See the Ottertooth map showing Chiniguchi Access. It details the main road access points and the nearby lodges. The page was last updated in 2006 but is still useful. Four parking/put-in options are highlighted –
- the public put-in (the MNR boat launch) on Matagamasi Lake. Parking can be tight during prime summer. It is free. See below for a sat image of the area.
- The Sportsman’s Lodge on Kukagami Lake with a shuttle to the Matagamasi Lake option #1 put-in. We paid $10. a day to leave our vehicle at the Lodge. Jim Stewart is the new owner.
- The Lakeland Lodge on Rioux’s Island in Wanapitei Lake’s Portage Bay. The gated parking lot is on the mainland and the current fee is $2. a day. It is a short paddle and portage into Matagamasi Lake.
- Rolly Jonas’ Lodge at the south end of Maskinonge Lake. The current charge is $8. The Temagami Outpost (what was known as the Taylor Statten Camp Oupost until 2015), a lodge at the top end of Maskinonge Lake, also uses the Jonas Lodge parking area. See here for an Ottertooth map with the road to the Jonas Lodge.
We went up Hwy 69 to just south of Sudbury and then turned right onto Hwy 537 to access Hwy 17. Going east on 17, we soon got to the turn-off for Kukagami Lake. [See here for the Google Maps view.]
The put-in for our trip was the public put-in at the south end of Matagamasi Lake. There is a parking area (option #1) that many paddlers use for their Chiniguchi loop trip. In the summer, parking spots can be scarce. Annoyed owners of nearby cottages can up the tension level. The lot is also not monitored, so vandalism is a potential issue.

We went with Option #2 – we left our vehicle at the Sportsman’s Lodge on Kukagami Lake. The lodge’s new owner, Jim Stewart, put the canoe and gear on his truck trailer and off we went to the Matagamasi (Ma tog a ma see) put-in, about fifteen minutes away.

The extra bit of peace of mind cost us $130 ($10 a day for parking and $50 for the shuttle), which is easy enough to rationalize, given the trip’s overall cost!
A post-trip comment by a fellow poster on the myccr forum pointed out a shuttle-free option!
- A 9-km. paddle to the north end of Kukagami Lake
- followed by a portage (either 175 or 465 m) into Doon Lake and then
- another 1100-meter carry to Matagamasi Lake.
The $50. shuttle made for a shorter and easier Day 1. We would have some longer portages (1500 and 1100 meters) three days later when we left the Chiniguchi River system for the Sturgeon River.

an alternative route to the Matagamasi Picto site from the Sportsman’s Inn on Kukagami
————–
We used the Natural Resources Canada topo maps – both the archived maps and the up-to-date ones found on the Toporama website. For specific portage and campsite info, we turned to the Chiniguchi area maps on the Ottertooth website, a goldmine of canoe-tripping info on the Greater Temagami Area.

See here for the entire collection of 1:50000 NRC topos
Click on the topo map sheet titles below to download –
——–

David Crawshay’s free Topo Canada iOS App for iPhone enables you to download all of the above to your iPhone. While leaving the iPhone on all day to use as your primary GPS device would eat up battery power like crazy, it is very useful to make a quick confirmation that you are indeed where you think you are! Download Crawshay’s app here.
———
There is an Android OS app from a German app developer similar to Crawshay’s Topo Canada iOS app. However, it costs $14. U.S. Given its usefulness, the one-time cost is a worthwhile investment that will save you time and aggravation. Click here to access the Google App Store page –

Note: The free version of the app may be enough for your purpose.
———

Toporama is NRC’s modern version of the archived topo sheets. It is a seamless map of the entire country and allows you to extract additional information and features from the map.

Access the Toporama website here.
———-
Also worth checking out is the Ottertooth map showing Chiniguchi Access. It details the main road access points and the nearby lodges.
———-
Other useful map sources include:


—————
Parks and Backcountry Camping Fees:

The route passes through an assortment of Crown Land designations. They are:
- Chiniguchi Waterway Park – established in 2006, the park includes most of the Ciniguchi River system, except for Chiniguchi Lake itself, the south end of Matagamasi Lake, and the section of the river from the bottom of Maskinonge Lake to the Sturgeon River. It does, however, include the Gawasi to Kelly Lake route to the Sturgeon. Click on the title to access an Otterooth map. Since it is a non-operating park, there is no camping fee.
- Wolf Lake Forest Reserve. The reserve includes most of Dewdney Lake, Wolf Lake, and the north end of Silvester Lake. There is no camping fee. The special designation presumably allows mining exploration to continue while protecting the old-growth forest at the same time!
- Crown Land labelled Enhanced Management Area on the Crown Land Use Policy Atlas webpage. It is the stretch from the south end of Chiniguchi Lake to just before the Sturgeon River),
- Sturgeon River Provincial Park. Backcountry camping permits are only required for the Sturgeon River section of the route. Instead of the usual fee per person, you are charged a set fee for the campsite, no matter how many people. The bigger your group – the maximum is 6 – the cheaper it gets! Plan on 2 nights for your trip down the Sturgeon.

Motorboat Traffic:
We did not see any motor boats on Matagamasi Lake, Chiniguchi Lake, or Maskinonge Lake. Perhaps it was because of the overcast to rainy weather during our mid-September visit. Presumably, motorboats are allowed in the bottom half of Matagamasi and all of Chiniguchi, Maskinonge, and KukagamiLakes.
—————
Day 1: Matagamasi Put-In to Northeast Arm
- Distance: 7.8 km.
- Time: 11:40 to 13:30
- Rapids:Portages: 0
- Weather: overcast/cloudy until 4 and then light rain; heavy rain after 10 p.m.
- Sightings: no motor boats; a 2-canoe party near the end of their trip.
- Campsite: Matagamasi Lake across from the pictograph site
- Natural Resources Canada archived 1:50000 topo maps: 041 I 10 Capreol; 041 I 15 Milnet
- See NRC’s Toporama (here) for its current interactive coloured mapping and print what you need.
- Ottertooth Map: The Middle Tracks
- GPS track from our Garmin eTrex 20 in my Dropbox folder.
We left downtown Toronto around 5:30 a.m., and by 11 we were at the Sportsman’s Lodge on Kukagami Lake. Another hour and we were on the water after the Lodge owner Jim Stewart shuttled us over to the put-in at the bottom of Matagamasi Lake.

Our objective for this first day out was the campsite on an east side point across from the Matagamasi Lake pictograph site. According to the note on the Ottertooth map, it is the second largest site in Temagami, presumably surpassed only by the Diamond Lake pictograph site.

Looking back at the Matagamasi put-in
As we paddled up the lake, we passed by two canoes whose German paddlers were headed for the landing. Jim Stewart had mentioned that they were due early this afternoon and that he was shuttling them back to his Lodge on Kukagami.

looking up Matagamasi’s NW arm on an overcast September afternoon
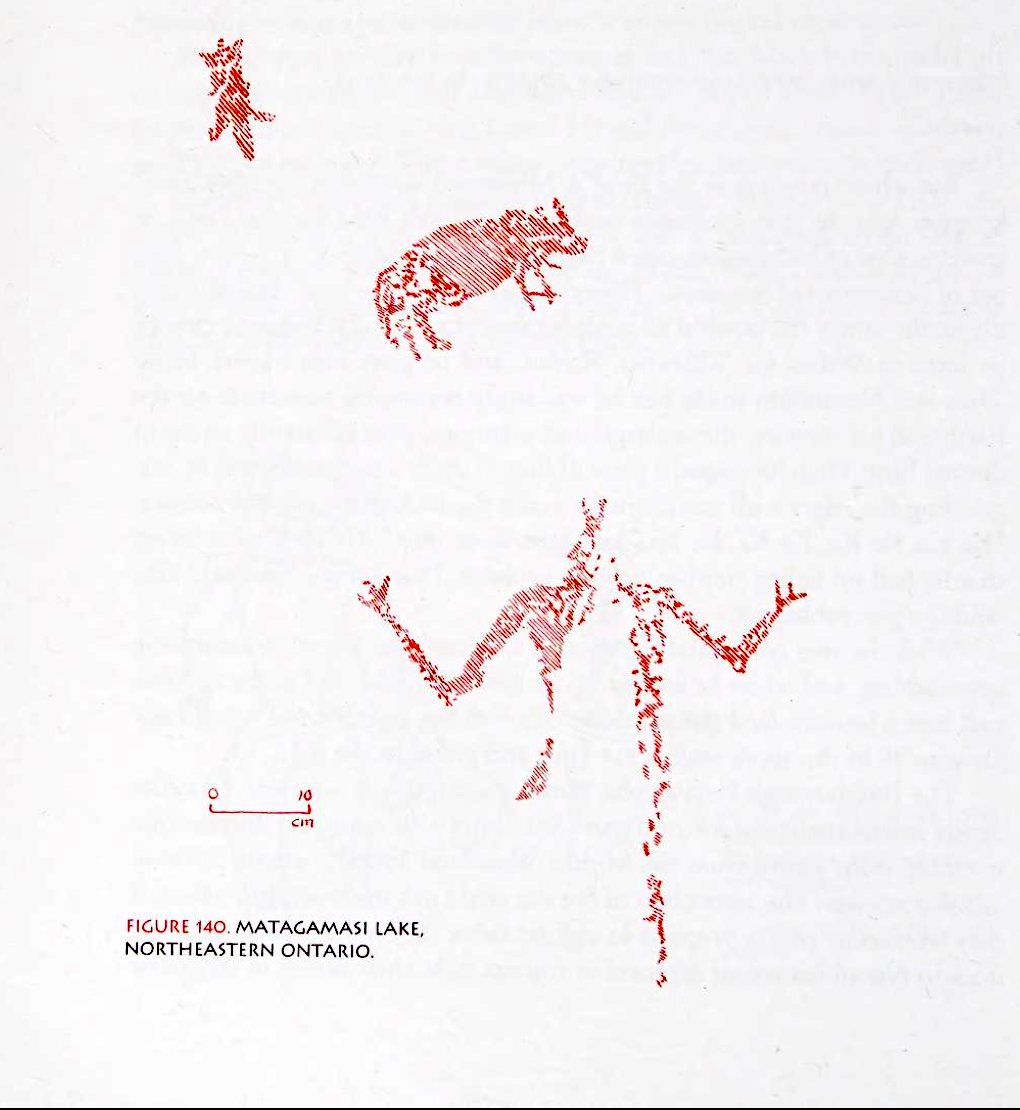
An hour or so after leaving the put-in spot at the south end of Matagamasi Lake, we were paddling along the vertical rock face looking for the images “painted” by some Anishinaabe shaman or vision quester some two or three hundred years ago. On display were:
- a human figure with outstretched arms,
- an animal figure (“wolf-like”?), and
- a smudge – perhaps an otter or beaver skin image? – a few inches higher and to the left.
We had as our guide a drawing by Selwyn Dewdney from his visit in the mid-1960s.

Dewdney sketch from Rajnovich’s Reading Rock Art


the man pictograph panel at the Matagamasi site
Selwyn Dewdney:
 The first edition of Selwyn Dewdney’s Indian Rock Paintings of the Great Lakes was published in 1962. (Click on the title to access an online copy.) Five years later, a second edition appeared in which Dewdney presented details on another 160 pictograph sites. It included this passage on pictograph sites in the Gogama area in general and Matagamasi in particular –

[Click here to access a pdf file of the additional 2nd. Ed. material.]
———
We noted a cross-like shape just to the west of the panel with the three images. It is perhaps a simple drawing of Animikii (The Thunderbird) or of the symbol the strange newcomers to the land, especially the men in black robes, seemed to attach much power to.

a cross drawing to the west of the main Mtagamasi pictograph panel
The image below is from the west end of the Anishinaabe world – a pictograph on the Bloodvein River in Manitoba with similar cross or thunderbird paintings.

Bloodvein pictograph site below Bushey Lake- cross and thunderbird figures
I was under the impression that this was the total number of images to be seen!
On our way to Wolf Lake the next morning, we passed by the rock face again and found more! This certainly made sense, given the note on the Ottertooth map (The Middle Tracks), which describes the site as the second largest in the Temagami area.

rainy day set-up at our Matagamasi Lake campsite
Our campsite was up by 2;30, hurried up by some drizzle that would become a light rain by 4 and go on all evening and into the next day. Our double tarp setup – one over our tent for peace of mind and the other over our lounging/dining area – is visible in the image above!
—————
Day 2: Northeast Arm To Wolf Lake
- Distance: 14 km.
- Time: 8:45 start-2:30 finish
- Rapids:Portages: 2 – 250 meters and 340 meters to Silvester Lake
- Weather: rain overnight, more around 6 a.m. thru breakfast; overcast during the day; thunderstorm and massive rain dump circa 4:00 p.m. followed by a couple of hours of visible sun! More rain overnight
- Sightings: 2 canoes out of Silvester, 1 into Silvester (we would meet again!), 1 on Wolf Lake and a group of 4 who camped on the clifftop site
- Campsite: small island across from the cliff top (very nice) campsite
- Natural Resources Canada archived 1:50000 topo maps: 041 I 10: 041 I 15 Milnet
- See NRC’s Toporama (here) for its current interactive coloured mapping and print what you need.
- GPS track from our Garmin eTrex 20
It was raining when we woke up around 6; it would continue until about 8:30. By the time we left the campsite and headed back to the pictograph site on the other side, it had stopped. We would have an overcast sky and the occasional drizzle for the next few hours.

The map below shows our route to our Wolf Lake campsite, which we would get to by 2:30 or so.
 But first…
A Return To the Matagamasi Picto Site:

Looking west to the picto site and the turn to the NW arm of Chiniguchi’s Matagamasi Lake
We decided to paddle by the rock face again for another look at the small collection of images and smudges we mistakenly thought made up the site.

Matagamasi picto site overview – a view from the east
We came at the site a bit further to the east and found a few pictographs we hadn’t even looked for the previous afternoon.
The East Panel:

Matagamasi pictograph site – easternmost face overview
As we approached, drawings of animals – a moose?- and a canoe with paddlers and other difficult-to-say markings popped out of the rock.

Matagamasi Pictograph site – the easternmost face

Matagamasi -easternmost face
A bit further down, we came across what looked like a set of four vertical lines. They are often described as tally marks, and the guess is that something is being counted.
- Could it be the number of days the vision quester has been out?
- Or perhaps it is nothing more than exposed bits of the underlying iron oxide rock stain?

tally marks – or iron oxide rock stain just to the west
We paddled back to the panel of images/shapes we had seen the afternoon before.
The West Panel:


matagamasi picto – a human figure with outstretched arms
As we continued west, we spotted the marking pictured below. It is about 15 cm. long and is either a faded “painted” image or a natural rock stain. The absence of more natural rock stain nearby makes the former more likely.

Possible pictograph to the west of the human figure image

more reddish stain on vertical rock

more rock stains looking like pictographs?
From Matagamasi Lake to Silvester Lake –

landmark on Matagamasi lake west of the picto site
We faced our first portages when we got to the north end of Matagamasi Lake. Since the Lake is a part of the Chiniguchi River system and we were going upriver to its source. there would be no running of rapids! Instead, there is a 340-meter carry out of Matagamasi to an open stretch of water, which leads to a second portage, 405- or-so meters into Silvester Lake.
The bit of the Natural Resources Canada topo below indicates a historical portage – the Toenail – that no longer exists.
The First Portage Up To Silvester Lake

Note: no sign of Paradise Lagoon on this NRC topo
As we paddled to the northwest end of Matagamasi Lake, we came to the first portage of the trip, the 340-meter (approx.) carry.

portage take-out NW corner of Matagamasi Lake
The Ottertooth map notes that it can be run or lined in high water. A look upriver at the boulder garden and low water quickly nixed the lining/tracking option. It was mid-September, and water levels were apparently much lower than usual.

looking up the Chiniguchi River from the NW corner of Matagamasi Lake
We found a walkable trail that made our first portage an easy one. The water level goes from 268m on the Matagamasilake end to 274m at the north end of portage – a 7-meter gain, Forty minutes later and a bit of time to snap some photos, our canoe was loaded, and we were ready to push off from the put-in spot.

Section of the first portage trail from Matagamasi to Silvester
The 2nd Portage From Matagamasi To Silvester
A short paddle up a wider section of the river brought us to the next carry, a much steeper and somewhat longer haul up to Silvester Lake. The Ottertooth map gives it the name Toenail Portage. We did meet two canoe groups as we neared the take-out for P02. One canoe was headed down to the portage we had just done; the other couple’s canoe sat at the take-out spot while they went bushwhacking with their dog along the river. We assumed they were headed to a spot on the west side of the river known as Paradise Lagoon.
While the topo map above does not indicate anything other than a very narrow section of the Chiniguchi River, the satellite image below shows the sizable side pool on the river’s west side. Given the lack of map detail on most maps in use, it is easy to see how the lagoon could have been missed by canoe trippers coming up or down the Chiniguchi.

On the portage trail, we stopped to read an 8″x11″ poster that someone had thumbtacked on the inside of a protective wooden container. It encourages canoe trippers – and visitors to Paradise Lagoon! – to get involved in the movement to save the area from the impact of ongoing mining activity. The next day we’d see a similar poster/container on the portage trail from Wolf to Dewdney.

When we finished the portage, we set up our Helinox chairs at the south end of Silvester Lake. While having a lunch break, we were surprised by a couple of paddlers also finishing their portage upriver. We moved our gear and canoe aside to give them some space! After a brief chat, they continued to Wolf Lake while we packed up and paddled over to the river’s west bank. We found there a trail that led us to the north end of Paradise Lagoon.
Paradise Lagoon:
We reached the lagoon at the spot indicated by the red arrow below.

This is the view we had from our rock-top vantage point:

A view of the Paradise Lagoon from the north end rock top
What we did not see was the falls tumbling down to our left from our rock-top vantage point. Given the low late-season water levels, there probably was no more than a trickle.
A bit of scrambling down the east side of the lagoon over rocks and we had a different perspective of the lagoon –

scrambling down the east side of the lagoon to get a different view
This panorama shot captures yet more of the lagoon from the south end.

When we got back home, I googled Paradise Lagoon and saw that we had missed getting a much more dramatic shot. This one from a Bill Steer article on the Northern Ontario Travel website shows what our views do not include!

This image on the Wikipedia site is even more awesome. In fact, it had me wondering if we had even been at the Lagoon at all!
So – a double miss on our part! No water tumbling down and the wrong vantage point! Still, it is a magical spot worth the effort of getting there. The YouTube videos showing people swimming in the pool and diving off the high rock undoubtedly means even more visitors, who can access the lagoon from the road to the west. We did see empty beer cans and other litter off the trail.
Looking For A Wolf Lake Island Campsite:
Once back at the canoe, we paddled up Silvester and the swifts dividing it from Wolf Lake and then headed up the lake’s west shore to the two indicated campsites. The southernmost one looked okay, but we kept on to the one a bit further up when we spotted a canoe with a paddler and his dog. A brief chat told us that the site was taken, but there was another one just across the lake and one on the nearby island.

We paddled across the lake to the campsite marker at the bottom of a steep trail that we walked up to get to the campsite. It is a bit of a carry, but the reward is a fantastic view of the lake with the bonus of a west view, perfect for the end of the day. It is the premier Wolf Lake campsite.

the view SW over Wolf Lake from the east side cliff CS
Back at the canoe, we paddled along the shore to see if there was a way we could eliminate the 100-meter carry up the steep access trail. There was! The site can be reached via a rough trail from the water immediately below. While it is much shorter, it is also much steeper!
A two-minute paddle away was the island site we had been told about. Before we committed to hauling our gear up to the cliff top, we figured we’d check it out first.

We were almost there when the sky turned dark, and we heard a crack of thunder. A quick look at the island camp spot and we found this –
- a decent and fairly sheltered tent site
- room for our four-person MEC Wanderer,
- a large fire pit that showed signs of frequent use
- some space to put up a second 10’x14′ tarp
- lots of nicely-spaced trees to use to tie down the two tarps
The sky got even darker, and another bit of thunder was all we needed to decide that we’d be setting up camp on the island! Within five minutes, our tent was up. Another ten minutes and the two tarps were up – one over the tent to take the brunt of the soon-to-arrive rain and the other over our Helinox chairs by the fire pit.
No sooner did we have everything up and our gear tucked away than it started to rain – a massive downpour that we would have been caught in had we decided to paddle back to that premier campsite on top of the cliff!

island campsite on Chiniguchi’s Wolf Lake
An hour later, the rain had stopped. We packed away the lunch stuff, emptied our coffee cups, and did a tour of our island domain. After setting up a designated toilet spot complete with a biodegradable bag so we could take the contributions with us the next morning, we went for an empty-canoe paddle up and down the east side of the lake.
Our first destination – the cliff and talus just across from our island.

Looking south to our Island campsite on Chiniguchi’s Wolf Lake

our island tent spot, and the cliff and rock rubble on Wolf Lake’s east side

the cliff and talus on the east shore of Wolf Lake
When we got to the shore by the talus, I hopped out. I was curious about some of what I thought might be pictographs on the vertical rock face.

the dramatic Wolf Lake rock face
It was the spot on the right-hand side of the image below that I was headed to. My 6′ frame is overwhelmed by the cliff’s height, whose powerful presence could have attracted a shaman or a young Anishinaabe vision quester looking for the right spot to leave his image – a thunderbird, a clan totem, a personal protector animal image, or some other mark – with the ochre powder in his pouch or medicine bag.

wolf lake rock face
Before I had even scrambled up to the spot, Max had zoomed in to 710mm with his Sony HX80 for this shot of the faux pictos!

closeup of the faux picto on Wolf Lake
Here are images of a couple of other reddish stains I found as I scrambled up the rock –

More natural iron oxide stains on the rock – the blood colour was right, and if you wanted to, you could turn these into painted images and provide some meaning to them. Later, along the east shore, we would see more examples.

Max paddled down the shore a bit, and I got this shot of him sitting at the stern end of the canoe. The sun was a welcome addition to the scene, and it came just a couple of hours after that rain!

looking south on Chiniguchi’s Wolf Lake from the east side cliffs
We saw four canoes coming up the lake as we returned from our evening paddle. We wondered where they had been when the rain started. By the time we had beached the canoe on our island, they had pulled up to the cliff campsite. After walking the same signed 100-meter portage trail up to the site from the south, they also figured out that landing just below the site and doing the steep haul up would be better.
Soon there were four overturned canoes on the rocks below the campsite, and they were busy setting up camp. The red arrow in the image below marks the location of their cliff campsite, 140 meters in a straight line from the shore of our island site.

a view of the cliff top CS on Wolf Lake’s east side from our island cs

closeup of the campsite on Wolf Lake’s east side from our island CS
Day Two had been an interesting mix of pictographs, portages, Paradise lagoon, a massive thunderstorm, and the imposing cliff face on the NE corner of Wolf Lake. We were definitely easing into a canoe-tripping frame of mind. Who knew that what we’ve been doing for the past forty years was nature bathing!

the NE corner of Chiniguchi’s Wolf Lake at dusk
—————
Day 3: Wolf L. To The Top of Chiniguchi L.
- Distance: 17 km.
- Time: 8:30 start – 16:00 finish
- Rapids/Portages:
- Weather: partly cloudy with occasional sunshine during the day
- Sightings: 1 tandem and a group of 4 at the end of the day
- Campsite:
- Natural Resources Canada archived 1:50000 topo: 041 I 15 Milnet
- See NRC’s Toporama for its current interactive coloured maps and print what you need.
- GPS track from our Garmin eTrex 20-

Day 3 route – Wolf Lake to upper Chiniguchi Lake
Leaving Our Island Campsite:
While our tarps were wet from the overnight rain, we were able to pack away the dry tent and enjoy a few rays of the early morning sun as we had breakfast and looked across the water to the clifftop campsite crew as they showed signs of stirring.

Island campsite on Wolf Lake

a view of the Wolf Lake island CS the next morning
On tap for the day were a couple of portages to Chiniguchi Lake and then a paddle up the lake to what we hoped would be a decent campsite. First up –
The Portage Into Dewdney Lake:

A well-used trail took us from the top end of Wolf over the logging road and then up to Dewdney Lake. As we crossed the road, we did notice a vehicle tucked on the side of the road to the west. It may have belonged to the couple with the dog we had spoken to the afternoon before. Talk about easy access to a multiple-day Wolf Lake campsite!

Once on Dewdney, it was a quick paddle to our second – and last! – portage of the day, the one into Chiniguchi Lake.
The Portage Into Chiniguchi Lake From Dewdney
The route from the Matagamasi put-in up to Chiniguchi Lake is well-travelled. If you see other paddlers, it is mostly like that it will be on this stretch. As a result, the portages are easy to find and well-used. As we approached the take-out spot at the top of Dewdney lake, we met a couple of paddlers heading up to Chiniguchi Lake. With their single carry, they were soon ahead of us as we moved our canoe and gear with our 1 1/2 carry system!

Once on Chiniguchi Lake, we followed the shoreline as it bends gradually to the northeast. A moderate wind from the northwest meant we had to put more oomph into our strokes as we approached the next point of interest on our Chinguchi tour.
Oddly, now that we were on Chiniguchi Lake, we were no longer in Chiniguchi Waterway Park! From the south end of the Lake, almost to the Sturgeon River, we would be on Crown Land.

————-
The Pictograph Site On Chiniguchi Lake
The rock face pictured below hosts a humble collection of almost-gone pictographs. Among them, we were able to discern a couple of canoes and some geometric forms and perhaps a very simple rendition of a Thunderbird image.

Chiniguchi Pictograph site overview from the south end

the Chiniguchi Lake pictographs
 The Ottertooth map (The Middle Tracks) includes this note about the site – (Rediscovered 2008).
You have to wonder how the site could have been forgotten, given its location next to a popular campsite on a frequently-visited lake! Then again, Selwyn Dewdney was not aware of the site in the 1960s, in spite of his many contacts and the interviews he conducted with local people, Indigenous and non-.

Chiniguchi Lake pictograph panel
Accentuating the red hue in Adobe Lightroom – an attempt at an app pictograph researchers use called DStretch – resulted in this view:

The Horned Snake (Michi-ginebig) played a significant role in Ojibwe mythology. If it is indeed a Michi-ginebig image, it looks like the painter started off strong with lots of paint and then ran out near the end! Then again, it could be two images – a U-shape and a, let’s say, flat-bottomed canoe with two paddlers! The human impulse is to create meaning, even when there is none.
The cross with a horizontal line on the top pointing to the left could be a crude representation of Animikii, the Thunderbird, next to Gitchi-Manitou, the most powerful of spirits. From the beak pointing to the left to the horizontal line in the middle representing the wings…

looking SE at the Chiniguchi Lake pictograph site

red hue accentuated!
To the left of the images discussed above are two vertical slash marks joined at the bottom, forming a V-shape.
A little bit further on are more marks that I did not get a good overview photo of – two zig-zag lines and what may be a human figure. If you see the zig zags as serpents, creating a story connecting them in their role as messengers of the manitous as they bring medicine and wisdom to the petitioning shaman would be easy enough!

Norval Morrisseau – (1962) Serpent Legend – delivering wisdom to the shaman

the location of the west-facing Chiniguchi Lake pictograph site
Just to the north of the pictograph site is a designated campsite. Sitting there was the couple we had met on the exit from Dewdney. They had decided that this was their campsite for their very short paddling day. Not that ours would be much longer!
————-
The Red Pine Point Campsite on Chiniguchi Lake:
Two kilometres northeast of the pictograph site, we pulled up to a marked campsite on a point after deciding that we wouldn’t be scouting out McConnell Bay and its beach area. We were amazed at the size of the red pines towering above our tent; the one that Max is hugging below must have been 20 meters tall. Long may it stand!


Chiniguchi Lake red pine – 20 meters tall or (ten x Max)
Later that evening, near dusk, we watched from our campsite on the point as the four canoes from the previous day’s Wolf Lake clifftop campsite floated by. They were on their way to the popular beach campsite on McConnell Bay.

—————
Day 4: Chiniguchi Lake to Sturgeon River

-
- Distance: 12 km.
- Time: 8:40 start – 15:30 finish
- Rapids:Portages: 3 for a total of 3300 m
- Weather: mixed sun and cloud with rain in the evening and overnight
- Sightings: no paddlers; a few ducks and other birds
- Campsite: End of the Parsons to Sturgeon Portage
- Natural Resources Canada archived 1:50000 topo maps: 041 I 15 Milnet; 041 P 02
- See NRC’s Toporama (here) for its current interactive coloured mapping and print what you need.
- GPS track from our Garmin eTrex 20


misty dawn on Chiniguchi Lake
I crawled out of the tent just before dawn and found the lake and surroundings bathed in a fine mist. To the west of the campsite is the island labelled Ranger Island on the Ottertooth map. Within a few minutes, I got the shots above and below. The sun had made an appearance!

Our day began with an easy lift-over into Sawhorse Lake, which along with White Rock and Redpine Lakes, makes up the headwaters of the Chiniguchi River system.

the headwaters of the Chiniguchi River system
The Lift-Over Into Sawhorse Lake From Chiniguchi Lake:


Chiniguchi to Button portage
The tree stumps in Sawhorse reminded us of Sucker Gut Lake or Willow Island Lake in the Temagami area. While they can be explained by the mid-1920s construction of the Mattawapika Dam, we are not sure of the cause of the Sawhorse flooding.

Sawhorse Lake – stumps
From Sawhorse Lake, we still had a bit more work before we got to Button Lake. The 585-meter portage from Sawhorse to Adelaide took us 45 minutes. We were happy to just paddle into Button Lake without having to get out of the canoe and do a lift-over.

From Button Lake, we would be heading east for the Sturgeon River via a couple of longer but easy-to-walk logging road portages.

two routes to the Sturgeon from Chiniguchi Lake
We had originally planned to enter the Sturgeon via the route shown with the broken black line on the map above. We had come down the Sturgeon from Stull Creek about a decade before and remembered the dozen or so C1 and C2 rapids that go down all the way to the Pilgrim Triangle area. Unsure about water levels in mid-September, we figured going down could be a real grind.
So instead, at Button Lake, we would head east to Parsons Lake and the Sturgeon. The complication – two portages totalling 2.6 kilometers. The positive – no bushwhacking needed! They are on gravel logging roads and fairly flat. They are also in much better than typical logging road shape.

The 1500-meter portage from Button Lake to ParsonsLlake
At the start of the portage, I did something I usually do not bother with – I took off my LL Bean boots and put on my hiking boots. The better outsole and the much better ankle support made it easy to rationalize the few minutes it took to do the change.
We did the portage in three 500-meter stages using our carry-and-a-half system. It has Max carry one canoe pack and one duffel to the end while I carry the other pack and duffel and strapped-together paddles to what we figure is the halfway point. While I drop my load off there and head back for the canoe and my camera pack, Max finishes the carry and returns to pick up the stuff I had dropped off. If we both arrive at the halfway point (in this case, 250 meters) at the same time, we know our estimate was pretty good.

the put-in on the west end of Parsons Lake
Once at the Parsons Lake end of the portage, we pushed off with the intent of stopping for the first decent lunch spot. It is 4.5 km. from one end of Parsons to the other; we were about halfway down when we stopped for our lunch break. Along the way, we did paddle in closer to check out potential shaman’s iron oxide paint on rock but came up with nothing more than natural iron oxide stains.
Parsons Lake is likely named after J. L.Rowlett Parsons, the geologist with Exploration Survey Party Number 3, whose report is included in the 1901 Report of the Survey and Exploration of Northern Ontario commissioned by the Department of Crown lands for Ontario. The task was to catalogue the mineral, lumber, hydroelectric, and agricultural resources. In his part of the report, the lake is described (p.100) but does not have a name. [See here for the report. Parson’s name is at the end of his contribution to the Report on p.113]

On tap for the afternoon was the second portage, a shorter 1100-meter carry down yet more fairly flat gravel road.

P to Sturgeon R from Parsons L.
With the three paddles strapped together and the life jacket soon to be attached to a canoe pack, the haul to the campsite on the banks of the Sturgeon was set. [We usually bring four paddles, but for this short trip figured we could get by with three and eliminate some weight!]

the path leading up to the logging road from the NE corner of Parsons Lake.
The campsite is in a clearing at the end of the road with ample space for several tents. Given the weather forecast, we set up both tarps, one over the tent and another to the side. It would rain a bit that evening and overnight and more when we got up the next morning! The tarps definitely earned their keep on this trip.

Campsite at end of the Portage from Parsons to the Sturgeon River
—————-
Day 5: Sturgeon River To Below Lower Goose Falls
-
-
- Distance: 26 km.
- Time: 9:40 start – 16:45 finish
- Rapids:Portages: swifts and Class 1-
- Weather: light rain in the morning; overcast in the afternoon; rain overnight
- Sightings: no humans; no moose or bear; one chipmunk; some ducks
- Campsite: a rough camp on a high sand bank below Lower Goose Falls
- Natural Resources Canada archived 1:50000 topo maps: 041 P 02; 041 I 15; 041 I 16
- See NRC’s Toporama (here) for its current interactive coloured mapping and print what you need.
- GPS track from our Garmin eTrex 20


A late start to the day, thanks to a solid rain that began around 6 a.m. and continued until about 9:30. We had put up both tarps the afternoon before, so we were able to take down the tent without getting it wet. With the tent down, we parked our packs and duffels there while we had breakfast under the nearby apple green tarp. This was one of those mornings when we had a second cup of coffee while we waited for the rain to stop. We finally put our canoe in the Sturgeon water at 9:30 in a light drizzle which would end an hour later.

Day 4 campsite on the banks of the Sturgeon
It is 14.4 kilometers from the Parsons-Strugeon trailhead to Upper Goose Falls. We got there shortly before one, having spent the morning benefitting from the swifts and class 1 rapids that sped things up. We were encouraged by the water level; it was not as low as we had expected.

Following the bubbles down the Sturgeon

abandoned boat on the Sturgeon
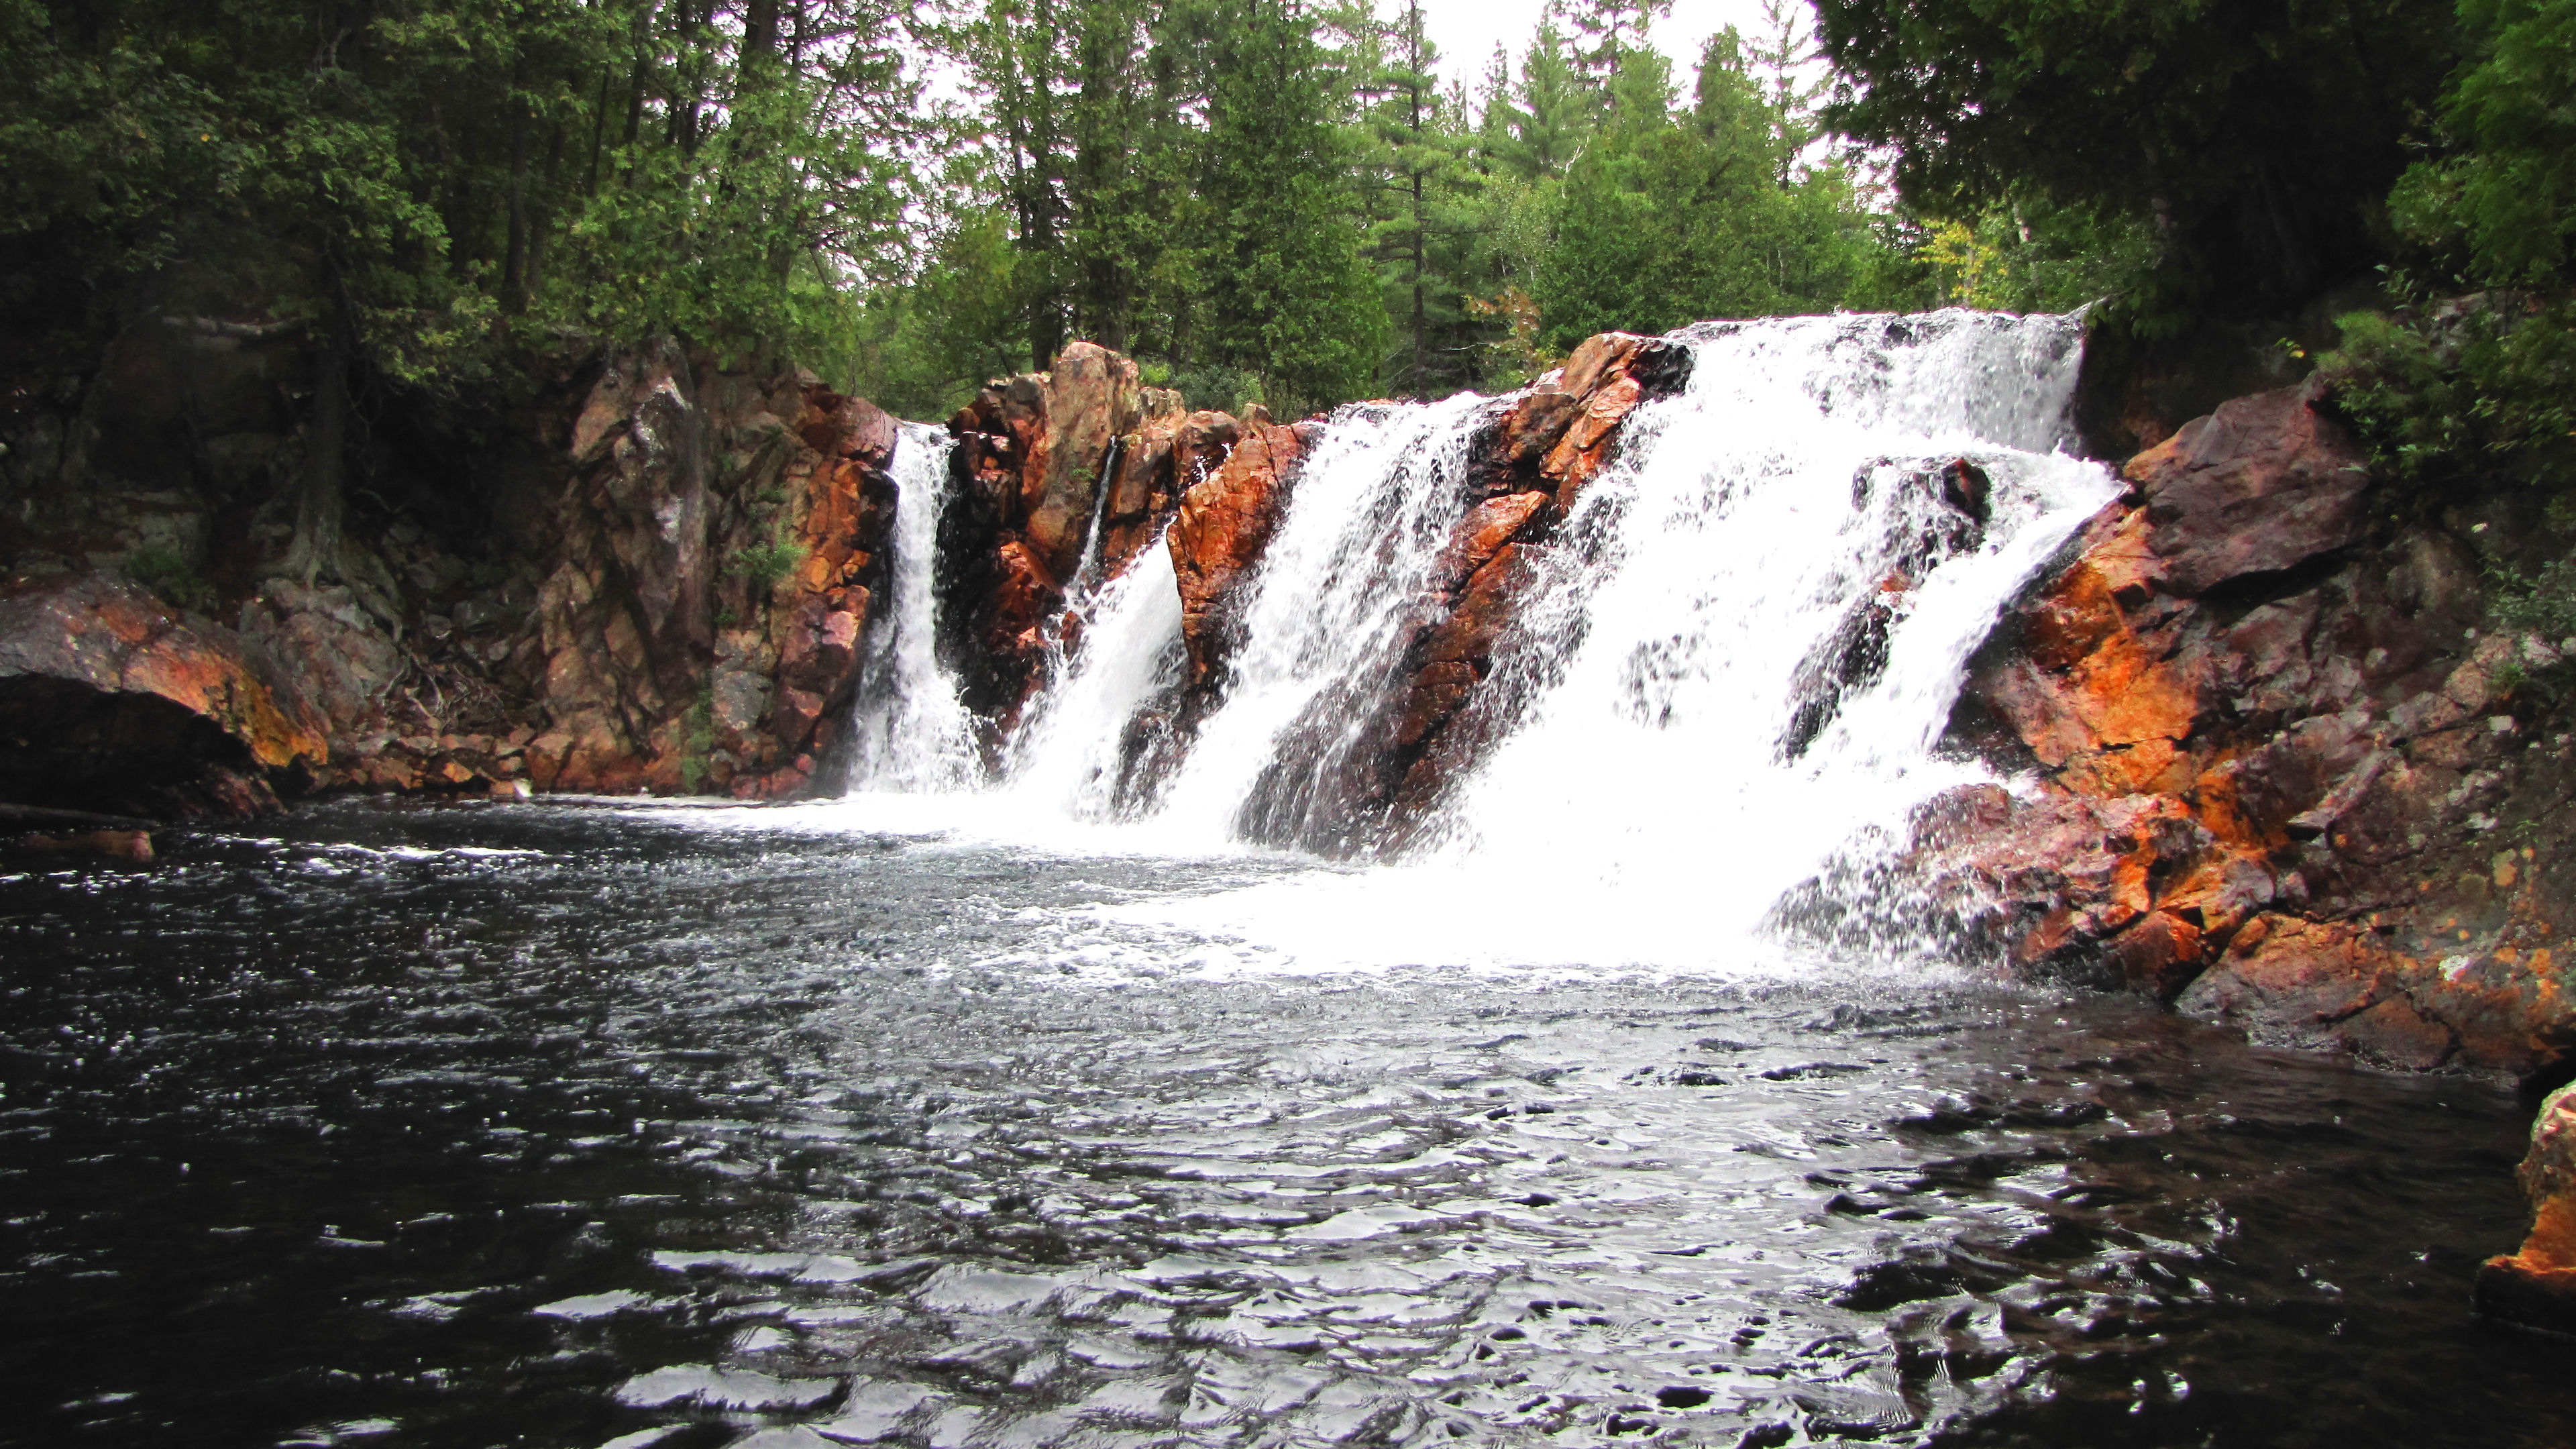
At 1, we were having lunch at bottom of the 80-meter portage around Upper Goose Falls. There is an A+ campsite at the top of the falls, but the wind was blowing hard enough that we went for the relative shelter of a spot down by the river.


a view of the Sturgeon River’s Upper Goose Falls

looking downriver from the top of Upper Goose Falls

Until Upper Goose Falls, the Sturgeon is relatively straight. Below the Falls, the river’s character changes. Over the millennia, it has carved its way through a massive glacial sand deposit. On the second map above, the Obabika river comes from the NE and merges with the Sturgeon just below the Falls. Below this point, the river meanders wildly and forward progress means paddling in all compass directions!
An hour after leaving Upper Goose Falls, we had covered 7 kilometers and were unloading our canoe at the top of our next portage, the one around Lower Goose Falls.

Lower Goose Falls – satellite image
The 215-meter portage took us up to the road and then down a side road back to the river. There is a campsite below the falls, but we still had a few kilometers in our paddles, so we decided to push on a bit.

ready to push off below Lower Goose Falls

looking back at the bridge and Lower Goose Falls
There are no official designated campsites on the Sturgeon from Lower Goose to the portage take-out spot for Kelly Lake. This does not mean, however, that there is nowhere to camp! We passed by a number of potential spots to put up our tent before settling on one about 4.5 kilometers from Lower Goose.

Sturgeon River Campsite below Lower Goose Falls
While the campsite was totally exposed, it was relatively flat. It took about twenty minutes to carve out a spot for our MEC 4-person Wanderer. The canoe was flipped over to serve as a handy table. Before we crawled into the tent for the night, we set up the tarp to provide an extra layer of protection from the expected overnight rain.

Sturgeon River view from our campsite below Lower Goose Falls

tarp over the tent on the Sturgeon
We had covered 26 kilometers on our first day on the Sturgeon. The next day we would put in a similar distance on our way to the portage that would be our exit from this meandering stretch of the Sturgeon.
—————-
Day 6: From Below Lower Goose Falls To Kelly Lake
-
-
-
-
- Distance: 31 km.
- Time: 9:25 start – 16:30 finish
- Rapids:Portages: 1 into Kelly Lake
- Weather: mostly overcast with some rain in the morning
- Sightings: the couple we had met on Day 2 on Silvester Lake
- Campsite: the signed cs on Kelly Lake
- Natural Resources Canada archived 1:50000 topo maps: 041 I 16 Lake Temagami.
- See NRC’s Toporama (here) for its current interactive coloured mapping and print what you need.
- GPS track from our Garmin eTrex 20

It was raining when we woke up around 6:30. We listened to the raindrops for a half hour before agreeing we might as well face the day. Given our location, we had not set up the second tarp as a dry spot for our gear and for breakfast after we took down the tent.
Max proposed doing something we had discussed before but never tried. We took down the inner tent while leaving the poles and the fly so that we would have a dry area to keep some of our gear – the rest would go under the canoe – and provide us with a dry breakfast shelter.
It worked out as planned. Even better, when it was time to go, the rain had stopped. The rest of the day was mostly overcast as we meandered our way south – and east and west and north! – to the portage trail that would take us from the Sturgeon to Kelly Lake,


leaving our cs below Lower Goose Falls

the Sturgeon River below Lower Goose Falls
Halfway through the day, we stopped for lunch on a grass-covered sandbank up from the river. It would also have made an acceptable tent spot had it been later in the day. We saw a number of spots like this on our trip down the Sturgeon from Parsons Lake to Kelly Lake. There is certainly no need to feel apprehensive about not finding an impromptu campsite as you come down this stretch.

lunch spot – and a decent possible campsite- on the lower sturgeon

a view of the river from our lunch spot

lunch spot and possible tent site on the lower Sturgeon
The Portage Into Kelly Lake:

The take-out spot for the 440-meter portage to Kelly Lake is difficult to miss. It begins at the mouth of Kelly Creek, across which we found the downed tree trunk you see in the image below. Once over it, the portage crosses Kelly Creek – almost non-existent on our trip – and then up a steep sand embankment to a flat open area at the top of a 25-meter slope. The plateau was apparently the location of a farm owned by the Kelly Brothers some time ago.

the beginning of the portage into Kelly Lake from the Sturgeon

Kelly Lake portage – Sturgeon end

the mouth of the creek where the Kelly Lake Portage begins

looking back down to the start of the portage into Kelly Lake
From the clearing above the creek bed, the trail heads east for perhaps 130 meters before leaving the main trail – the 3.5 km. portage that takes you straight to Maskinonge Lake. We were able to find it thanks to a few strands of orange prospectors’ tape. The trail showed little sign of having been used even though it was mid-September.

the Kelly Lake campsite
We turned in at the one signed campsite once we got to Kelly Lake. It is about halfway down the lake on the west side. Like the portage trail, it did not look like it had been used much in the past few months. Up went the tent and the two tarps – more rain was forecast for the evening, and we were ready!
—————-
Day 7: Kelly Lake To Carafel Lake
-
-
-
-
-
-
- Distance: 13 km.
- Time: 10:10 start – 16:00 finish
- Rapids:Portages: 3 portages (P) and a few beaver dams (BD)
- Weather: overcast; occasional drizzle
- Campsite: on Carafel Lake
- Natural Resources Canada archived 1:50000 topo maps: 041 I 16 Lake Temagami; o41 I 09; 041 I 10
- See NRC’s Toporama (here) for its current interactive coloured mapping and print what you need.
- Ottertooth Maps:
- GPS track from our Garmin eTrex 20


Kelly Lake campsite
it is 25 kilometers from Kelly Lake to Kukagami Lake. We had two days to deal with the numerous beaver dams and short portages that would get us there. First, we had to get to Maskinonge Lake; then, we would use the Carafel Creek/Lake route to Kukagam Lake.

Day 7 – portages, beaver dams, and lift-overs.
Another rainy start to the day had us delaying until 10 before pushing off and heading for the south end of Kelly Lake. Waiting was the first of the day’s obstacles, a beaver dam. It took us a half-hour to get to Gamagowong Lake.

the narrow section between kelly and Gamagowong Lakes
At the west end of Gamagowong Lake, we emptied the canoe for the start of a 310-meter portage into teardrop-sized Gagnon Lake.
Note: While Gagnon and Gamagowong Lakes flow east into Kelly Lake and down Kelly Creek into the Sturgeon River, Gawasi Lake empties into the Chiniguchi River system’s Maskinonge Lake.

start of the portage from Gamagowong into Gagnon
Once on Gagnon Lake, we headed for the far shore for another portage, the 400-meter carry into Gawasi Lake.

put in on Gagnon from Gamagowong

approaching Gawasi Lake from Gagnon
At the west end of Gawasi, we spent fifteen minutes dealing with two more beaver dams before we slipped into Maskinonge Lake. It had taken us about three hours to deal with the various impediments to easy forward paddling! Shortly after turning south and heading down the lake, we pulled ashore. It was time for lunch – and that second cup of filtered coffee!

The Anishinaabe Oirigin of the name Maskinonge
The name “muskellunge” originates from the Ojibwe words maashkinoozhe (meaning “great fish”), maskinoše or mashkinonge (meaning “big pike” or “ugly pike[2]“) and the Algonquin word maskinunga, which are borrowed into the Canadian French words masquinongé or maskinongé.
[source:Wikipedia]

looking north on Maskinonge Lake
Sitting on the shore of Maskinonge Lake, we were returning to the Chiniguchi River system on which we had started our little canoe trip. From our Matagamasi Lake put-in we had gone up to its headwaters in Sawhorse Lake. We left it there to reach the Sturgeon River via the Parsons Lake route.
Chiniguchi River system top to bottom
Had we paddled up Maskinonge to Lower Matagamasi and back to our put-in at the south end of Matagamasi, that would have closed the circle! Instead, we looked from our lunch spot to the southwest for the start of the last leg of our journey, the Carafel Creek/Lake route that would take us back to the Sportsman’s Inn on Kukagami’s Klondike Bay.
Like Gawasi Lake, Kukagami and Carafel Lakes empty into Maskinonge Lake as the Chiniguchi makes its way to Murray Lake before merging with the Sturgeon.

Carafel Creek – from Kukagami (273m) down to Maskinonge (250m) – a 23m drop
Another beaver dam, a short portage, and a lift-over were waiting for us. The terrain had wetlands feel to it as we pushed on to Carafel Lake, and one of the three campsites indicated.
Along the way, we had our major wildlife sighting of the trip, a turtle sitting on a floating log.

wildlife sighting on Carafel Creek


 Getting around the collapsed bridge was our one portage of the afternoon. Once on the other side, we took a few moments to set up a photo that has become a staple on each canoe trip. That would be an action shot of Max, the stern paddler, at work (or is that play?) that I send to Lila.

remnants of the Carafel Creek bridge crossing


crunching our way over a Carafel Ck. beaver dam

looking back from the Carafel Ck beaver dam (one of a few!)
A last mini-portage and we were on Carafel Lake. The Ottertooth map (Southern Track) indicates three sites; we headed for the first one, located on the north shore of the lake. It was an excellent site that could host a large canoe group. We had it to ourselves!

Carafel Lake campsite

Carafel Lake campsite – tent and tarps
—————-
Day 8: Carafel Lake To Kukagami Lake (Sportsman’s Inn)
- Distance: 12 km.
- Time: 8:35 start – 12:45 finish
- Rapids:Portages: 5
- Weather: mostly cloudy with some rain
- Natural Resources Canada archived 1:50000 topo maps: o41 I 09; 041 I 10
- See NRC’s Toporama (here) for its current interactive coloured mapping and print what you need.
- GPS track from our Garmin eTrex 20

After breakfast under the tarp, thanks to an early morning shower, we set off for our half-day on the water. It would include the 4 portages indicated on the map seen above. This was one of those times when the tiny screen of the Etrex 20 exacted a price. Unable to get a fuller picture of exactly where we were, we spent 45 minutes pushing through 5″ of water in the wrong direction.
I finally pulled out my iPhone and opened David Crawshay’s Topo Canada app. Within a minute, we were on track – i.e. north! That brought us to the first and worst of the day’s portages, the 440-meter carry out of Carafel Lake. We were at the top of the portage an hour and a half after starting. The other three came and went much faster, and by 11:30, we were in Outlet Bay.
Kukagami Lake was fairly calm as we paddled down to the narrow peninsula that frames the east side of Klondike Bay. A 45-meter portage across the peninsula and another 700 meters across the bay, and we were on the sandy beach below the Sportsman’s Inn on the Bay’s north shore.
After retrieving the car keys, we backed up the vehicle as close as we could and then hauled the gear up from the shore. Once everything was loaded, we took up the offer of a shower, which was definitely needed after a week of haphazard cleanliness!
While the weather was not what we were hoping for, the trip was still an excellent little adventure. It got us to a southwest corner of the greater Temagami area after a half-dozen trips in the northern half. As we drove down Highway 17 back to southern Ontario, we had all sorts of highlights to go over –
- The Matagamasi pictograph site
- Paradise Lagoon
- Wolf Lake rock face and island campsite
- Chiniguchi Lake pictograph site
- the 2.6 kilometers of logging road portages from Button to the Sturgeon via Parsons Lake
- the easy C1 rapids and shifts below the Pilgrims’ Triangle
- Upper Goose Falls
- Lower Goose Falls
- the glacial sand deposits of the lower Sturgeon
- Carafel Creek/Lake
We are happy to have the time and the good health and fitness to have experienced them all.
———————————
Maps:
See here for the entire collection of 1:50000 NRC topos
Click on the map titles below to download –
—————-
Ottertooth’s Chiniguchi Maps

Click here or on the map to access the Ottertook webpage
Middle Tracks (Matagamasi to N of Chiniguchi Lake)
Northern Tracks (Stouffer Lake and Parsons Lake access to Sturgeon R)
Kelly Lake Crossovers (two options from the Sturgeon R to Maskinonge L.)
Southern Tracks (from Maskinonge Lake to Kukagami Lake)
—————-
For more of our Temagami-area posts, check out any one of these –

————————————–
1. Montreal River/ Smoothwater Lake/ Scarecrow Lake/ Sturgeon River/ Wawiagama/ Obabika Lake/ Diamond Lake/ Tupper Lake etc.
Temagami: Paddling From Peak to Peak (Ishpatina Ridge to Maple Mtn.)
————————————–
2. Lake Temagami/Obabika L. / Chee-skon L. / Bob L./ Diamond L./ Wakimika L./
Early Autumn Canoeing In The Heart Of Temagami
A Return Visit To Temagami’s Diamond Lake Pictograph Site
————————————–
3. Ferguson Bay/Diamond Lake/ Lady Evelyn Lake/ Hobart Lake/Tupper Lake
Paddling To Temagami’s Maple Mountain
back to the top
————————————–
4. The Lady Evelyn From Top To Bottom

Temagami’s Lady Evelyn River From Top To Bottom: Introduction and a Bit of History
The Lady Evelyn River From Top To Bottom: Route Options, Maps, Shuttles, Permits, And More
Day 1 – To the Put-In And Up The Montreal River To Smoothwater Lake
Day 2 – From Smoothwater Lake To An “It’ll Do” CS On Lady Evelyn’s South Branch
Day 3 – From Our “It’ll Do” Campsite To Florence Lake
Day 4 – On Florence Lake
Day 5 – From Florence Lake To Just Below The Forks of the Lady Evelyn
Day 6 – From Just Below The Forks to Macpherson Lake Island CS
Day 7 – From Macpherson Lake To The South Channel’s Bridal Veil Falls
Day 8 – From Bridal Veil Falls To The Bottom of the South Channel
Day 9 – From The South Channel To The West End of Lady Evelyn Lake
Days 10 & 11 – From The West End of Lady Evelyn lake to Mowat Landing
————————————–
5. Random Temagami-Related Posts
Temagami’s Lady Evelyn of the Lake – Who Was She?
Robert Bell’s Lady Dufferin Lake: It’s Not Where You Think It Is!
————————————–


 full. Each has a tokma, a walking stick with a T-Shaped handle")


