Puerto Varas in Chile’s Lakes Region – Top Things To Do!

Related Post:  By Bus And Boat Through The Andes  – The Cruce Andino From Puerto Varas To Bariloche

Chile Puerto Varas


Chile’s Región de Los Lagos , about one thousand kilometres south of Santiago,  is Region X of Chile’s fifteen administrative regions and sits just to the north of mythic Patagonia.  Landing at El Tepual International Airport near Puerto Montt, a large port with access to the Pacific, I headed up twenty kilometers to Puerto Varas, its smaller (41,000 population instead of 175,000) and more charming little sister. I would later spend a couple of days in Puerto Montt and discover that it is a nicer place than the guide-books make it out to be – but still nowhere near as chilled out as Puerto Varas!

The town is located on the southwestern shore of Chile’s second largest lake – Lago Llanquihue (pronounced Yankee Way!) and traces its roots back to the early 1850’s with the arrival of a couple of hundred families from Germany.  They would be the first of a massive wave of German immigrants attracted by the agricultural riches of the area stretching all the way up to Valdivia.   The name of the town’s mayor these days, Álvaro Berger Schmidt, is just one of the echoes of this past.

Of course, left out of the story are the pre-European inhabitants of the region, the Mapuche whose territory it was in 1500.  The very word “Llanquihue” means “hidden lake” in their language. Not far from Puerto Varas is the Monte Verde archaeological site with evidence of human habitation going back 15,000 years!  While the bits of German culture tugged at my heartstrings – my mother was German and we spoke German at home – it would have been interesting to talk with a local person familiar with the Mapuche story and the way things are these days.

Ojibwa dream catchers at Puerto Varas market

Ojibwa dream catchers(?)   in Puerto Varas at the crafts market

Over the years the town has also taken advantage of the beauty of its surroundings.  I was there in February, the equivalent of August in the northern hemisphere, and could see that it is a popular tourist destination with Chileans, even if it is not nowhere near as  glitzy and moneyed as nearby Bariloche on the Argentinian side.   It makes an ideal base for a two or three-week stay in the region, especially if you fancy outdoor activities like kayaking, hiking, volcano climbing, and bicycle touring.  The town’s main street is lined with agencies catering to all the above and more!

When To Visit:

From April to September things get wet in the Los Lagos region.  The four-month period from December to March see less rain and fewer rain days; the two prime months for Chilean tourism are January and February so you can expect things to be busier and more likely to be booked then. See the website weather 2 for a comprehensive Puerto Varas weather profile.

See here for Google’s 3-D satellite view of Puerto Varas and vicinity.  The web-based app provides an interesting perspective. It takes a few seconds to upload.

What To Do When You’re There

What follows is my incomplete list of things to do in Puerto Varas.  Let me know what I’ve missed in the comments below!

1. Bicycle Touring:

Bring your own bike or rent one in Puerto Varas – and then do the three-day ride around Lago Llanquihue.  Over the past few years the various towns and villages have created a bike lane that circles the lake and makes the ride even more stress-free. Here is one travel agency’s description of the ride.

cycle tourists resting in the Plaza de Armas

If you are really keen you can also do the ride from Puerto Varas to Bariloche, making use of a boat ride or two to get you to the next road.  I talked to cyclists – Chilean, Argentinian, and European – who were doing exactly this over a two-day period.

2. Climb A Volcano!

This was definitely on my list!  When I got there I wandered downtown from my hilltop hostel and gazed east across Lago Llanquihue to the two main possibilities – Volcán Osorno and Volcán Calbuco.

the view of Puerto Varas from the Hostel Melmac Patagonia

The photos above and below – downtown Puerto Varas from my hostel’s front steps…

another view from the Hostel Melmac hilltop location

looking up to the Hostel Melmac on the hilltop

My first afternoon view of the two volcanoes – Osorno and Calbuco.  The clouds have moved in and covered their tops.  A couple of days later I would be standing on top of the one on the left side – Volcán Osorno!  Check out the details in this related post –

Climbing Volcán Osorno In Chile’s Lakes Region

3. The Cruce Andino To Bariloche

If you want something a little less active – I know I did after my volcano climb! – then there is a boat ride or two you can check out.  Sailing on Lago Llanquihue  – or on the next large lake to the east, Lago Todos Los Santos – is a popular day trip with many visitors.  The most ambitious one – and the most expensive at $280. U.S. – is the Cruce Andino, a twelve-hour journey through the Andes by bus and boat that takes you through some stupendous scenery.  You can spend a night or two in Bariloche on the Argentinian side and then take the boat back – it is half-price for the return! – or, like me,  take the bus via Villa La Angostura and Osorno.  See the post below for photos and maps of the Cruce Andino option –   By Bus And Boat Through The Andes – The Cruce Andino

4. Relaxing In Puerto Varas 

The downtown section of the town is a very manageable couple of main streets with an assortment of restaurants, hotels, and shops selling outdoor gear and clothing.  To no surprise – given the German/Spanish roots of the local culture and the abundance of seafood – I did not find many places that have embraced vegetarian cuisine with any enthusiasm!  The one vegetarian restaurant Masala Chai is located within one hundred meters of my hostel so I ate there four times over my three-day stay!

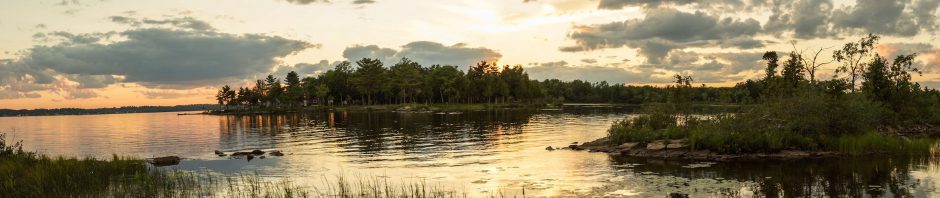
5. Walking Along The Puerto Varas Waterfront 

The shore of Lago Llanquihue draws many of the town’s visitors.

  • Some are there for the view of the volcanoes on the other end of the lake;
  • some are there for the beach;
  • some visit the town’s Tourist Information Centre;
  • some walk along the road to the food trucks at the far end of the bay.

canoes on the shore of Lago Llanquihue

I grew up in a mining town on the Canadian Shield with its countless lakes and rivers and seemingly unending boreal forests. It was the homeland of the Anishinaabe until they, like the Mapuche, were overwhelmed by more numerous newcomers with superior technology. Well, maybe not in the case of those Algonquin-style canoes! I was surprised to see a version of them sitting on the beach of Llanquihue.

And as I walked along the waterfront I also passed by a hotel with the name Radisson, the last name of the very same Pierre Esprit –  coureur de bois and hero of my youth!  Why is there a hotel in Puerto Varas named after a seventeenth century adventurer  who made a name for himself on those rivers of the Anishinaabe world?

The Casa del Turista sits on the top of a manmade spit that juts into the lake; behind it park benches and grass invite visitors to sit down while they turn their gaze to Osorno.  I love the Lonely Planet’s description of the scene –

“Two menacing, snowcapped volcanoes, Osorno and Calbuco, stand sentinel over picturesque Puerto Varas and its scenic Lago Llanquihue like soldiers of adventure, allowing only those on a high-octane quest to pass.”

A bit over-the-top, you’d have to agree!  Osorno is some forty kilometers away and is worth a “wow” on first seeing it but that’s it.  And “snowcapped”  no longer describes Calbuco since it erupted in 2015.  Tour groups leave Puerto Varas for Osorno daily for walks up the slope of the volcano to the beginning of the glacier. That’s where they turn back; only those equipped for a mountaineering adventure continue to the top.  Six hundred climbers a year make it.

There are a few large – and expensive – hotel options in Puerto Varas.  Two of them fill the left side of the panorama below and offer rooms with a view – the Hotel de los Volcanes with its Dreams Casino and the Hotel Radisson.

Hotel de los Volcanes and hotel Radisson in Puerto Varas

Puerto Varas Waterfront and Casa del Turista on Point

view near Plaza de Armas Puerto Varas

6. Checking Out Puerto Varas’ German Heritage:

The tourist office offers a brochure – Paseo Patrimonial – which highlights aspects of its German past, especially as seen in architectural style. I never did pick up the guide but did see a few of the buildings on the list.  If you were really motivated you could spend a day just focussed on this theme!

Still active is the Club Alemán on Calle San Francisco, complete with a restaurant.

Club Alemán – Deutscher Verein on San Francisco in Puerto Varas

My time in the town coincided with an annual celebration of things sweetly German – El Dia del Kuchen – on the first Saturday of February. I walked down to the town square after returning from my Volcano Osorno climb to find the scene below – hundreds of people gathered on a weekend afternoon around tables laden with German-style cakes just like the ones my mother used to make! Also flowing freely were German-style craft beers.

Puerto Varas town square – Dia del Kuchen

Another sign of Germanic influence on the town’s past was the church which is an important part of its skyline.  You can see it in the photo below, which I took from the north end of the shore walkway on a cloudy day.

I did get closer to the Roman Catholic church – the Iglesia Sagrado Corazón – and its three spires. Inspired by Marienkirche in Germany’s Black Forest region,  it is made of wood and is clad with tin sheeting that reminded me of similar construction that I saw in Punta Arenas, a Chilean town some 1300 kilometers south on the Strait of Magellan.

Puerto Varas – Iglesia Sagrado Corazón

A plague in the front foyer of the church notes the financial contribution of the German people to its renovation and maintenance.  The  church was built between 1915 and  1918 after the first one burned down.

An iconic Puerto Varas shot – unfortunately not one I thought of taking! – is taken from some distance to  the west and has the church in the foreground and the lake and Volcán Osorno in the background. Click here to see what I mean!  The telephoto lens compresses the scene nicely!

7. Visit Nearby Puerto Montt

Worth a day trip is a visit to Puerto Varas’ big sister of a city – if only to feel the contrast between its hustle and bustle and the laid back scene in Puerto Varas.  It is an inexpensive bus ride or a slightly more expensive trip by taxi.

An upcoming post will highlight some of what Puerto Montt has to see!

8. Hiking In The Nearby National Parks

Something I did not do was hiking on the Chilean side of the Andes, given that my focus was the trails in the mountains near Bariloche.  Not far from Puerto Varas is Vicente Pérez Rosales National Park.  The local trekking/climbing agency I used for my Volcan Osorno climb – Huella Andina Expeditions –   offers hikes of various lengths and difficulty in the park and elsewhere; so do a number of other agencies in town.  It might be worthwhile checking out the various options to see what is possible.

Let me know what you would add to the list!


Next Post: Climbing Volcán Osorno In Chile’s Lakes Region

Posted in Uncategorized | Leave a comment

Cycling Around Tasmania – Cradle Mountain to Zeehan

Previous Post: From Gowrie Park To Cradle Mountain

cradle-mountain-caravan-park-to-roseberry

Cradle Mountain Caravan Park to Rosebery

It had rained off and on during the night and the tent was wet as I tucked the fly and the inner tent into their separate bags.  With all my gear loaded, I cycled over to the Cradle Mountain Discovery Park kitchen/dining building for my usual breakfast – an oatmeal concoction and a couple of cups of coffee.  It was 7:45 – overcast but not raining.  I was hoping it stayed that way.

The Vale of Belvoir from my saddle on C132

The Vale of Belvoir from my saddle on C132

The first hour of the seventy-kilometer ride to Rosebery, my goal for the day, went along nicely. Even though I was now on A10 and heading down into the “wild” West Coast,  the terrain was still mostly flat and Monday morning traffic was very light.  It looked like I would be treated to a nice gentle downhill run until I got to that one last uphill before Rosebery that would have me coasting into town.

A10 – B28 junction

And then – it started raining! About fifteen minutes passed and I was cycling along when a vehicle – a pick-up truck – stopped.  The driver waited until I pulled up next to him and then told me to put my bike in the back and hop in!  I told him I was fine and that I’d just keep pedalling. I’m sure he thought I was nuts as he insisted yet again.

Up went the bike into the back with the side bags providing a bit of a cushion; into the cab I crawled, a bit wet.  Next to me was a beekeeper making his rounds of his various bee colonies. He was on his way back to Queenstown on B28 but when we got to the fork in the road he stayed on A10.

My “Hey, no need to go out of your way! You’ve already saved me forty kilometers of the road!”  was met with a “No worries – it’s just a couple extra” response.  I gathered that this was not the first time he had stopped to give a touring cyclist a hand. He figured he might as well eliminate the biggest hill of my day.  (You can see what looks like a little bump on the elevation chart at the start of this post!)  Our great conversation was over when he stopped at the top of that hill and turned back for B28.  Meanwhile, I got one fantastic ride down into Rosebery with my speedometer showing km/hr in the mid-50s.  My clothes were nicely air-dried by the time I got to the bottom!

As the photo below of that hilltop shows the rain had also stopped and the sun was breaking through! It would stay nice for the rest of the morning and afternoon.

the top of the hill before Roseberry

the top of the hill before Rosebery

It was about 11:30 when I coasted down Rosebery’s main street (the A10!).  The Rosebery Bakehouse is just a couple of storefronts up from the IGA and that is where I leaned my loaded bike against the front while I went inside for lunch.  A veggie sandwich and a cup of coffee – and wi-fi!  Given my easy morning, I had decided that I would push on to Zeehan, another thirty kilometers down the road. I checked Tripadvisor for a place to stay and came up with the Hotel Cecil.  The server was kind enough to phone ahead for me to confirm room availability – so all was set!

Main Street Roseberry, Tasmania

Main Street Rosebery, Tasmania

After lunch,  I walked across the street to the mine exhibit.  it was a gold discovery in the 1890s that started this town with a current population of 900; eventually, zinc became the primary metal to be extracted and the mine is still open these days. Having grown up in a mining town in northern Canada it was easy to relate to Rosebery’s history.  The sight of the mine mill across from the exhibit brought back memories of Noranda’s Horne Mine mill that I had worked in during my four-month summers off from school during my university years. It paid the bills for the next year of school and accommodation!

Roseberry mining display across Main Street from the IGA.jpg

Rosebery mining display across Main Street from the IGA.jpg

Roseberry mine mill on the side of main street

Rosebery Mine mill on the side of the main street

cradle-mountain-caravan-park-to-roseberry

Cradle Mountain to Rosebery

As the elevation graph shows, the ride from Rosebery to Zeehan only has one significant hill and even it only involves a rise of about 120 meters.  Also, note a negative feature of the Google Map – generated graphs – it always uses the same distance from the lowest to highest point of the ride.  The 933 meters on the left graph should really be three times as high as the 334 on the right!

The road was all but empty; I saw perhaps five cars during the hour and a half that I spent cycling to the Hotel Cecil.

a nice bit of downhill road from Roseberry to Zeehan.jpg

a nice bit of downhill road from Rosebery to Zeehan

And then – Zeehan. Another mining town with a population of less than a thousand (728 is the most recent count). It was founded a decade before Rosebery up the road and was built on a silver discovery.  It reminded me of Dawson City (current pop. 1200)  in the Yukon and the center of the 1890’s Klondike Gold Rush.  In both cases, grand buildings on the main street provide evidence of a time when these towns were riding high.

I came off the A10 and headed down the main street to that red location marker you see on the map below – Hotel Cecil and Maud’s Restaurant.  The owner – a welcoming Filipino woman – was also the cook and she would later prepare an excellent vegan-friendly noodles & veggies lunch for me.

My room was up on the second floor.  During the afternoon I kept my bike locked outside but I did haul it up to my room overnight for total peace of mind.  The hotel has seen better days and needs work but at $50. Aus the room was totally acceptable. The original plan had been to stop at Rosebery and tent there. Given the rain that moved back in overnight I would have had other worries!

zeehan-tasmania-cecil-hotel-and-heritage-center_

Zeehan - Cecil Hotel lobby and a corner of the dining room.jpg

Zeehan – Cecil Hotel lobby and a corner of the dining room

my-room-at-the-hotel-cecil-in-zeehan

Zeehan - West Coast Heritge CentreNot far from the Hotel Cecil is the old downtown area, the core of which makes up  The West Coast Heritage Centre, a commendable community project to revitalize the town.

An admission ticket lets you wander through the various buildings and get a feel for what Zeehan would have been in its heyday when it had a population of 10,000.

The promo above has a list of the various attractions.  My two-hour visit began with a ticket purchase in the Zeehan School of Mines and Metallurgy building on the very right of the image below. It was the conversion of this former school into the West Coast Pioneers’ Memorial Museum in the mid-1960s that was the first step towards the multi-building Heritage Centre that exists today.

With my ticket, I accessed the other buildings and outdoor exhibits in sequence.

Zeehan's Heritage Centre on Main Street

Zeehan’s Heritage Centre on Main Street

The grandest building of all is the Gaiety Theatre; at one time its seating for 1000 made it the largest theatre in Tasmania.  Given that Zeehan was then the third largest town on the island, the seats got filled!

Zeehan's architecture heritage buildings on Main Street

Zeehan’s architectural heritage buildings on Main Street

zeehans-gaiety-theatre-with-seating-for-a-thousand

Zeehan’s Gaiety Theatre – with seating for a thousand!

Zeehan Gaiety Theatre info board.jpg

Zeehan Gaiety Theatre info board.jpg

Zeehan’s Gaiety Theatre – the entrance hall – looking back at the entrance door

zeehan-gaiety-theatre-hallway-to-main-entrance

Zeehan Gaiety Theatre – hallway to the main entrance

Unfortunately, few mining towns are exempt from the boom and bust cycle. Locals still hope for an upturn in the town’s luck – an increase in metal prices, new investment, a new discovery…and another boom.

zeehan-gaiety-theatre-poster-1904-05

Zeehan Gaiety Theatre - poster 1899

the Zeehan courthouse

Zeehan’s Masonic Lodge

the centerpiece of Zeehan’s Masonic Lodge

I headed back to Hotel Cecil and had a cup of coffee with the free wi-fi.  Later that evening, I was back at the hotel’s restaurant for a second helping of fried noodles and veggies. During the night intermittent rain fell; if it continued it would make the next morning’s 43-kilometer ride a wet one.

zeehans-gaietry-theatre-and-post-office

Zeehan’s Gaiety Theatre, Police Station,  and Post Office on Main Street

Next Post: From Zeehan To Queenstown via Strahan

Cycling Around Tasmania – Zeehan To Queenstown Via Strahan


Posted in bicycle touring, Tasmania | Tagged , , , , , , | Leave a comment

Climbing Volcán Osorno In Chile’s Lakes Region

Table of Contents:

—————-

Volcán Osorno – Basic Background

Each year about 600 climbers summit this glacier-capped stratovolcano (8701’/2652m) at the southeast end of Lago Llanquihue. On a clear summer morning, the reward is an incredible panoramic view of a slice of the Chilean Lakes District (X Región de Los Lagos). 

  • Down below is the lake, Lago Llanquihue, Chile’s second-largest.
  • To the southwest sits Volcán Calbuco;
  • Lago Todos Los Santos stretches some thirty kilometers from Petrohué to Peulla and the border with Argentina to the southeast.

Osorno’s last eruption was in 1869; another half-dozen have been recorded going back to the 1600s, including one witnessed by Charles Darwin, who was nearby on the HMS Beagle in 1835!

Petrohue docks and Volcan Osorno

a view of Volcán Osorno and Petrohué docks from Lago Todos Los Santos

—————-

Why Go?

  • easily accessed;
  • an excellent Refugio at the trailhead
  • great panoramic view on a clear day;
  • fairly challenging hike up a scree trail leading to some glacier traverse
  • and a bit of 60º ice climbing to get to the top
  • you can leave Puerto Varas in the early evening, sleep at the Refugio, do the climb, and be back in Puerto Varas at three the next afternoon!

—————-

When To Go:

Primetime climbing is during the summer months of December, January and February, though people climb it year-round.

—————-

What You Need:

  • A CONAF permit
  • Mountaineering boots and crampons
  • Harness
  • Climbing rope
  • Ice axe
  • Helmet
  • Waterproof gloves
  • Trekking poles – optional

—————-

How To Do The Climb 

On your own – bus from Puerto Varas to Ensenada at the east end of the lake and then hitchhike or walk up to the Refugio Teski Club.   The road is paved all the way up to the Refugio which sits at 1300m. and was built in its present location after the previous hut was destroyed in the Great Chile Earthquake of 1960.

With a guide – as a solo traveller and novice climber, my choice!

a view of Volcán Osorno from Lagp Todos Los Santos

—————-

Puerto Varas – The Starting Point

I arrived in Puerto Varas on a Thursday afternoon, a bit tired. Having left Toronto at 11:00 p.m. the day before,  I had missed a night’s sleep as I flew to Santiago and another one thousand kilometers south of Puerto Montt. A $20. cab ride from the airport and I was at the Hostel Melmac Patagonia in the room that would be mine for three nights until my Sunday morning departure for Bariloche.

After a  walk down the stairs from the hostel to the downtown area and to the shore of Lago Llanquihue, I  saw the two cloud-draped peaks in the distance. In the panorama shot below, the 2652-meter volcano on the left side is Osorno; on the right side of the image is Volcán Calbuco, somewhat lower at 2000 meters and missing the snow cap since its recent eruption in 2015.

Volcánes Osorno and Calbuco to the east from Puerto Varas

—————-

Osorno or Calbuco – Which One To Do?

I hoped to start my Chile/Argentina hiking & climbing trip with an ascent of one of them. But which one? I needed to find a local guiding agency to help me make up my mind and then provide a guide who would take me up!

In the evening, I started a flurry of emails with Huella Andina Expeditions (HAE), a local mountaineering agency with a 5-on-5 -star rating on Trip Advisor. It is family-run and has been in operation since 2009.

This email the next morning (Friday) helped me make up my mind –

To Osorno – The regular program starts today at 7:30 p.m. driving to the Teski hut.  There we eat, prepare equipment, and start the climb at 5 a.m.  We do not use the chairlift because it starts running at 10-11 a.m., so all the way is by foot.
To Calbuco – We start the regular program at 5 a.m. from Puerto Varas, and we arrive with the car at the beginning of the trail at an altitude of 500m.
In numbers: Osorno and Calbuco are both 1,500m of elevation gain and approximately 7 km to walk (one way).
The main difference between them is the character of the climb. While Osorno is a glacier climb, Calbuco because of last eruption is a “rock climb”: basically volcanic scree and to crawl / climb over some boulders in 2 sectors of the ascent: a ridge in the middle of the climb and a 30m climb to arrive to the summit.

Calbuco in the foreground; Osorno behind (with route indicated in orange)

I ended up choosing Osorno. Even though it is 600 meters higher than Calbuco, the 7-kilometer distance covered is actually the same and in some ways, Osorno is an easier climb. Also, a client was already booked for Osorno, which made it cheaper to do than the Calbuco climb with me as the sole client.

—————-

Huella Andina Expeditions (HAE)

click on image to access Huella Andina website

Spoiler Alert!

Huella Andina Expeditions is totally deserving of its 5-star rating on TripAdvisor.

  • Excellent initial communication via email to set the trip up,
  • easy online payment,
  • pickup at my hostel door,
  • accommodation,
  • supper, and breakfast at the Refugio Teski included in the price,
  • first-quality equipment (helmet, ice axe, crampons, harness, waterproof and insulated  gloves),
  • professional guiding by a very competent José Miguel Potthoff Pugin who also turned out to be totally simpatico – a nice guy to spend a day with. The fact that he is fluently trilingual – Spanish, German, English – made communication clear and precise.

I am embarrassed to admit that I initially hesitated at the $280. U.S. price. Given the all-inclusive nature of the package, given the technical nature of the top part of the climb … well, there is a reason why you need to register at the the CONAF hut at the trailhead ! I like that Huella Andina was confident enough in their service that they never offered to lower the price to get me interested!

The Normal Route from the Refugio Teski

—————-

Off To Refugio Teski For Supper & Bed

José picked me up at about 6:00 p.m. at the Hostel Melmac Patagonia (another service deserving of its. 4.5/5 star rating!). Already in the vehicle was Sarah, an Aussie adventurer who had just recently been climbing volcanoes in Ecuador. We drove along the south shore of Lago Llanquihue to Ensenada and then headed north on U-99 until we got to the turn-off for V-555. This paved road would take us through lush forest terrain until we came to a series of switchbacks that would take us up steeply to Refugio Teski Club, our base camp for the next day.

You can see the last bit of the road in the Google satellite image above. The road goes as far as the CONAF (Corporación Nacional Forestal)  building just behind the refugio.  We would drop in there first; José took care of all the mandatory registration details, and I stepped outside to snap my first photos of the side of Osorno!

early evening at the CONAF center on Volcán Osorno

Behind the CONAF building is a volcanic ash road that goes further to a restaurant. Osorno’s top was covered in clouds; I hoped for a clear morning view when we got to the top!

the Osorno trailhead to the right of the CONAF building

We drove back the 120 meters to the Refugio Teski Club. Behind and above the Refugio are a bunch of other buildings – the Osorno Ski /Ski lift Centre. In the summer, the ski lifts take sightseers up to an elevation of 1670 meters for some fine views. We would only see the ski centre complex the following day after sunrise when we looked down at where we had come from in the dark!

Google satellite image

The Refugio justifiably gets rave reviews for its magical sunset view of the Lago below. It is about 43 kilometres from the hut’s restaurant to Puerto Varas, and apparently, you can see all the way back on a clear morning. Evening cloud, haze, and dusk meant we had to be content with dramatic streaks of red on the horizon as the day ended!

the Refugio Teski Club and Lago Llanquihue

the dusk view from the Refugio Teski Club on Osorno

Refugio Teski on Osorno – restaurant area

By 9:30 or 10 – after a dinner that arrived soon after we did, thanks to José (I think) phoning ahead the order – it was lights out, and we all crawled into our sleeping bags. We were perhaps the only guests at the Refugio that night, so we each got a room of our own.

When it is busier,  up to four people are bunked in those same rooms! At 4 a.m., we were up for our day’s adventure. I had slept fitfully – in fact, since I had left Toronto three nights before, I had gotten less than half of my regular snooze time! I would be dragging my butt a bit this morning – and it would mean I would get lots of great shots of my two fellow mountaineers ahead of me!

—————-

Walking Up Osorno’s  Slopes

six a.m. on the slopes of Osorno

looking down from the slopes of Osorno at 6 a.m.

Instead of my usual Sony A77 and an assortment of lenses, I decided on this three-week trip to go very light. Left at home was all the fancy camera gear. Along for the ride was my Fuji X20, a camera I love to shoot with, knowing full well that it is just not in the same league as my “better” cameras. Instead of the 420 sq. mm. of an APS-C size sensor, it has one that is perhaps 1/8th the size! The low light and high iso performance are not the greatest. On the plus side, the X20 has a sensor twice the size of an iPhone or p&s camera and an excellent 28-112 zoom lens.   It weighs twelve ounces/350 grams, and I am glad I decided to take it instead of the usual 3 kilograms. The 12-megapixel raw files I came home with were acceptable, given that none would be turned into billboards!

It took me a while to figure out exactly where to put the camera. On this first trip, I had it tucked inside my jacket. I would later come up with a much better system – I nestled it between the back of my neck and the top of my pack and was able to access it very quickly as I walked along the trails!

moving up Osorno  scree slope to the glacier-capped top

—————-

Shifting Into Mountaineering Mode

With the putting on of the technical gear – the harness, the crampons, the helmet – the day’s hike became a mountaineering trip. One trekking pole was collapsed and put away, replaced with an ice axe. My light gloves – inadequate for a sustained stretch of hands-on ice climbing – had been replaced by José with a more substantial pair. (I am happy he noticed. I would have had some seriously cold – frozen? – hands! What was I thinking?)

putting on the crampons on Osorno

view of Osorno and Lago Llanquihue

Once the trip got more serious –  maintaining a tightness on the rope, taking care of where and how I stepped, watching the climber ahead of me – the photos mostly stopped. A couple of times, when we took a brief rest, we would snap a few shots – but that would be it until we got to the very top. So – the forty minutes of 60º ice and snow slope that we kick-stepped our way up – no photos! See the end of the post for a Youtube video of a climber who attached a GoPro to his helmet during the ice climb section. It will give you a good idea of what it was like!

a photo stop just before the final ice climb to the top of Osorno

Jose and my climbing partner before the final scamper up the ice/snow slope of Osorno

——————-

Osorno Summit On A Cloudy Day

view east from Osorno summit

And finally – the top! High fives all around and a few photos! Then it was time for a quick snack as we stood in the clouds. I pulled out my orange Goretex jacket and slipped it over the other two jackets I was already wearing – it was a bit windy as we stood up there. As the following pix will show, we had an obscured view that morning! José mentioned that on a clear sunny day, we would have lounged up there for up to an hour enjoying better views. Instead, we were on our way back down after twenty!

break time at the top of Osorno

a view of the way back down Osorno from the top

The hike to the glacier’s edge is doable by anybody and we did meet a few people on our way back to the Refugio who were doing that. However, there is a reason why only 600 people summit Osorno each year.    – once you are on the glacier and, even more, when you are faced with the final 60º  ice and snow climb to the top, it is an entirely different situation. You are now in the realm of mountaineering, lack of necessary gear and experience up there as the weather suddenly changes for the worse, and the results could be fatal.

the view west towards Lago Llanquihue – 9:30 a.m.

More cautious kick-stepping as we made our way down the steep part of the volcano cone. Already I was beginning to feel my quads and calves tighten up. The stress of keeping the muscles tight and engaged would mean that the last few kilometers of the walk back to the Refugio Teski would be a bit painful.

——————-

Back To The Refugio Teski

It took less than an hour to get back to the edge of the glacier, where we took off all the technical climbing gear and packed it away. We were at the 2000-meter level; still to go was the 700-meter descent to the Refugio and a cup of coffee!

back down at the bottom of the glacier – Osorno suit in the clouds

our pile of technical gear getting put away on Osorno

my gear on top of my pack on Osorno slopes

Thanks to the tightness in my legs, I got a few nice shots of the other two as they motored on down ahead of me! Since it was still dark when we had walked up this stretch, it was neat to see it now in daylight – and as the clouds swirled around, they added a bit of drama to the scene.

the scree path back down to the Refugio Teski

Somewhere along the way, I noticed the plaque below; it was a reminder that there is always an element of risk involved when you set off for a mountain top. No details were given, but you wonder – avalanche? Crevasse? Rockfall?

memorial plaque for two climbers who lost their lives on the slopes of Osorno in 1981

the faint outline of a path as we descend Osorno scree slopes

the last bit back to the Refugio Teski on Osorno

With the Refugio in sight, I told José and Sarah not to wait for me while I descended at a somewhat slower speed! They stopped every once in a while on our descent from the edge of the glacier so I could catch up.

two happy climbers at the end of our Osorno summit

a view of the buildings on Osorno – including the Refugio Teski

At the Refugio, more high fives and that feeling of elation of having succeeded! We went through our gear and made sure that José got back all the stuff he had lent us. I sipped a cup of coffee and did leg stretches to counter the tightness. Then – the ride back to Puerto Varas and my hostel, a shower, and then a quick lunch with my climbing partner at Masala Chai, the nearby vegetarian restaurant.

——————-

A Sunday Afternoon In Puerto Varas

Puerto Varas town square – Dia del Kuchen

It was late afternoon when I wandered down from the Hostel Melmac into the image you see above.   It was Dia del Kuchen in Puerto Varas!  I knew all about kuchen (it means cake in German) thanks to my mother, who was born near Hanover – and here were the townsfolk celebrating at least one part of their cultural heritage!

I still had an evening to spend in town before my early morning departure for Bariloche across the border. I had already bought my Cruce Andino ticket before setting off for Osorno. My quads and calves were looking forward to a day of rest on the series of buses and boats that would get me to Bariloche!

El Dia de Torte in Puerto Varas – the cake giveaway.

——————-

Additional Info:

I brought my Spot Connect (no longer available) to record a GPS track of the route, but for some reason, the device would not work, and 5:00 a.m. with two waiting climbing partners was not the right time to fiddle around with it – so no tracks! It may have been a battery issue – the device has always been reliable. It was working a few days later!

————

Wikiloc GPX Track

Wikiloc users have uploaded GPS tracks of the Osorno climb. This one by Claudio Riveros P titled “Ascensión Cumbre Volcán Osorno” comes closest (I think!) to the route we took to the summit. Just click on the image to access –

————

Youtube Videos of the Osorno Climb

The Youtube video below captures the feeling of the ice climb to the top.  Also check out some of the other short Youtube videos of the Osorno climb.

——————-

Next Post: By Bus And Boat Through The Andes – The Cruce Andino

By Boat And Bus through The Andes – The Cruce Andino


Posted in Chile, hiking/trekking, mountaineering, Uncategorized | Tagged , , , , , | 4 Comments

Bariloche – Argentina’s Outdoor Playground Capital

Table of Contents:

Where is Bariloche? Overview Map and Distances

So – what is there to see in Bariloche?

More Bariloche Area Things To Do  – Trekking-Related

Previous Post: By Boat And Bus Through the Andes – The Cruce Andino

By Boat And Bus through The Andes – The Cruce Andino

————–

Where is Bariloche? Map and Distances

San Carlos de Bariloche – to use its full and official name – is a city of about 113,000 in Argentina’s Lakes District on the east side of the Andes mountain range. Located on the south shore of Lago Nahuel Huapi,  it is the administrative center of Argentina’s oldest national park. Travellers intent on an extended visit to the country will probably pass through it at some time during their journey.

I came to it on the plush but over-priced Cruce Andino from Puerto Varas in Region X (Región de Los Lagos)  on the Chilean side, which also has the same combination of stunning lakes and mountain peaks to dazzle travellers.

The map above shows the more common trajectories – and the significant travel time involved to get there from Buenos Aires or Ushuaia, especially if you take the bus to save some pesos!

————–

So – what is there to see in Bariloche?

The main reason is not for the town itself but for what it is close to.  In the winter months (July-October) it becomes South America’s skiing and snowboarding capital, thanks to the trails – groomed and off – at nearby Cerro Catedral, twenty kilometers to the west. In the summer months (December-April)  those same trails and a series of mountain huts – mostly owned and maintained by the Club Andino de Bariloche – become a mecca for hikers and rock climbers.

During my visit, I spent about ten days hiking those trails. Before, between, and after my hikes, I got to know at least the downtown area of Bariloche. What follows is my list of things worth checking out in the time you spend in Bariloche –

  1. the Centro Civico (town square)
  2. Avenida Mitre (the pedestrian mall)
  3. the chocolate shops
  4. Catedral Nuestra Señora del Nahuel Huapi
  5. the Nahuel Huapi waterfront beaches
  6. the artisanal beer district

downtown Bariloche – a compact area to explore

————–

1. The Centro Civico (Town Square)

The Bariloche town square faces the Lago on its north side and is flanked by a museum, an arch gateway to Avenida Mitre,  municipal government and police buildings and a hotel on the other sides.  Noteworthy in its absence is the religious component – the church!  The square is about seventy years old. It may be that by this time the hold of institutional religion was waning in Argentina.  The cathedral was built around the same time but a few hundred meters away.

Bariloche – panorama del Centro Civico

During the day some St. Bernard Mountain Dogs are on the square, ready for what seems to be an Argentinian custom of getting your photo taken with one of them!  This custom – along with architecture and skiing and the obsession with chocolate and beer –  is just one of the many reminders of the Swiss and German roots of the town.

St. Bernard Mountain Dog posing with turistas at El Centro Civico

As busy as the square is during the day, it takes on a more charming look at night thanks to the lit-up buildings and the buskers entertaining the tourists and passing their hats in hopes of a donation.

towards el Centro Civico at dusk

el Centro Civico de Bariloche at night

At the center of the square is a statue of a horse and rider. It is the hero of standard Argentine history – General Julio Roca, Minister of War and long-serving President of the country.   150 years ago he was responsible for dealing decisively with an uprising of the indigenous people known as the Mapuche whose area this was before the Europeans arrived. (The very name Nahuel Huapi apparently means “island of the tiger” in their language.)  Roca’s strategy was summarized as “extinguish, subdue or expel”.  On the front of the horse, I noticed some graffiti –  someone had recently scrawled the term “genocide”.

————–

2. Avenida Mitre (the pedestrian mall)

From the town square, a walk through the arch below takes you east to the pedestrian mall made up of five or six blocks of Avenida Mitre.  I must have strolled up or down this totally tourist stretch of shops a half-dozen times during my stay. Many of the major sports labels have a presence here; if it isn’t their own outlet then it is in the display windows of other shops. Patagonia, North Face, Salomon…you get the idea!

the east end of Calle Mitre in Bariloche at dusk

street musicians at dusk on Mitre in Bariloche

I was surprised to see that the city had decided that February – prime summer tourist season – was the best time to rip up two blocks of the street and do whatever it is that needs to be done. Then again, the same thing seems to happen in my hometown – so perhaps town bureaucrats the world over are just on the same wavelength!

infrastructure work on Mitre, Bariloche’s pedestrian mall – not a pretty sight!

A Germanic touch on a not-so-charming part of Avenida Mitre in Bariloche

a block of Mitre in Bariloche

3. The Chocolate Shops

Of all the towns I have visited in Patagonia – from Punta Arenas on up to San Martin de Los Andes – Bariloche is one of the largest ones. It is also the one most clearly dependent on the tourism industry with shop after shop selling stuff that is clearly not meant for locals.

There is a chocolate shop like Mamuschka on every block of Avenida Mitre. They all have enticing window displays and promise choco-fueled ecstasy to those who enter.  As a strict vegetarian – i.e. vegan – I never did step inside though it would have been interesting to see if they bother catering to potential customers looking for non-dairy versions of their products!

The window display below – not chocolate – did catch my eye for another reason. It looks to me like Ojibwe dream catchers – a cultural artifact from the boreal forests of the Canadian Shield.  I had also seen them in store windows in Puerto Varas and in the window of the kitchen hut at Refugio Frey.  These were certainly more gaudy and tacky than the ones I have seen back home. Each time I was left wondering – What is this doing here? Perhaps the inherent poetry of the artifact helps explain why it has become a part of global culture?   If you know what’s going on – a comment would be appreciated!

Ojibwe dream catchers reinterpreted in Bariloche

street art on a wall off Avenida Moreno

another chocolate shop window

Stepping into a rather plain-looking front entrance I had a WOW moment as I walked into the Galaria del Sol on Mitre.  the atrium has an almost cathedral-like look; the wood beams and glass make for a striking combination.  Shops surround the dramatic middle space on two levels.

Galeria del Sol on Mitre in Bariloche

————–

4. Catedral Nuestra Señora del Nahuel Huapi

On the east end of the downtown area and one street closer to the water – is the neogothic-style Catedral Nuestra Señora del Nahuel Huapi. Built in the early 1940s,  it is the powerful statement of the Catholic Church’s presence that I missed seeing on one of the sides of the Centro Civico.

Bariloche catedral interior

While I did see a few petitioners during my visit, I wondered about the fervour of Argentinians for the Church and for traditional religion even with one of their own as the current Pope.

As is custom, the cathedral’s front door is on the west side and the altar and apse at the east end.  It is the grandest church that I have seen in Patagonia on either the Argentine or Chilean side.

————–

5. the Nahuel Huapi Waterfront Beaches

Bariloche is strangely cut off from the shore of Lago Nahuel Huapi.  The very busy Avenida Bustillo/Roca/12 de Octubre goes right across town from west to east along the shore.  I walked to the west end of Avenida San Martin, crossed the road and made my way to the water. Over the 45 minutes, I walked 1.2 kilometers from the left side of the map to the swimming pool on the east side before heading up to the cathedral.

green marker in the map center is El Centro Civico

Bariloche properties lining the beachfront

vamos a la playa – Bariloche

wooden statues on the shore of the Lago

promenade – Bariloche lakefront

Stretches of the waterfront are fairly derelict and the swimming pool pictured below has definitely seen better years.  It was summertime;  the pool should have been packed with people in one stunning setting.  Given the year-round tax dollars generated by tourism in the city,  the pool should not look like this!

the Bariloche swimming pool

————–

Bariloche’s Vegetarian Restaurants

One street above Avenida Mitre is the main shopping street of the city. West of Morales it is named San Martin; to the east it becomes Moreno.  This street has banks, many hotels, and several restaurants.  I had chosen my hostel on Juramento – Hostel 41 Below – because it offers a vegetarian/vegan supper. It is located one street above Avenida San Martin.

On my first morning in Bariloche, I also discovered my first vegetarian restaurant in Patagonia! Between my hostel and Ren, all my food needs were (deliciously) met!  East of Morales I later found another Ren restaurant!  Perhaps the fact that Bariloche is not only a major tourist center but also a university town explains this openness to vegetarian food choices?

Ren on Avenida San Martin – la cocina vegetariana en Bariloche

The presence of a woman who seemed to be the boss and who looked Chinese made me think of a possible explanation of the restaurant’s name.  One of the Five Confucian Virtues is Ren (Jen).  After my first visit, I googled Wikipedia for more info. The next afternoon I asked one of the servers why the restaurant was named as it is and she confirmed my guess by noting some of the points in the Wiki quote below! What a great name for a vegetarian restaurant!

Jen (pronounced “ren”) is translated into English as “humanity” or “humaneness.” It is the highest Confucian principle. People cultivated by it are humane individuals who exhibit benevolence and care toward others.

————–

7. El Districto de Cerveca Artesanal

My hostel was a five-minute walk from Ren.  It was also in el districto de cerveca artesanal. If you were to walk up Juramento during the day you would not know this!  The pubs are closed and cars line the street.  See below for the daytime look!

Avenida Juramento during the day

Hostel 41 Below on Avenida Juramento in Bariloche – view from across the street

However, come back at dusk – and on the weekend –  and it is a different scene! On the Sunday night that I arrived on Juramento, I stood at the bottom of the steps to my hostel and looked back down the street. It looks pretty deserted, right!

Calle Juramento looking west from my hostel front steps

Down below was the scene looking in the other direction!  I had walked into a street party with customers from the three pubs on the street sitting at tables on the street or just standing and taking in the music.

dos astronautas coverAnd what music! The amplified instruments put out a dreamy guitar-based rock sound – echoes of Pink Floyd guitar filtered through U2 and Coldplay. I became an instant fan!  (Back home I downloaded their Campamento CD from  iTunes.)


Dos Astronautas on Calle Juramento on my Sunday night arrival

The band’s name – as Konna’s signboard says – is Dos Astronautas. I dropped off my duffel bag in my room, had some leftover supper that the staff put together for me, and headed back out to the street for the music and an incredible updated hippy vibe that reminded me of evenings on Yorkville Avenue in Toronto in the late 1960s!

Here is a YouTube sample of the Dos Astronautas sound. Appropriately the band is playing in the town square in Bariloche.  All that is missing is some nighttime atmosphere.

Dos Astronautas on Juramento in the Beer District Bariloche

Just beyond the Konna Bar and the Dublin Bar is Los Vikingos Pub and across the street is a Mexican restaurant.  Around the corner were a couple more pubs and another band playing!   I walked around the neighbourhood with my Fuji x20 on my first evening in Bariloche certain that I had stumbled into a little magical corner of the universe!

Los Vikingos Pub – Juramento/20 de Febrero

El Mexicano on Morales across from Juramento

————–

More Bariloche-Area Things To Do 

Well, there you have it! Bariloche through the eyes of a 65-year-old first-time visitor whose Spanish language skills are pretty basic!  Maybe your Bariloche includes more beer and more hanging out at the various clubs that only open around ten or eleven?  By then I was probably dreaming about the next morning’s bus ride to the trailhead of my next hike!  Click on any of the following post links to see why I call it Base Camp Bariloche!

1. Base Camp Bariloche & The Hiking Trails of Northern Patagonia 

Base Camp Bariloche & The Hiking Trails of Northern Patagonia

————–

2. The Nahuel Huapi Traverse – Day-By-Day With Pix, Maps & Route Info

Day 1: Villa Catedral To Refugio Frey

Patagonia’s Nahuel Huapi Traverse – Day 1 (Cerro Catedral to Refugio Frey)


Day 2: Refugio Frey To San Martin (Jakob)

Patagonia’s Nahuel Huapi Traverse: Day 2 – Refugio Frey to Refugio San Martin/ Laguna Jakob

Day 3: Laguna Jakob to Laguna Negra

Patagonia’s Nahuel Huapi Traverse – Day 3 (Laguna Jakob to Laguna Negra)

Day 4 (Laguna Negra to Refugio Lopez)

Patagonia’s Nahuel Huapi Traverse – Day 4 (Laguna Negra to Refugio Lopez)

Day 5 (Refugio Lopez to Bariloche)

Patagonia’s Nahuel Huapi Traverse – Day 5 (Refugio Lopez to Bariloche)

————–

3. The Hike To Refugio Otto Meiling – Getting Closer To Cerro Tronador

The Hike To Refugio Otto Meiling – Getting Close To Cerro Tronador

Posted in Argentina, Easy Travelling | Tagged , , , , , , , , , , , , , | 6 Comments

By Boat And Bus through The Andes – The Cruce Andino

Table of Contents:

Is The Ride Worth It?

————

Travelling  from Puerto Varas, Chile to Bariloche, Argentina

The Bus Option:

I had a choice to make.  The  Andesmar bus takes seven to eight hours and the price is a reasonable 22,000 to 27,000 Chileno Pesos. (i.e. 33 to 41 US dollars.)  Get a seat on the right-hand side of the bus and some nice views may be had!

puerto-varas-bariloche-bus-route1

The Cruce Andino Option

However, there is another option.  It is:

  • much shorter in terms of distance covered
  • but takes an extra five hours and
  • costs seven times as much!

That’s the one I took!

————

Climbing Volcan Osorno The Day Before 

I bought my ticket at the Turis Tours office in Puerto Varas on a Friday afternoon, a couple of days before my Sunday departure.  A few hours later I headed for the Refugio Teski on the side of Volcan Osorno for the start of a climb of the volcano that I had arranged with Huella Andino Expeditions.  

Climbing Volcán Osorno In Chile’s Lakes Region

Now it was Sunday morning and while the climb had been a great success, my calves and quads had seized up and I could barely bend my legs as I carried my duffel down to the pick-up point by the Turis office!  A day of passive boat and bus riding would do my legs good!

In the satellite image below you can see the snow-covered peak of  Volcan Osorno (2652 m or 87o1′) on the east side of Lago Llanquihue.  It and Volcan Calbuco (2015 m or 6572′) are the two striking peaks you can see from Puerto Varas, with Calbuco no longer having its snow top thanks to a recent eruption in 2015.

When I first got to Puerto Varas I stood on the shore of the lake and got a shot of the two cloud-covered peaks.  Osorno, the one on the left,  is 47 kilometers away while Calbuco to the south-west is 31 kilometers distant.

Volcans Osorno and Calbuco to the east from Puerto Varas shore

————

The Cruce Andino – The Trip’s 7 Segments

Known as the Cruce Andino the trip is a combination of bus and boat that takes you over water and back roads travelled by few.   On a clear and sunny day the views as you cross, for example,  Lago Todos Los Santos are fantastic.  And thanks to the $280. U.S. cost it is a journey that few can justify!  I had read the reviews (see TripAdvisor here and here) and they were mostly very positive.  Excellent weather was forecast for the day I wanted to go so I decided to splurge.  Read on – and check out the pix I took – to find out if it was worth it!

The map below shows the Cruce Andino route from Puerto Varas.   It is made up of the following bus and boat segments –

  1. Puerto Varas to Petrohué – 65 km. by bus along the south shore of Lago Llanquihue
  2. Petrohué to Peulla – 35 km. by boat across Lago Todos Los Santos
  3. Peulla to Puerto Frias – 26 km. by bus across the border and over Paso Perez Rosales
  4. Puerto Frias to Puerto Alegre – 4 km. by boat across Laguna Frias
  5. Puerto Alegre to Puerto Blest – a 3 km. bus ride
  6. Puerto Blest to Puerto Pañuelo – 25 km. by boat across Lago Nahuel Huapi
  7. Puerto Pañuelo to various hotels in Bariloche – 18 km. by bus

Three boat rides and four bus rides – that alone would help explain some of the additional expense. Instead of one person putting my luggage into the bus in Puerto Varas and taking it out in Bariloche, there would be at least a dozen Turis staff along the way handling the bag and making sure it got there.  They have the routine down; everyone’s luggage made it!

————

1. Puerto Varas to Petrohué By Bus (65 km.)

Our Cruce Andino tour bus left at 8:30 and took me back along the road to Osorno.  On the way we stopped at a couple of spots for photos;  the two below are the ones I got from the side of the road of the two volcanoes.

Volcan Osorno from the road to Petrohué

Osorno

It is a 65-kilometer ride to Petrohué and the first boat. The elevation along the lakeshore is about 65 meters; by the time we got to Petrohué, we were at 195.  The 130 meter gain in altitude? Well, that would be the Saltos del Rio Petrohué – the Petrohué Falls – a scenic drop in the river as it makes its way south to the Pacific Ocean.

Google satellite view – Puerto Montt to Bariloche

We stopped there for perhaps 45 minutes and walked through the building pictured below to access the trail to the falls themselves.  I walked up to a line-up – and yet one more expense –  a ticket to see the falls!  Noticing another tour group just walking right through the entrance, I ended up just joining them instead of waiting for my chance to buy a ticket.  Given what Turis is charging,  this additional ding is annoying.  Entrance to the falls should be included in the $280.! How is that for rationalizing my action?

gift shop/snack bar/entrance ticket sales

As for the falls, While I have paddled up to and portaged around many more dramatic ones on my canoe trips, what makes the Saltos distinctive is the backdrop of Volcan Osorno to the north.  It was especially neat to look at the volcano and think that twenty-four hours before I had stood on top!

first view of the Rio Petrohué waterfalls

the view from Petrohué Falls to Volcán Osorno

While it seems like the volcano is fairly close, it is actually about eight kilometers from the falls to the top of the volcano.  Its looming presence is one of the highlights of the day’s journey and we would see it from various angles as the hours passed.

my fellow travellers getting their own copy of the above shot!

the mirador at Salta de Rio Petrohué

panorama of the Petrohué Falls Area

Our photo taking done, it was back to the buses for the last bit of the ride up to Petrohué. Returning to the parking lot a bit early, I did not see our bus anywhere. My sense of panic led to a brief conversation with a bus driver who told me that my Turis bus had just taken the baggage to Petrohué and would be back soon to pick us up.  Whew! And then other people from the bus that I recognized started showing up and I knew I could relax!

back to the Turis Tour bus to finish the ride to Petrohué

————

2. Petrohué to Peulla – 35 km. by boat

My lack of patience is undoubtedly my worst trait!  This trip would give me many opportunities to practise the art of waiting without getting all stressed out.  Line-ups to get off the bus, on the bus, on the boat, off the boat – over and over all day! My camera did give me something else to focus on, as did potential conversations with my fellow passengers.

the line up to get on the boat at Petrohué

I felt a special connection with the bicycle tourists that I saw at the dock.  Months before my plan had been to join an organized bike tour of the region but I had waited too long to book a spot.  So I decided to go visit the Lakes region on both sides of the Andes anyway – but with a hiking instead of a cycling focus.

a bicycle tourist waiting to get on the boat at Petrohué

The boat ride across Lagos Todos Los Santos is one of the two long sections of the day spent on the water. The Google satellite image below captures the lake from the left (Petrohué)  to the right and east end (Peulla).  It took us about two hours to cover the about thirty-five kilometers.

The view of Osorno with Petrohué in the foreground was one of my favourites of the day.  It would pop up in most of my shots for the first hour or so!

Petrohué docks and Volcan Osorno

While I did have a window seat inside on the first deck I spent most of my time outside framing shots without any glass between my lens and the scene!  Also out there was an Austrian bicycle couple whom  I started chatting with about their trip. They were on their way to Bariloche and were going to bicycle the road parts. Their mountain bikes with 45mm tires were perfect for the gravel roads they would be dealing with until they got to Puerto Pañuelo a couple of days later.

on the boat deck on Lago Todos Los Santos

heading east on Lago Todos Los Santos

bikes on the rear deck of the Turis boat on Lago Todos Los Santos

————

3. Peulla to Puerto Frias by Bus

At about 1 p.m. we got to Peulla at the east end of Lago Todos Los Santos. This was to be our lunch stop before we hopped on to the bus for the twenty-six-kilometer bus ride through and over the Andes.

a shot from the Peulla docking area

looking back at our boat at the Peulla docking area

Peulla, Chile


From the docking area, it is a pleasant half-kilometer walk up to the Peulla Hotel. There is a shuttle bus for those who are not keen on walking or who want to get to the hotel and the restaurant faster. I walked along with the two Austrian cyclists for a bit and then it was time for them to push on.  They would have some altitude to gain before they stopped for the night at Puerto Frias on the Argentinian side.

a walk from the Peulla dock to the hotel and restaurant

two Austrian bike travellers from the boat

The Hotel Peulla is certainly in a nice location. Some travellers stretch the journey into two days by spending the rest of the day here and then continuing on Bariloche the next day. It gets mixed reviews from Trip Advisor contributors! (See here for the latest reviews.)

the Hotel Peulla – our lunchtime stop

Hotel Peulla dining room

The recommendation made by most guidebooks is to bring along a lunch from  Puerto Varas or Puerto Montt, given the cost of lunch – and its mediocre quality – at the hotel dining room. Being a vegan limits my food choices even more! I ended up walking back over the bridge to the take-out spot and checked out their menu.

My question  “Tienes algo vegetariano?” got me a couple of corn empanadas which hit the spot once they arrived about twenty-five minutes later.  The small kitchen was swamped with orders! I was clearly not the only one who had decided to make it a picnic instead of a white-tablecloth lunch!   I found a shady spot and a log to sit on and framed the two photos below while I waited for my name to be called.

the Peulla take-out counter with the vegetable empanadas

the Peulla take-out dining room!

The actual crossing of the Andes would be the focus of the next part of our trip – the bus ride from Peulla at 192 meters a.s.l (above sea level) to the Paso Perez Rosales at 1092 meters and then back down on the Argentinian side to Puerto Frias at about 780 meters. The elevation chart below gives you an idea of the elevation gain as you travel the 26 kilometers of gravel road.  Along the way, I saw the Austrian cyclists. They had pulled off the road to let the bus pass; we were stirring up a lot of dust! Luckily for them, other than the tour bus there are almost no vehicles on this stretch of road.

peulla-to-puerto-frias-elevation-chart

the 26-km. bus ride across the Andes from Peulla to Puerto Frias

As we made our way up the river valley towards the pass, we stopped at a spot where I was able to get close to the river and get a shot of Cerro Tronador (3478 m), along with Volcan Osorno on the west side of Lago Todos Los Santos, the dominant peaks in the area. The sign looks like it has been there for some time!

Cerro Tronador view from the road near Casa Pangue

The three Tronador peaks are about 13 kilometers away from where I took these photos. About ten days later I would be on the north side of Cerro Tronador in my tent above the Refugio Otto Meiling, but still five kilometers from the summit!  In the Refugio Meiling that night I would chat with a guide and his two clients. They would be getting up at 3 a.m. for their walk across the glacier and then a bit of an ice climb to the top. While I had considered doing the climb,  the US$600. seemed a bit too steep for me.

a satellite view of the valley leading up to Cerro Tronador

Cerro Tronador de Mirador Casa Pangue

After our photo-op stop, it was back in the bus for some serious altitude gain!  From the river at about 300 meters a.s.l. it was another 700 meters on a series of switchbacks as the bus engine groaned its way to the top at Paso Perez Rosales. Somewhere along the way, we crossed the border;  the Turis staff had organized things so that there were no border formalities to take care. A quick ride down the other side of the mountains and we were in Puerto Frias, Argentina!

————

4. Puerto Frias to Puerto Alegre – 4 km. by boat 

5. Puerto Alegre to Puerto Blest – a 3 km. bus ride

panorama – Puerto Frías – Lago Frías

The boat crossed Lago Frías to Puerto Alegre where waiting buses took us for a quick ride to Puerto Blest.  We would line up to get on board our second – and shortest at 3 kilometers – ride across the lago.  I scanned the side of the small lake as we motored across and given the steep terrain, I could see why they’ve never undertaken a road to cover the short distance.

the Turis boat at Puerto Frías taking on passengers

On the other side is Puerto Alegre, not much more than a dock and a parking lot where the shuttle buses were waiting to take us down to Puerto Blest. My lack of photos tells me it all happened very quickly.  I think I was also getting a bit tired and blasé about the trip by this time as the scarcity of images for the rest of the trip probably indicates!  I’ve posted three down below!

It was about 5 p.m. and we had been on the go for eight hours.  Our finest views were behind us.

Puerto Frias – Puerto Alegre – Puerto Blest

————

A Wait At Puerto Blest

We had a bit of a wait in Puerto Blest; the boat was not yet there.  Some passengers went into the restaurant attached to the small hotel.  I walked down to the end of the Peninsula, a narrow spit that goes out into Brazo Blest, an arm of Lago Nahuel Huapi, the lake we would be cruising on all the way to Puerto Pañuelo. I did notice some hikers with their packs.  There is a hiking trail from Pampa Linda that ends here; they would be joining us for the boat ride back to Bariloche.  I talked to one hiker and she was aghast at how much the ride cost.  She gulped when I mentioned the $280. U.S. I had paid! (The Cruce Andino  is 25% cheaper if you are a Chilean or Argentinian – $220.!)

Puerto Blest dock – waiting for the boat to arrive

The Turis boat arriving at Puerto Blest

————

6. Puerto Blest to Puerto Pañuelo – 25 km. by boat across Lago Nahuel Huapi

There are about 25 kilometers of water to cross from Puerto Blest.  The Google satellite view below shows Lago Nahuel Huapi and Bariloche to the east.

Lago Nahuel Huapi de Puerto Blest a Bariloche

As we approached Brazo Trieteza, I took the shot below. That is Cerro Lopez looming over the water.  I did not realize it at the time but a week later I would be tenting near the Refugio Lopez on the side of that mountain!

Cerro Lopez at the entrance of the Brazo Trieteza

Docking At Puerto Pañuelo

Rather than go by boat right to Bariloche, we debarked at the dock at Puerto Pañuelo, some 25 kilometers west of the city. Just above us as we docked was the Llao Llao Hotel, one of Argentina’s most famous. I meant to get a shot from the water but waited too long – a missed opportunity! Once we were on land my focus changed to trying to spot my blue Helly Hansen duffel bag. There it was!

7. Puerto Pañuelo to to Bariloche – 18 km. by bus

One more bus ride – and one tired bus rider! When we bought our tickets in Puerto Varas we were asked to provide the name of our hotel.  Now as we headed east on Avenida Bustillo and then on Avenida San Martin, the bus stopped at the various establishments.  I had reserved a room at the Hostel 41 Below on Juramento, just off  San Martin and very close to the Hotel Bariloche Edelweiss, a five-star business-class hotel.  That is where I got off the bus.  It was now past eight o’clock as I lugged my baggage up Juramento towards the hostel.

I was amazed by the scene in front of me!  Juramento is apparently the heart of “el distrito de la cerveca artesanal” and I had walked into a street party!  As I approached 41 Below a rock band was putting out an incredible trippy sound. I was totally enchanted – and rejuvenated by the energy on the street and in the music.  Over the next few days, I would get to know Bariloche better and that first very positive impression would remain.

Bariloche – Calle Juramento – Dos Astronautas at work!

————

Is The Ride Worth It?

As for the Cruce Andino, all in all, I had enjoyed the twelve-hour journey from Puerto Varas. If the point of travel is to experience things a bit out of our ordinary, then it had been a success. There were memorable views and great photo-framing opportunities as the day unfolded. Kudos to the Turis crew for making it all happen seamlessly – with no drama, very little waiting, and no one left in a panic over lost luggage.

Would I do it again? I think so – even though the $280. cost is maybe $100. too much.   While backpackers in their early twenties will almost certainly be on that $40. bus from Puerto Varas to Bariloche, if you can afford it, I’d say “Go for it!”  While you are not really cruising in a catamaran through the Andes – it is more like you approach them by water on the Chilean side, take a bus through and over them, and then boat away from them on Lago Nahuel Huapi once you get to the Argentinian side – it is still a great trip.

As my photo of the line-up of mostly older and financially secure travellers – and that would include me! –  shows, I was not the only one who was able to rationalize the extravagance!

Bon voyage!

P.S. – If you have Google Earth installed on your device and want to see the actual route of the Cruce Andino, get the kml file here in my Dropbox folder.

————

Next Post: Bariloche – Argentina’s Outdoors Playground -Things To See &Do

Bariloche – Argentina’s Outdoor Playground Capital

Posted in Argentina, Chile, Easy Travelling | Tagged , , , , , , , , , , | 3 Comments

Patagonia’s Nahuel Huapi Traverse – Day 5 (Refugio Lopez to Bariloche)

Day 4: Refugio Manfredo Segre (Laguna Negra) to Refugio Lopez

To the side of the Refugio Lopez is a tenting area; my spot was the flat area with the ring of rocks as a boundary that you see on the bottom of the image below. That rocky slope is the one I had come down the previous afternoon from Pico Turista.

Unfortunately, I didn’t think to take a photo until I packed away the tent! The spot was quite exposed and normally I would not even have considered it. However, the weather continued to be exceptionally kind – no wind during the night and no rain. And now it was morning and the clear sky promised yet another fine day for walking.

my tent spot near Refugio Lopez

Well, not a day of walking! Maybe a two-hour downhill to the road at Arroyo Lopez where the trail ends on the side of a small snack bar.  In fact, the end is so close that many hikers do not stop to spend the night at Refugio Lopez, preferring to keep on going to the road and then returning to Bariloche at the end of Day 4.

Refugio Lopez above Lago Nahuel Huapi

The Refugio Lopez was not very busy and there were few people who overnighted, my Porteño campañero de sendero Diego being one of the few. Unlike me, he had not brought a tent along, though he did have a sleeping bag and sleeping pad.

Refugio Lopez interior – eating area

Since I didn’t have a place to stay in Bariloche the night before, the Refugio Lopez made for a great place to chill with the few other hikers and enjoy the evening views.  I used the dining area to have both supper and breakfast.  Since “cooking” only involved adding water to my dehydrated Pad Thai supper and to my oatmeal breakfast, I just got the kitchen staff to boil up some water for me.

Nobody was up in the morning except for my buddy Lopez when I walked onto the Refugio porch.

Lopez – a border collie? – on the Refugio Lopez porch

Refugio Lopez – the counter and snacks for sale

Breakfast done, I got a bit more hot water and made a second cup of coffee and joined Lopez and a few hikers on the front porch of the Refugio.

There were a couple of dogs at the Refugio. One, a chocolate-brown Labrador retriever,  is the hut dog and living the good life. That’s him inside the hut –


Lopez was the other dog; he had wandered up to the hut a couple of days before and was still hanging around.  The night before I had spent a half hour deburring his fur while taking in the sunset views.

So here he is in the photo above the next morning with his paw on my right knee, a signal that he wants me to keep giving him attention – as in ear scrunchies and belly rubs!  I hope he is being taken care of these days. Maybe he just wandered away from his people at the bottom of the hill for a little adventure.  It would have been reassuring to see a collar on him!

the view from the front porch – a lazy start to the day at Refugio Lopez

The upscale Llao Llao Hotel was visible down below on a narrow strip of land between the Lago Moreno and Lago Nahuel Huapi. A few days before I had ended my boat trip through the Andes from Puerto Varas on the Chilean side at Puerto Pañuelo just below the Hotel.

A warning about the pronunciation of  “Llao Llao”! With what I thought was my passable Castellano, I pronounced it Yao Yao; I had no idea what Diego was talking about when he said Shao Shao.  What he was doing, of course, was speaking Spanish the Argentinian way, the Porteño way. More than once he had me completely baffled!  Llamar became shamar and castellano becomes casteshano!

Llao_llao

Wikipedia source – here …Cerro Lopez and the Refugio in the background!

I never did visit the hotel, perhaps Argentina’s most famous.  I had intended to bicycle out to the hotel on my first or second day in Bariloche – it is a 30-km ride there – before I set off on this hike.  I figured a cup of coffee or maybe lunch there would give me an excuse to walk around and get some neat photos.

Unfortunately, my calves and quads were still seized up from the long stretch of serious ice climbing I had done to get to the top of Volcan Osorno on the Chilean side a couple of days before. I needed to recuperate from that before I did something crazy like bicycle 60 kilometers!

the view of “Shao Shao” from the Refugio Lopez front porch

panorama – the view from Refugio Lopez

Refugio Lopez to Arroyo Lopez trailhead/Highway 77

Sometime around ten Diego and I set off for the end of the trail at Arroyo Lopez. It is six kilometers – and a drop of 770 meters in elevation –  from the Refugio down to the road (Highway 77) and the trailhead behind the snack bar at Arroyo Lopez. The trail runs on the east side of the creek bed as it makes its way down the valley.  It was a bit confusing at first and Diego and I got separated down near the creek bed.  After waiting a bit for him to catch up, I decided to keep going. More trail markers at regular intervals made the way much more obvious.

For some reason, I also stopped taking photos!  The two below are about the only ones. There were certainly no grand vistas to capture – mostly a shaded forest trail taking me to the exit.  I was already thinking about how I was going to get back to my hostel in Bariloche for my first shower in five days!

following the red dots to the end of the trail from Lopez

In fact, I ended up googling for some pics of the trail; this Argentinian blogger had a couple I ended up “borrowing” just to remind myself – and show you – what it was I walked by. See his post here for the next two pix – and a lot of other good shots. He took them on the way up to the Refugio!

Parador Roca Negra on the trail from Refugio Lopez to the road

About 45 minutes from the and I came to a dilapidated shack – the Parador Roca Negra – which has a restaurant. There is a switchback road that comes up to this spot and a couple was standing there as I came cruising by.  They asked me if I was el canadiense!  It seems that Diego, who I thought was behind me, had somehow ended up in front of me!  He had told them to pass on the message when I came by.  My waiting for him at various points on the trail had only increased the lead he had on me!  Relieved that he was doing fine, I continued on down the shady trail, which is carved out of a massive glacial sand deposit.

Finally the end of the trail – and the beginning of the road back to Bariloche.  The map on the display board in the photo below represents the trailhead of the path to the Refugio Lopez. Next to it was a small restaurant/snack bar with some tables. Parked on both sides of the road were vehicles, left by people who had gone for a hike. There is apparently a problem with cars being broken into when hikers leave them sitting there for a few days!

the trailhead to Refugio Lopez at Highway 79

I didn’t even stop for a celebratory can of Coke at the snack bar. Putting down my backpack on the side of the road, I stuck out my thumb at the occasional vehicle that came by.  Within ten minutes a young couple with their 18-month old boy sitting in the back stopped and offered me a ride. I hopped in even without asking exactly where they were going – if it was east it was good!

I was hoping for a ride all the way to Bariloche; they were going as far as Colonia Suiza!  I amused my fellow passenger in the back seat as we travelled along the gravel road to their restaurant destination in the village. He soon had my index finger in a deadlock!  We got to Colonia Suiza and bumper-to-bumper traffic.  It was a Sunday afternoon and clearly Colonia Suiza is on the list of must-visit places when in Bariloche!  Restaurants and crafts stores and specialty food shops seemed to be the big attractions.

Given that the roads are not paved and it hadn’t rained in a long time, the vehicles stirred up clouds of dust.  I felt sorry for the cyclists doing their Circuito Chico; this cannot have been what they signed up for!  After five days on the trail, all the commotion and the dust were the last things I wanted.  How to keep going east?  There is a bus that comes through Colonia Suiza – the #10 – which takes passengers to a connecting point for another bus – the #20 – which goes right into Bariloche.

Told that the #10 had just passed by and that the next one would be in over an hour I decided to press on, walking down a road that would take me to the one road leading out of the village and to Bariloche.  Within ten minutes of setting off,   someone stopped – and gave me a ride right to the spot where the #10 bus deposits its passengers for the transfer to #20. Even better – we got there within seconds of the #10 I had missed!  On the other side of the road, the #20 had just pulled up and was letting off its passengers before turning around for the return to Bariloche.  Buena suerte!  I was on my way back to town!  I pulled out my rechargeable bus pass card and paid the fare after the #20 pulled up.

Hostel 41 Below supper table – all veg

When I got back to Calle Jugamento and the Hostel 41 Below I was expecting to be spending the night in a room with two bunk beds and three other sleepers. The room I had all to myself for the first three nights was supposedly booked for the night of my return. But – more luck! – the room was available after all.  (Probable reason – it costs four times more than a bed in a room shared with three others!)  I showered and lounged on the bed and had a nap and waited for that evening’s vegetarian supper. And yes – now that I was no longer off the grid, I checked my email and read all the latest about the smash media hit of the decade – the ongoing Trumpland saga.  Sad!

The Nahuel Huapi Traverse had been much more than I was expecting: challenging trails, terrific vistas and viewpoints and photo ops, and helpful fellow hikers on the trail … two days to do laundry and rest up and make arrangements and I would be off on my next hike, a shorter one up to the Otto Meiling Hut and Cerro Tronador. That post will be up in a week or so – but here is a photo taken from my tent spot –

Next Post: The Refugio Otto Meiling and Cerro Tronador

Posted in Argentina, hiking/trekking | 2 Comments

Patagonia’s Nahuel Huapi Traverse – Day 4 (Laguna Negra to Refugio Lopez)

Previous Post: Day 3 – Laguna Jakob (Refugio San Martín) to Laguna Negra 

Day 3 had been a big day made even more exciting thanks to a brain cramp on my part.  Less drama on the trail was my wish for the day! Sometime during the night I had woken up and plugged my iPhone into the battery charger; it was now fully charged and the GPS track was ready to be taken more seriously!

my tent spot near Refugio Italia at Laguna Negra and the trail sign to the refugio

As I crawled out of my tent space – super-well-sheltered! – I could see why it was still available at 9:20 the previous evening! I had bumped my head on some of the branches the night before as I put up the tent. Clearly everyone else had decided that it was too enclosed and too small a space. In the photo above it is barely visible on the left-hand side!

Refugio Italia and Laguna Negra

I walked down the trail to the refugio; it sits quite exposed on a long stretch of rock outcrop. I couldn’t get over my luck with the weather; every day so far had been clear and sunny and relatively wind free. In worse weather, the traverse  would become   much more of a challenge, not just the route (i.e. red dot!) finding but also tenting at the end of a wet and windy day.

Refugio Italia (Manfredo Segre) at Laguna Negra)

Refugio sign at Refugio Italia (Manfredo Segre)

Out came my simple breakfast  – the ziplock bag filled with oatmeal and an assortment of other ingredients (chia seeds, hemp seeds, raisins, cranberries, walnuts). All you need to do is add some hot water. The concoction is a canoe trip staple that  my brother and I take along and it keeps us going for hours.  Also essential is a hit of caffeine but unlike the cup of filtered coffee we make when canoe tripping,  I contented myself with some instant.

inside the Refugio Italia at Laguna Negra

The hut was fairly quiet. Given its location the refugio does not get the visitors that Frey or Lopez do. I looked around for Diego but he was not up yet.  Given the potential for trouble on the Jakob-Negra section you need to sign a waiver as well as check in on arrival. I had not bothered to walk down to the refugio the night before since it was almost dark when we got to the camping area. I put up my tent and crawled inside and hoped that Diego, who was sleeping in the refugio, would let them know. I knew he had when one of them looked up for the coffee pot she was preparing and asked me if I was el canadiense!

Laguna Negra - Refugio Lopez

Before I left the refugio Diego walked in.   I told him I’d be ready to go in about 45 minutes and, after leisurely taking down the tent and packing,  I wandered back to the refugio with my pack.   He was nowhere to be seen.  I waited for about ten minutes and assumed he had started off without me. So off I went.  I would never catch up to him!  And why? He hadn’t left yet!  We’d meet at the end of the day at the Refugio Lopez – at the top end of that red line you see snaking from Refugio Italia. It is approximately ten kilometers.

Refugio Italia (Manfredo Segre) from the other side of Laguna Negra

The first part of the day’s walk involved curling around the east and north shores of the laguna, an easy walk except for a bit of scampering over a gnarly rock outcrop. To help those passing through, there is  a climbing aid – ropes fastened to the rock.  Not quite a first since I did see permanent rock bolts on Day 3 in the section above Laguna Témpano.)

Looking back at Refugio Italia on Laguna Negra

climbing aid on the rocks around Laguna Negra

At the far end of the lake I want down to the water and filled up my water bottle and waved my Steripen in it for a minute, not wanting to take any chances.

a last chance to fill up the water bottle  at Laguna Negra

From the laguna the sand and scree trail goes up to the ridge which I then walked north as I passed Cerro Bailey Willis. Compared to the previous day’s trail this one is very well-marked with lots of red paint, cairns, and signs to show the way.  And if nothing was visible all I had to do was turn around to see markers for the way back to Laguna Negra!

the path up to the ridge above Laguna Negra

laguna negra to refugio lopez - first half

sign for Lopez – the next Refugio

looking back at Laguna Negra – from the trail to Refugio Lopez

looking west to Cerro Tronador from the trail to Refugio Lopez

From near the top of the ridge I looked west.  Hola, Cerro Tronador!  Even though it was about 25 kilometers from where I was standing,  it still dominates the neighbourhood.

Tronador from the ridge above Laguna Negra

A few days later I would be at the Refugio Otto Meiling and learn that there are actually three peaks – Pico Argentina, Pico Chileno, and the highest of them, Pico Internacional. My tent above the Otto Meiling hut was still about seven kilometers from the peaks! The photo below shows the sheltered spot I found to put up my tent for the night!

tent spot below Tronador above Refugio Otto Meiling

four days later – tent spot below Tronador above Refugio Otto Meiling

Back to that ridge near Cerro Bailey Willis – it was time to finish off the climb! To get there I wove my way through the pile of rock rubble, aided by that occasional red paint dot.

a look back at a couple of day hikers working their way up the slope to Cerro Bailey Willis

looking up at the rubble in search of a trail to the top of the ridge

the path for Refugio Lopez cuts over to the saddle – Cerro Bailey Willis on the right

transition point on the trail from Negra to Lopez – the saddle below Cerro Bailey Willis

Over that saddle in the image I went and past the gentle west slope of Bailey Willis – no more shots of Laguna Negra now!  A different landscape started to open up ahead of me – the top of a green valley and the Cerro Lopez massif. It was shortly after noon – 12:15 – and another scorching day in the sun.  I got the sunscreen out and applied a bit more on my exposed bits – i.e. hands and face and neck.  I decided to postpone lunch until I found a shady spot down along the Arroyo Goye.  I’d also be able to fill up  my water bottle there too.

a look back at the trail I have just walked from Refugio Italia (Manfredo Segre)

In the photo above I had one last look at the rock tower that looms above Refugio Italia; when I turned around I was looking at Cerro Lopez and the upper section of the valley I’d be crossing.

the view from the Bayley Willis Col towards Refugio Lopez

walking down to the top of the Arroyo Goye valley – the view ahead

the Arroyo Goye running down the valley floor

looking back at the saddle and the scree slope

the path to the Cerro Lopez ridge

in the meadow below the Cerro Negro ridge

When I came to the small trickle of water that becomes Arroyo Goye and found some trees with a leafy canopy I set down my pack and got out the empty Nalgene water bottle and the lunch fixings.  As I sat there the X-ray like look of the clouds floating by caught my attention.

wispy clouds in the valley below Cerro Negro

With lunch over I had the hike’s last section of uphill scrambling waiting for me.  Given the stunning mountainscape,  I had every reason to stop and set up a quick photo every once in a while.

a plateau half way up to the Cerro Lopez ridge

Cerro Tronador from a plateau below Cerro Lopez

And then – this!  Over the hour and a half I  made my way up the scree slope until I was standing on the ridge you see running along the top third of the photo. Where you end up is near Pico Turista, a popular day hike destination for those coming up from Refugio Lopez.

the last bit of uphill for the day – up to Cerro Lopez ridge

looking up at the scree slope to Cerro Lopez ridge

When I stepped to the north side of the ridge my reward was this awesome scene – Lago Nahuel Huapi in the distance and Lago Moreno a bit closer and in between the two the Llao Llao Resort. And I turned my gaze a bit further to the east I could see Bariloche.

a grand view from Pico Turista of Lago Nahuel Huapi

a view of Lago Nahuel Huapi. up to Bariloche

To the west there was Cerro Tronador veiled in afternoon cloud.  This spot by Pico Turista was just one of the many on this traverse where the sheer beauty of the views made the price of getting there – the aches and pain and tedious scrambling up scree slopes – worth it!

the view west from Cerro Negro ridge

And then it was down, down, down!  For a long time I did not even see the refugio! the first landmark was a small glacial lake that I would soon get to.  three people are visible in the two photos below. I would eventually end up talking to them as them rested on the side of the laguna while I refilled my water bottle yet again.

the laguna on the way to Refugio Lopez

down at the Laguna – on the way to Refugio Lopez from the Cerro Lopez ridge

looking back at a bit of down scrambling from the laguna

The Refugio Lopez – finally!  And no Diego sitting there waiting for me!  The hut keeper surprised me with a question about his whereabouts; there is obviously communication between refugios about who and how many are on the trail each day. I guess we were the only two that day!  Diego would come down that slope pictured above about an hour later.  We would compare notes for the day, one that we agreed was happily much less challenging than the day before.

a different perspective on the Laguna Negra – Refugio Lopez Hike

Unlike the others on the Nahuel Huapi Traverse, The Lopez hut does not belong to the Club Andino de Bariloche.  Instead, it is privately owned and looks well-maintained.  I would find a flat tent spot not far from the hut – somewhat exposed for my liking but given the great weather and lack of wind it did the job nicely.  Nearby were another three or four tents; hikers can camp for free. I did make use of the hut for supper and breakfast and spent a bit of money at the food counter.

the Refugio Lopez

Refugio Lopez above Lago Nahuel Huapi

Next Post: From Refugio Lopez To the End of the Trail at Arroyo Lopez/Highway 77

Posted in Argentina, hiking/trekking | Leave a comment

Patagonia’s Nahuel Huapi Traverse – Day 3 (Laguna Jakob to Laguna Negra)

Previous Post: Day 2 – Refugio Frey to Refugio San Martín (Laguna Jakob)

My Route Options For The Day

I was in the kitchen of the Refugio by 8:15 or so for breakfast. With my cup of refugio coffee finished, it was time to meet with the others and discuss the day’s plans. On the plus side, I had the following:

  • another sunny and windless day with no forecast of sudden weather change
  • and no  snow on the upper sections of the trail (it was early February!)
  • other hikers who were planning to do the trail

The poorly marked trail from Laguna Jakob to Laguna Negra features some semi-technical climbing.  Doing it alone was never a consideration.

I would set off with those who were going to do the section and then –

  1. After checking out the climbing section above Laguna Témpano and deciding it was something I could do, continued the nine kilometres to Laguna Negra, or
  2. decided it was too risky to do and turned back to the refugio.  From there, I would do the easy but long 18 km walk down along the Arroyo Casa de Piedra to the highway and then hitchhike over to Colonia Suiza, where I would spend the night at a campground.  The next day, I would walk up to Laguna Negra from there and continue the traverse.

On the map below

  • Option #1 is made up of Routes 9 and 7  to Laguna Negra.
  • Option #2 is Route 3  , following the Casa de Piedra down to Highway 79.

I must again acknowledge the website I used to obtain the map above, TrekBariloche.  It is the single best online source of information on hiking in the Nahuel Huapi area.  The writer has walked these trails for the past 18 years, and that detail shows on his website.

a Google satellite view with my Spot Connect GPS tracks roughly indicating the route to Laguna Negra

The Hut Keeper’s Information Session

There were four of us – Moritz and Daniel, the two German guys; Diego, the hiker from Buenos Aires; and me.  We eventually found ourselves signing the waiver form to acknowledge our intent to do the route to Laguna Negra via the Laguna Témpano ascent.

The hut keeper also brought out a scrapbook with perhaps 40 or 50 photos that he talked his way through.  They illustrated major points in the route. I will admit that after twenty images or so, my mind drifted away  – information overload!  There is no way you can remember all that stuff. Detail piled on detail!   Had I been thinking, I would have taken some photos of his photos with my iPhone so that I could consult them during the day.

Another thought that came to mind was this – why don’t they just provide hikers with better information – a brochure, for example –  that they could take with them. That, and a more clearly marked trail, which would not take more than a day’s work for park workers to do,  would eliminate most of the issues with this section of the traverse.  I have never walked a trail as poorly marked as the one I did on this day!

————

GPX and KML Files of the Route to Laguna Negra

Update:  The following GPX and Kml files should give you a 100% clear idea of the route and eliminate any safety concerns. Download them from my Dropbox folder…

GPX File – Jacob to Negra                   KML File – Jacob To Negra

————

The Need For More Trail Markers

Of course, a clearly marked trail would only encourage more people to do this section on their own without a guide. As we would learn, the most difficult technical part of the day comes in the first hour and a half with the scramble up the rock face above Laguna Témpano.  After that, the only difficulty is finding the few trail markers as you make your way to Laguna Negra. It may be that since I did the route, new markers have been added to make it much more apparent.

Looking back at the Refugio San Martín on Laguna Jakob

There were lots of red dots and blue and white paint as we left the refugio and headed towards Laguna Témpano. The photos above and below show the gradual uphill of the terrain.  Then the markers become scarcer, and you have to look a bit more carefully as you continue.

the trail to Laguna Los Témpanos

At about 10:30 – as seen in the photo below – we found ourselves on a ridge below Pico Refugio.

a view of Laguna Témpanos from the SE

The lowest of the GPS tracks in the satellite image below is where I took the above photo from.  We were about to see what all the fuss was about!

The route above Laguna Los Tempanos – follow the one-every-ten-minutes GPS tracks!

This is where the scrambling up began, Moritz and his GPS track in the lead, Daniel not far behind, and then Diego and finally me, the old guy of the crew and a bit more winded than them! I was feeling fine with the terrain, having done a few summers’ worth of Alpine Club of Canada trips in the Canadian Rockies and some of the minor ranges to the west on very similar rock.

los cuatro amigos arriba de Laguna Témpano – Daniel, Diego, me, Moritz

I did notice a rock bolt or two drilled into the rock face as we made our way up. Perhaps a guide would make use of those bolts with clients not used to being in this kind of terrain or in case wind or rain or snow made it necessary to secure everyone.  I cannot say that any of us ever felt that uncomfortable as we made our way up.  The fact that we had perfect conditions did not hurt!  We took it slowly and deliberately, stopping every once in a while for photo ops!

the technical part of the day’s walk to Laguna Negra via Cerro Navidad

Laguna Jakob and Laguna Temprano

Laguna Jakob and Laguna Los Témpanos

On on of those little breaks I turned toward the Laguna below and got this panorama that stretched all the way back to Laguna Jakob on the left-hand side of the image.  Then I turned around to get a shot of the remaining part of the climb – and Mortiz and Daniel working their cameras!

Daniel on photo duty before we embrace the climb above Laguna Los Tempanos

Five minutes later we were on the move again: Moritz leading, Daniel following, Diego in the bottom right of the photo and me looking up and taking the photo.

Moritz leading the way up the rock face above Laguna Los Tempanos

And finally, thirty minutes later, we were on top.  We had done it!  The hut keeper had told us that this exposed section of the trail accounted for 80% of the day’s difficulties, and that the rest would be more straightforward.

It had taken us two hours (9:45 to 11:45) to get there from the refugio.  Handshakes all around – and maybe some relief that we were spared any drama. Then it was time to say goodbye to Moritz and Daniel.  They were going to be switching to warp speed, leaving Diego and me to move along at a more leisurely pace!

Laguna Jakob to Cerro Navidad

Laguna Jakob to Cerro Navidad

I did have a GPS track on my iPhone, which included the rest of the day’s hike. (I found it at the Club Andino de Bariloche website a few months ago. It no longer seems available.  See here for a downloadable copy.)  Unfortunately, the Osmand app and maps that I had installed would inexplicably freeze – sometimes it worked, and sometimes it didn’t.  We did have the red trail markers and occasional cairns to guide us. They were scarce as we made our way towards Cerro Navidad, a major point on the route and the highest one of the day.

looking over to our next objective

The photos above and below were taken around 11:45 after the two German guys had sped onward. After aiming my camera toward the ridge we were heading for, I turned around to get a shot of Diego and our packs.  We were on the col below Pico Refugio and took a little break before moving on.

Diego and I  were both travelling somewhat heavier than the two guys up ahead; Daniel may have had three kilograms in that tiny backpack of his!  He was travelling so lightly he did not even have a sleeping bag with him!  I had a tent, sleeping bag, Thermarest pad, Goretex rain gear, and food for five days … it all added up to about 15 kilograms. Diego’s pack weighed a bit less since he was sleeping in the refugios each night.

taking a breather to the left of Pico Refugio

A helpful bit of paint on the rocks – the red/white square – told us we were on the “trail”. We would climb up to that low section you see between the two peaks. There is a vertical stick at the top of the cairn in the middle of the shoulder.

paint on the rocks – the path to Cerro Navidad

Jakob to Negra – middle section over Cerro Navidad

We would stay high above Laguna Navidad until we got to the ridge which led us to Cerro Navidad and its wooden cross.  This part of the trail is very poorly marked and we were sometimes left wondering which way was the right way.

Diego surveys the scene above Laguna Navidad

looking back at Diego and the faint trace of a trail on the way to Cerro Navidad

working our way around Laguna Navidad – Diego approaching over a boulder

a view of Cerro Tronador from above Laguna Navidad

Laguna Navidad and the trail to Cerro Navidad – Diego is to the right of the boulder in the image center – we had come down from the ridge on the top right of the image

Cerro Navidad ridge on the left, Laguna Navidad, and the terrain we are traversing to get there

You can see our approximate path on the satellite image below as we crossed the scree slopes high above the laguna.

The path above Laguna Navidad

Once we crossed to the west side of the Cerro Navidad ridge, we searched for any sign of a trail to continue.  We finally found it descending a bit on the other side of the ridge before climbing back up towards Cerro Navidad itself.  In the photo below, we are at Cerro Navidad summit, having spent about four hours (minus some rest breaks and lunch) to get there from the Pico Refugio col.

Cerro Navidad with Cerro Tronador in the background (26 kilometers away!)

a view from the top of Cerro Navidad

It was a nice twenty-minute walk down from Cerro Navidad across a relatively flat stretch of trail marked with the occasional cairn and splash of red paint.  We stood on the ridge with a valley to either side of us.  Looking to the right, we saw a snow patch with footprints crossing it.  I remarked to Diego that the footsteps may have belonged to our two German speedsters.  Any older than a day, and the sun would have melted their distinct impressions away.

And then – we – or I – made a strange decision.  Somehow, I figured the trail and the valley we wanted to descend to were to the left!  No footprints in the snow – but in the distance on the rock wall at the other side of the gorge, a splash of red.  So we headed down the steep scree slope, making very slow progress.

Cerro Navidad to Laguna Negra

It somehow did not feel right, but we kept on, me in the lead and Diego behind.   Every once in a while, I would check my GPS app on my iPhone.  It kept freezing up.  And then the moment of realization – that red trail marker that I was heading to –  well, it turned out to be a bunch of red flowers! We had spent half an hour floundering in the heat on the exposed slope heading to an imaginary red marker!

I turned off the iPhone, waited a few seconds, then turned it back on.  That seemed to resolve whatever issue the Oosmand app was having.  This time it worked, and what it told me was this – “Buddy, where do you think you’re going! You need to get back to the ridge!”

a false descent – the La Chata Valley! Que stupido!

So back up we went, not yet seeing any markers but the app was on and it showed that we were getting closer to the GPS track.  Finally – relief when we reached a point that corresponded exactly to the GPS track location!   We had recovered from our one-hour waste of time and energy.   And now – to make it even better – we spotted a red dot painted on the rock ahead of us.  We were on our way again!

As we looked down we saw again the snow patch with what looked like footprints crossing it.    Well, a few days later in Bariloche I met Daniel at the only vegetarian restaurant in town and he confirmed that they had indeed walked across that snow.  Had we only clued in right away!

The descent to the Arroyo Negra Valley

Diego and I filled our bottles with the water slowly trickling downhill from the snow patch and then began the long three-hour scramble down to the Arroyo Negra Valley.  It didn’t seem to want to end, and it made for difficult walking, especially for Diego, who did not have trekking poles.  He was definitely faster than me on the ascent; my poles made a difference on the descent, which did not seem to end.

Diego at the top of one of the many drops down to the valley – 300 meters in all

the Arroyo Navidad valley

Diego on one of the final drops to the valley floor

We were headed to the point where the trail up to the Refugio Italia meets the trail coming up from Colonia Suiza. I know that now, but I did not at the time!

I was maybe 10 minutes ahead of Diego at this point, and it was about 8:30. Fatigue had definitely set in, and I just wanted to get to the Refugio, put up my tent, and crawl in!  Had I only known what to look for, I would not have walked right past the trail which goes up to the refugio.

As my GPS tracks show, I was actually headed down a downhill trail to Colonia Suiza! Luckily for me, some hikers were coming up the trail, and when I asked them if  Laguna Negra was up ahead, they straightened me out very quickly.  They were headed up to the Refugio for the night, so I turned back with them. I stopped at the junction while they continued.  I assumed that Diego had not yet caught up, so I waited there for him.  A few minutes later, he came down the trail, and we both headed up the home stretch to Laguna Negra.

The Arroyo Navidad – Arroyo Negra junction

Once we were on the trail up to the Refugio, it was all walk and no photos!  The one below is the only one I took over the next forty-five minutes as we made our way up that gorge and onto the ridge to the left.  It was 9:20 when we got there! Diego kept walking to the Refugio itself while I looked around for a flat, sheltered spot where I could put up my tent. Since hikers are supposed to check in when they arrive, I hoped that Diego would let the hutkeeper know that El Canadiense had arrived!

the final ascent up to the Refugio Italia on Laguna Negra

I looked up and noticed the full moon shining over the camping area, then crawled into the tent and into my sleeping bag, relieved to have survived my misadventures. A few sips of water, an energy bar,  and an extra-strength Advil and I zipped the tent door shut.   I was done for the day!

For a 2015 report on the route from Laguna Jakob to Laguna Negra, check out this informative account here, complete with lots of great photos. To get an early start, the hikers –  Richard Hughes and his wife Patsy-  set off at 8:00 rather than wait to hear the hut keeper’s trail talk at 8:30. Their crossing was less eventful than mine!

Next Post: Day Four – Laguna Negra To Refugio Lopez

Patagonia’s Nahuel Huapi Traverse – Day 4 (Laguna Negra to Refugio Lopez)

Posted in Argentina, hiking/trekking | Tagged , , , , , , , | 1 Comment

Patagonia’s Nahuel Huapi Traverse: Day 2 – Refugio Frey to Refugio San Martin/ Laguna Jakob

Another sunny day in northern Patagonia! By 8:30, everybody was ready for whatever adventure the day would bring.  Outside of the Refugio, a couple of dozen people milled about, busy with their packs and water bottles and sunscreen. Maps were out and being examined.

Refugio Frey to Refugio San Martin:JLaguna akob

Day Two – Refugio Frey to Refugio San Martin: Laguna Jakob

On the menu for the day were a few different options:

  • Some would be staying and doing some rock climbing. The hut is at the centre of some excellent rock climbs, as I could see by the number of people with the necessary gear.
  • Some would walk back down the trail to Villa Catedral (see 1 on the map above).
  • Some would return by route 2 to Villa Cathedral via Laguna Schmoll and the trail to the right of the cancha de futbol, which is at the junction where the trail splits in two – to the right back to Villa Catedral and to the left to Laguna Jakob.
  • Some like me would be walking Route 8 to the Refugio San Martin on Laguna Jakob.
  • Previous Post – Day 1: Villa Catedral To Refugio Frey

Patagonia’s Nahuel Huapi Traverse – Day 1 (Cerro Catedral to Refugio Frey)

the eating area in the Refugio Frey’s cook shack

I boiled some water on the kitchen stove and prepared my oatmeal breakfast. I also had that essential cup of coffee – a no-frills instant Nescafé with some powdered coffee creamer. Then it was out to join the others as we discussed our various plans for the day.

a busy Refugio Frey at 8 a.m.

Mine involved a walk along the shores of Laguna Toncek and then a scramble up the scree slopes to Laguna Schmoll. From there it was another bit of rough uphill to the split in the trail at the “Cancha de Futbol”.  The trail would eventually lead to a ridge at the top of the Rucaco Valley.  From there it was a clear view to the  west and Laguna Jakob and the Refugio.

Before I left the Refugio the first of perhaps four or five helicopter drops for the day began. Lowering down food and other supplies and taking out a load of waste or whatever, it kept the staff busy hauling stuff to and from the landing zone for 45 minutes. I watched for a while and then headed along the shore of the Laguna. Ahead of me were some other hikers, people I recognised from the previous day. Only one of them – Diego from Buenos Aires – would still be on the same trail with me the next morning.

helicopter dropping off supplies

a view of the helicopter drop from the side of Laguna Toncek

a view of the helicopter drop from the side of Laguna Toncek

looking down Laguna Toncek towards the Refugio Frey

Looking back at the Refugio I saw the last of the drops for the morning.  Twenty minutes later when I snapped the photo below I was at the other end of the lake. Next up was the ascent on a scree slope to Laguna Schmoll.  The “trail” markers – sometimes just a red circle, sometimes a red circle inside a black one, sometimes an arrow in red or black, sometimes a word! – are painted onto the rocks.  Looking for them becomes a part of the journey; not seeing one for a while,  you start worrying that maybe you are lost!

See if you can find any red dots in the three photos below!

above Laguna Toncek - scampering up the valley to the Laguna Schmoll

the trail up above Laguna Toncek – scampering up the slope to Laguna Schmoll

the top of the ridge between Laguna Toncek and Laguna Schmoll

the top of the ridge between Laguna Toncek and Laguna Schmoll

the real top of the ridge above Laguna Toncek and Laguna Schmoll

looking back towards Laguna Toncek from the trail to Laguna Schmoll

At the top of the ridge I turned around to get one last shot of where I had come from; then I turned forward and faced Laguna Schmoll.  Since there was no wind, the glacial lake was ripple-free. I found a spot by the edge of the Laguna and sat there for a while, taking in the scene. Forty meters away a hiker had put up his tripod and was taking in the scene.

Laguna Schmoll – stunning lake above Laguna Toncek

contemplating photo possibilities on Laguna Schmoll

Not far from where I was sitting was the plaque you see below; it explained the origin of the laguna’s name. It is a memorial for an Austrian climber – and perhaps a member of the local alpine club – who lost his life on Cerro Paine in Chile’s Torres Del Paine Park.

Herbert Schmoll memorial plaque

With my water bottle out, I also reached into my pack for a snack. Not too long afterward I got visitors! A couple of birds, tentative at first, but then hopping fairly close to where I was sitting were clearly wondering if I had anything for them!  Let me know if you can identify the kind of bird they are!

a view of my rest stop on the edge of Laguna Schmoll

Laguna Schmoll visitor

bird on the rock at Laguna Schmoll

the view from the trail above Laguna Schmoll

My rest spot had been on the shore just above that small point you see jutting out into the laguna. Now – thirty minutes later – I was looking down, having scrambled up that mess of rocks you see below.  Visible in the middle of the photo are a couple of fellow hikers coming up behind me.

hikers making their way up to the pass above Laguna Schmoll

In the photo below, I am already looking back at the top of the ridge I had just climbed; Laguna Schmoll is behind, and below that wall of rock you see.  I was now standing in a fairly flat open area, which has earned it the nickname “cancha de futbol”, a totally appropriate name for futbol-obsessed Argentina!

panorama – the top of the pass to the upper Rucaco valley and Laguna Jakob

On nearby rocks, arrows pointed in the directions of both Catedral and Jakob. While the Catedral trail follows the ridge the right, the indistinct path to Jakob goes down a fairly steep scree slope on the left.

the ‘Cancha de Futbol’ and the sign for Villa Catedral

the ‘Cancha de Futbol’ and the sign for Laguna Jakob

panorama – upper Rucaco Valley and Cerro Tres Reyes

Laguna Jakob is located below the ridge on the top left-hand side of the photo above. To get down into the forest from the cancha de futbol requires 45 minutes of heavy-duty scrambling down a fairly steep scree slope.

Ahead of me on the downslope was a hiker – a guy in his early thirty’s from India – who was having a rough time.  He was slipping and sliding and losing his balance and facing in to the slope as he made his descent.  One of his problems? He did not have trekking poles!  The extra points of contact provide more stability.  Years ago I had laughed when I saw Chamonix walkers using them; these days I know better and would never go hiking without them. Live and learn!

As I caught up to him we stopped for a brief chat on the challenge of the scree slope.  I offered him one of my poles but when he declined I told him to follow me.  He had been trying to go straight down;  we went down more gradually in switchback fashion and that seemed to help him.

the scree scramble down to the upper  Rucaco valley floor

In the photos above and below I have stopped and pointed my camera back up at the terrain I have just negotiated.  You can see my fellow hiker in the photo above.

looking back up at the scree trail

The reward for the scree slope scramble was a nice walk up the Rucaco Valley on a flat dirt trail.  I stopped for lunch in the cool of the forest; it was hot out there in the full sun and the shade was appreciated!  The Indian guy came walking down the path; he was keen to keep moving so did not stop for a break.  I’d catch up to him a bit later in the afternoon as we made our way downhill to the Refugio.

the forest trail on the upper Rucaco valley floor

After lunch, it was on to the end of the wooded area before the trail heads back up above the treeline to more scree and indistinct trails marked with the occasional red dot or stone cairn. Along the way, I refilled my water bottle from one of the side streams coming down the slopes to the Rucaco valley.  While it is probably perfectly safe to drink the water in this area without treating it,  since I had brought my SteriPEN along, I did make a point of using it. It weighs about 100 grams and uses UV light to make the water safe to drink.

panorama of upper Rucaco Valley back to Cancha de Futbol Pass

a last look at the Rucaco Valley before Laguna Jakob

It had taken me three and half hours to descend from the Cancha de Futbol, walk the Rucaco Valley and ascent to the ridge above Laguna Jakob. I looked back one last time and took the photo above, complete with the helpful arrow pointing hikers toward the Frey hut!  Then it was on and mostly down to my next tent spot, the bush behind the Refugio San Martin.

Laguna Jakob in view – and the next day’s route too – click on the image to see the “trail”

approaching Laguna Jakob and Refugio San Martin from the east

San Martin Refugio and Laguna Jakob

As we neared the Refugio, my Mumbai buddy and I crossed the bridge and walked what is apparently a new path for the final half-kilometer.  Oddly, when we got to the Refugio,  I  took off my pack and relaxed and chatted with a couple of other people who had just come in.  What I didn’t do was take some close-up photos of the Refugio and its surroundings! The one you see here  I “borrowed” from the Club Andino de Bariloche website.  See here.

Update: In early July 2017, the San Martín Refugio was intentionally burned down. It was either the work of an indigenous Mapuche resistance group or made to look like it was. Pamphlets claiming Mapuche responsibility were found near the hut. See here for an English translation of an article about the incident. Click on the top right-hand side to access the Spanish original. There are now two dome structures on the site and Refugio San Martín is open for trekkers.

Already on my mind was the next day’s hike, the one from Refugio San Martin to Laguna Negra via a steep climb above Laguna Los Témpanos and Cerro Navidad. It was the most complicated and poorly marked – and least used – section of the entire traverse. Since the guys who had just come in – a couple of German guys in their twenties, Moritz and Daniel – were planning to do it, I was keen to talk to them since I clearly was not going to be doing it by myself!   The fact that Moritz had the GPS track for it was definitely a good sign!

my tent spot near the Refugio San Martin

Not far from the Refugio I put up my tent on a bed of sand in the shade of some overhanging branches.  Then it was back to the Refugio for supper – and more discussion and assessment of the next day’s possible adventure.  The Lonely Planet Trekking Guide-book had the following bit of advice about the next day’s section –

This section of the trek, following a high-level route, is harder and more hazardous than other stages. Ideally for very experienced trekkers, it should not be attempted unless the weather is very good. At any time – most commonly, early in the season (until about mid-December) – crampons and an ice axe may be needed to do the route safely. The hut warden at Refugio San Martín (who has photographs that clarify the route) can give further advice, and will ask you to fill in a form and hand it in on arrival at the other end.  

from Lonely Planet’s Trekking in the Patagonian Andes (2009)

Lots to think about and different options to consider.  As always, time – or maybe the title of the following day’s post! – would reveal all!

Next Post: Day 3 – Refugio San Martin to Refugio Italia (Laguna Negra)

Patagonia’s Nahuel Huapi Traverse – Day 3 (Laguna Jakob to Laguna Negra)

Posted in Argentina, hiking/trekking | Tagged , , , , , , , , , | Leave a comment

Patagonia’s Nahuel Huapi Traverse – Day 1 (Cerro Catedral to Refugio Frey)

Previous Post: Base Camp Bariloche and the Hiking Trails Of Northern Patagonia

And so the hike begins.  Step #1: get to the trailhead! There is a bus from downtown Bariloche that goes right to the Villa Catedral parking lot at the foot of the ski hill.  The night before I had topped up my SUBE card.  (If you bought one in Buenos Aires it will work in Bariloche too!  It takes the place of bus tickets – just swipe the card as you enter the bus and you’re done.)

Catedral bus Route from downtown Bariloche

I walked almost to the east end of Avenida Moreno to the correct bus stop.  Unlike the other route stops on Moreno and the buses themselves, which have numbers, the stop and the bus (officially #55) to the ski hill are indicated by the sign  Cerro Catedral or  Catedral.  A bus makes the trip every hour during the summer.

We went west along Moreno and then turned south on to Morales and west on Neumeyer, where it stopped to pick up some backpackers.   We had come back to within 200 meters of my hostel! I remember thinking that I had done a lot of walking for nothing given that I too could have gotten on here.  I later asked the person at the CAB info desk why she had told me to catch the bus on Moreno and she explained that the bus route alternated between Avenidas Bustillo and Pioneros so the safest thing to do was to catch where I did.

The bus ended its run to Villa Catedral shortly after 11. As people got off the bus, some headed towards the trailhead to Frey.  Other backpackers headed for the ski lift and the ride up to Piedra del Condor or Punta Nevada. The two maps below show the choices hikers have at the starting point at Catedral:

1. hiking above Lago Gutiérrez and up the Van Titter Valley to the Refugio Frey

2. riding the cable lifts to Piedra del Condor or Punta Nevada and then hiking the ridge to the Cancha de Futbol and then a scree slope scramble down to Laguna Schmoll. From there it is down to Laguna Toncek and a walk to the Refugio at the other end of the glacial lake.

Day 1 – Villa Catedral to Refugio Frey

And here is a section from the more detailed official park map.

Of the two ways of getting to Refugio Frey, #1 is the easier and #2 the more scenic. For someone just intending to go to Refugio Frey and Laguna Toncek, #1 and #2 together would make a nice loop with a night at the Refugio to break it up. If you’re planning on continuing on to Refugio San Martín (Laguna Jakob), then #1 makes more sense since you will only have to walk once the section from the Frey hut to the trail junction called  Cancha de Futbol.

The parking lot at Villa Catedral

I set off at about 11:15, having taken out my trekking poles and set up my Spot Connect GPS tracker so my wife could follow along as I did my walk in the park!  Keen to do some walking, I headed for choice #1 – the trail up the Van Titter Valley. In the image below the trailhead sign is barely visible on the far side of the parking lot.

Villa Catedral estacionamiento – and trailhead to Refugio Frey

Refugio Frey Trailhead sign

At the far end of the parking lot, I found the small wooden statue of a hiker next to the signboard for Frey. I stepped back and got a shot of the hiker with my trekking poles and then continued.     For the first 100 meters or so the trail is actually a gravel road but soon enough I reached the point where a sign pointed to the off-road start of the trail.

the trail to Refugio Frey as it leaves the gravel road at Villa Catedral

Trail Map and Info at the start of the Trail to Refugio Frey

Since 2016 hikers need to book a space at the Refugio if they plan on sleeping there overnight.  This is true even if you are going to put up a tent. I had made my reservation at the Park Info Centre in Bariloche a couple of days before and had a voucher to show at the registration desk at the Refugio when I arrived. Frey is the only hut which requires pre-book.  Given its easy accessibility, the hut, which sleeps 35,  is the busiest of the CAB mountain huts. See here for the 2017 price list.

Refugio Frey por Catedral sign

On the first section of the trail, Lago Gutiérrez is on your left as you make your way to the point where a second lower trail from the lake joins the main trail.  There are a few bridges  – like the one on the photo below – that cross over small streams tumbling down to the lake.  A section of the hillside with charred tree trunks was a reminder of the fragility of the ecosystem. In the park wood fire are not permitted, campers being required to have their own butane or gas stoves.  I had left mine back in Bariloche, having decided to make use of the Refugio kitchen instead. I figured it would also give me the right to sit in the comfort of a warm dining area if the weather was bad.

looking back at one of the bridges on the first section of the trail to Refugio Frey

hikers on the trail to Refugio Frey above Lago Gutiérrez

the trail to Frey above Lago Gutiérrez with a view of Bariloche

looking back at the junction of the Catedral and Gutierrez trails

When I came to the junction of the two trails, the second section of the walk began. It is a very pleasant walk up the Van Titter valley with its many mature trees and the arroyo or stream flowing down.

The following four images will give you an idea of what it looks like. It was about 1 p.m. on a very warm sunny day as I made my way up the valley; I was very happy about the leafy canopy which provided some shade.  While no one will rave about the stunning mountain views on this part of the trail, it clearly has its own soothing and quiet beauty. I stopped to fill my water bottle with some cold Arroyo Van Titter Nouveau and for a while listened to the stream as it trickled down to Gutierrez.

the trail to Frey as it heads up along the Arroyo Van Titter

the Frey Trail as it crosses the Arroyo Van Titter

walking up the Van Titter valley on the Frey Trail

easy walking up the Van Titter valley towards Refugio Piedritas

When I came to the clearing pictured in the panorama shot below I took off my pack and joined the dozen or so other hikers in the shade. Out came the water bottle and the energy bar.  There were just two kilometers to go but they would be the most work, given the altitude we needed to gain before we got to the Refugio.

panorama – Refugio Piedritas – a rest stop one hour from the Refugio Frey

Built over the cavity in the corner of the rock pictured below is half of a hut! Inside the shelter I saw a wooden platform which would give hikers a dry floor for the night if needed.  There was also lots of space around to put up a tent or three, though given how close you are to the Refugio from here it would really have to be an emergency to make you want to stop here. The views up top at the Refugio are also far superior!

Refugio Piedritas – a bivy shelter built into the sloping rock face

Time to move on – and up!  I watched as a family with two young children – the boy was 6 and the girl  5 – made their way in front of me.  I would see them again in the refugio kitchen, impressed again at their cheerful, non-whiny attitudes. When I mentioned how impressed I was, the father smiled and said they were experienced hikers who had done a few walks already.  They were going to overnight at the Frey and then head down the next morning.

two families start the final ascent to Refugio Frey

The Frey Trail above Refugio Piedritas

This last section of the trail above the Refugio Piedritas was the roughest of the day. It was also the most exposed as we lost that leafy canopy that had provided shade on our way up the valley.

a fellow hiker coming up the trail to Refugio Frey

As you spend time on a hiking trail you come to recognize people as you pass them by – only to have them do the same a while later! In the photo above I can see Diego, the guy from Buenos Aires, who I did not know yet.  We would end up walking together on Days 3, 4, and 5 of the Traverse.

Finally, the Refugio Frey came into sight! Still a half hour to go but there it was. That red arrow in the photo below is actually pointing at the bathroom/shower building; the Refugio itself is just to the left of it.

Refugio Frey comes into sight!

Refugio Frey – close but still a way to go!

Refugio Frey and Toilet:shower building

The first thing I did was check in at the desk, showing my permit to tent overnight. It was about 4:00 when I arrived and gathered outside was a crew of scruffy hardcore rock climbers sitting there with their collections of rock bolts, belays, carabiners, helmets, harnesses, ropes … I looked around and could see a dozen amazing climbing objectives that could keep these guys and gals amused for days.  I was quite happy just to be walking by!

the Refugio Frey with the add-on cook shack

I had decided to leave my cook stove and gas canister behind in Bariloche. Instead, I figured I would pay the nominal fee to use the kitchen facilities and also give myself a reason to be inside if the weather turned bad.  I spent no more than $10. U.S. at any of the four refugios I stayed at on the traverse, tenting each night and preparing my food in the hut.

Refugio Frey and Laguna Toncek from the helicopter pad

panorama: Refugio Frey and Laguna Toncek from the helicopter landing area

The views from the Refugio Frey and from other vantage points were wow-inducing!  I had left my “better” DSLR-quality cameras at home (my Sony A77 and my Sony A6000 with their various lenses) because of weight and security concerns. Instead, it was my Fuji X20 with its 28mm-112mm zoom lens that came along.  While its sensor is small compared to the one in the cameras left at home, it is still twice as large as the sensors most point and shoots and smartphones have.  The fact that it shoots raw image files meant that I was usually able to avoid the blown-out sky problem that smaller sensor cameras like my Canon Elph 330 have. I had it around my neck the entire hike and it was ready to go at a moment’s notice!

one of the many climbing peaks near Refugio Frey

an available tent spot near Laguna Toncek shore

I left the Refugio, having checked in at the desk, and went looking for a tent spot. I considered the empty space you see in the photo above but decided that in spite of the attempt to create a windbreak, it was still too exposed.  I walked past the helicopter landing area – no camping there! – and headed down the slope. As I did the wind disappeared. “Much better!” I thought.  That is my tent – the small sand coloured one behind the North Face mountain tent.  It is a Big Agnes Fly Creek UL and weighs 2 pounds (1 kilo). I made sure I secured the tent so that it wouldn’t blow away and then headed back to the Refugio.

Actually, I ran back!   As I was finishing with the tent I reached into my pocket for my wallet and –  it wasn’t there!  I had left it out on the counter in the Refugio when I had taken it out to show the young woman my registration slip.  Various horrible scenarios came to mind as I rushed back to the hut. As I stepped into the refugio she said – “You forgot something!”

a more sheltered – from the wind – spot on the other side of the ridge

I looked at the registration list. A few other hikers had checked since I had left to put up my tent. Most of the hikers were Argentinian with two from France and me the lone Canadian. I did also notice that I was a bit older than most of the others!

the Refugio Frey cook shack window decals

The cook shack is an add-on to the Refugio itself.  It has a basic stove and pots and kettles, running water, and utensils and some plates and cups.  It can hold perhaps 12 people on the benches around the three tables.

the kitchen facilities in the Frey cook shack

the kitchen facilities in the Refugio Frey cook shack

One thing that caught my eye is the circular object you see below. It is a “dream catcher” and it comes from a world I am more familiar with, that of the indigenous people known as the Ojibwe or Anishinaabe who inhabit the boreal forests of the Canadian Shield. To see it hanging at the Refugio Frey, some twelve thousand kilometers from its place of origin, was to realize that it was one of those cultural creations which speak to something universal in the human spirit. In March of 2016 in the display window of a surfers’ shop on main street in Bicheno on the east coast of Tasmania I had also seen one. Small world!

an Ojibwe dream catcher at the Frey hut

another view of Refugio Frey and Laguna Toncek

After my supper in the cook shack – I had one of my Backpacker’s Panty suppers – I scampered up above the Laguna Toncek and the Refugio for a slightly different perspective on things.  In the image below I am looking at my tent and the valley – the Van Titter – that I had walked up in the early afternoon.

an evening view of the Frey tenting area at the top of the van Titter valley

More conversation in the Refugio with my fellow hikers, including that couple with the two amazing children.  The boy had spent the evening playing chess with anyone who was willing!  Also, there was a Taiwanese couple currently living in Buenos Aires. They too also had their six-year-old boy along for their overnight at the Frey. Both couples were going back down the next morning by the same trail we had all come up on. But first they had a night up on the second floor of the Refugio; there were about thirty people booked.

My tent spot, had it been raining, would surely have had a stream of water running through it. But – I had perfect weather  – no rain, very little wind, and a temperature of about 10ºC.  So, no worries this night – in fact, not on any of the four nights of my hike. It would have been a more messy and challenging and potentially dangerous trip with rain or strong winds or snow on the high trails.

My sleeping bag (good to -10ºC)  and my Thermarest NeoAir sleeping pad with 5 cm (2 in.) of air to cushion me assured a restful sleep. The day’s exertion also made falling asleep very easy. In my dreams, I wondered what the next day would bring!

Next Post  – Refugio Frey To Refugio San Martín (Laguna Jakob)

Posted in Argentina, hiking/trekking | Tagged , , , , , , , , , | 2 Comments